
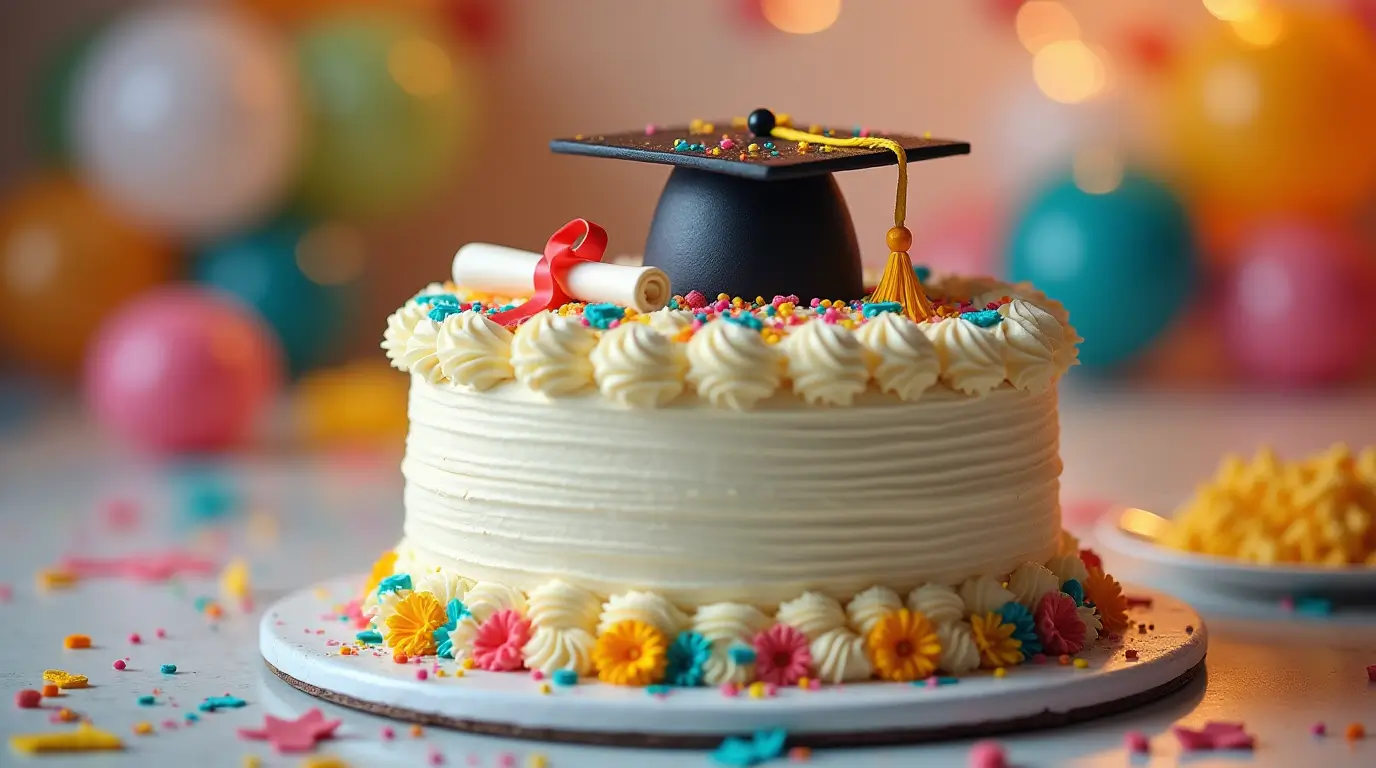
Graduation day is one of those moments that deserves to be celebrated with all the pomp and circumstance it’s due—starting with the cake! After all, what’s a graduation party without a show stopping dessert? Whether you’re celebrating a high school or college grad, a stunning graduation cake can be the centerpiece of the celebration, drawing everyone’s attention and sweetening the mood.
Table of Contents
This recipe is not just about baking a cake—it’s about crafting a memorable moment for the graduate and their loved ones. From fun and creative decorating ideas to flavor combinations that will wow your guests, we’ve got you covered. Ready to make a cake that will make your graduation party truly unforgettable? Let’s dive in and create something that’s as sweet as the achievement it celebrates!
1. Key Benefits of Graduation Cakes
Graduation cakes aren’t just a sweet treat—they’re a symbol of achievement and celebration! Whether you’re marking the completion of high school, college, or any milestone, a graduation cake has the power to turn an ordinary gathering into a memorable event. Here’s why you should absolutely make one for your graduation party:
Celebrate the Moment in Style
A graduation cake is more than just a dessert—it’s the centerpiece of your celebration. It’s an easy yet elegant way to showcase your achievements while indulging in something delicious. Think of it as the sweet finale to your hard work and dedication, making every slice feel like a victory!
Endless Customization Possibilities
The best part about graduation cakes is how easy it is to personalize them to fit your unique style or school theme. Whether you prefer a classic, simple design or want something more extravagant, the cake can reflect your personality or alma mater’s colors. You can even design it with fun, creative touches like fondant graduation caps, diplomas, or school logos!
Perfect for Any Age Group
Graduation cakes are versatile—ideal for all ages and types of graduates. From a kindergartener’s first big graduation to a college graduate celebrating their journey, the cake can adapt to suit the event. You can make it playful for kids with bright colors and fun toppers, or sophisticated for adults with sleek, elegant designs.
Easy to Make, Yet Impressive
You don’t need to be a professional baker to make a stunning graduation cake! With the right ingredients and some simple decorating tips, even beginners can create a show-stopping cake. It’s all about mastering the basic technique and adding that personal touch. Plus, it’s much more affordable than ordering from a bakery, and you get the satisfaction of homemade!
Create Lasting Memories
A graduation cake isn’t just for eating—it’s a part of the experience. As you gather around the cake to sing “Happy Graduation” and snap photos, it becomes a lasting memory that you and your guests will treasure. It’s that sweet moment of pause before the big celebrations continue.
By baking your own graduation cake, you’re not only adding a personal touch to the party but also creating a dessert that truly reflects the significance of the occasion. Ready to dive into making your own? Let’s get started!
2. Ingredients for Your Graduation Cake
Making a graduation cake that’s both delicious and visually stunning starts with the right ingredients. Here’s a simple list of what you’ll need to create a rich, flavorful cake that will leave everyone asking for seconds.
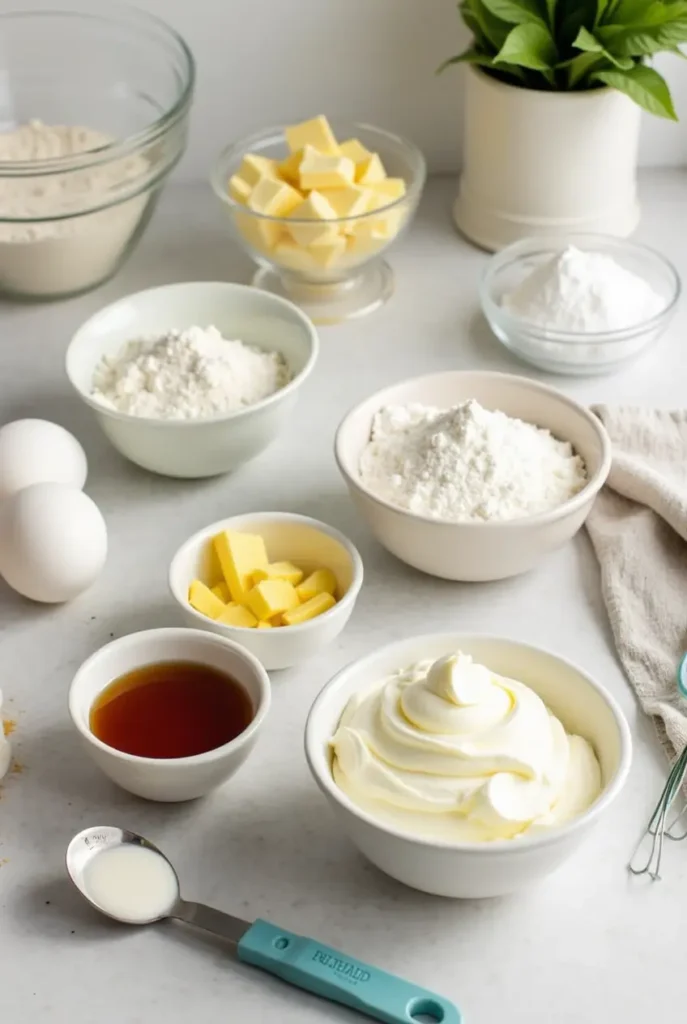
For the Cake:
- 2 ½ cups all-purpose flour: The foundation of your cake, giving it the right texture.
- 2 ½ teaspoons baking powder: Helps your cake rise to perfection, giving it a light and fluffy texture.
- ½ teaspoon salt: Balances the sweetness and enhances the other flavors.
- 1 ¼ cups unsalted butter (softened): This is the secret to a moist and tender cake. Make sure it’s softened before mixing.
- 2 cups granulated sugar: Adds sweetness and helps create a light, airy texture.
- 4 large eggs: Provides structure and richness to the cake.
- 1 teaspoon vanilla extract: For that warm, comforting flavor that pairs perfectly with almost any frosting.
- 1 cup milk (whole or buttermilk works best): The milk keeps your cake moist, and buttermilk can add a little extra tang and tenderness.
For the Frosting:
- 1 ½ cups unsalted butter (softened): This is the base for your rich, creamy frosting. It gives the frosting a smooth texture and buttery flavor.
- 4 cups powdered sugar: Sweetens the frosting and gives it that perfect, spreadable consistency.
- 1 tablespoon vanilla extract: For added depth of flavor, making the frosting extra delightful.
- 2 tablespoons heavy cream: Adds richness and makes the frosting easy to spread. You can adjust the amount based on how thick or thin you prefer the frosting.
- Food coloring (optional): For a festive, personalized touch. Choose colors that match your graduation theme or school colors!
For Decorating (optional but highly recommended):
- Fondant: Perfect for making intricate graduation cap or diploma decorations. It’s easy to work with and can be rolled out to create customized designs.
- Graduation-themed cake toppers: These can be a fun, quick way to add personality to your cake.
- Edible glitter or gold sprinkles: Add a little sparkle to your cake for that extra “wow” factor—perfect for celebratory moments!
3. How to Make Your Graduation Cake
Now that you’ve gathered your ingredients, it’s time to bring your graduation cake to life! Follow these simple steps, and you’ll have a cake that not only tastes amazing but also makes your celebration unforgettable.
Step 1: Preheat the Oven & Prepare Your Pans
Start by preheating your oven to 350°F (175°C). While the oven heats up, take two 9-inch round cake pans and grease them with butter or non-stick spray. For added assurance, you can line the bottom of each pan with parchment paper to ensure your cakes come out cleanly.
Step 2: Mix Your Dry Ingredients
In a medium bowl, whisk together 2 ½ cups of all-purpose flour, 2 ½ teaspoons of baking powder, and ½ teaspoon of salt. This helps ensure the dry ingredients are evenly distributed, which is key for a perfectly textured cake.
Step 3: Cream Butter & Sugar
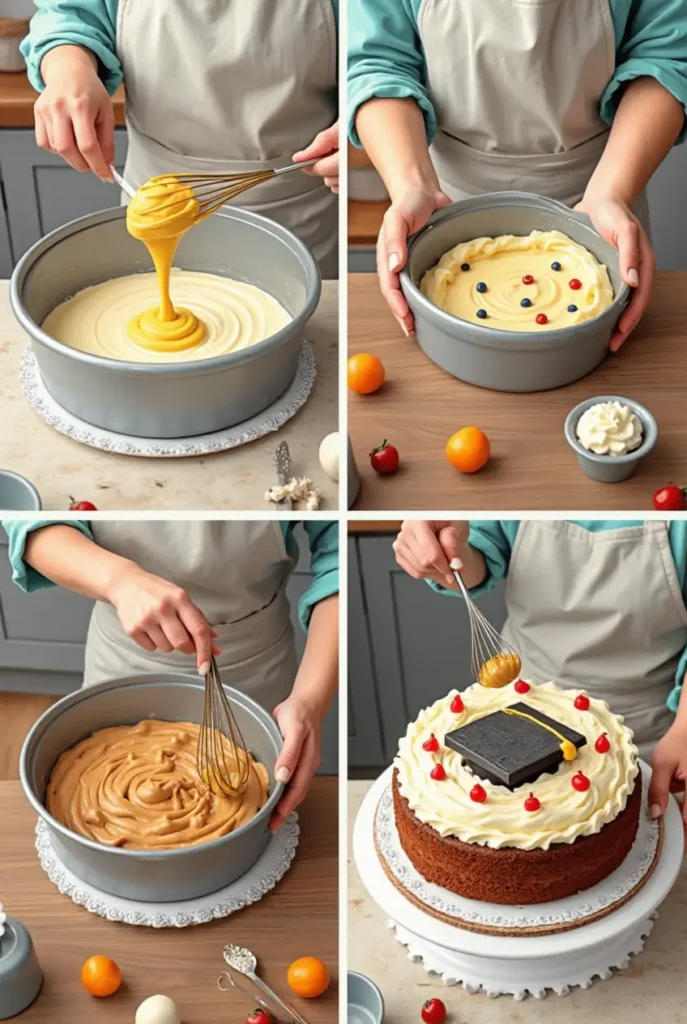
Now it’s time to make your cake light and fluffy. In a large mixing bowl, cream together the 1 ¼ cups of softened butter and 2 cups of granulated sugar. Use a hand mixer or stand mixer on medium speed for about 3-4 minutes, or until the mixture turns pale and fluffy. This process traps air into the butter and sugar, creating that soft, airy texture in your cake.
Step 4: Add Eggs and Vanilla
Add 4 large eggs, one at a time, making sure to beat well after each addition. This ensures that each egg is fully incorporated. Once the eggs are mixed in, add 1 teaspoon of vanilla extract for that classic, warm flavor. Mix until everything is smooth and creamy.
Step 5: Combine Wet & Dry Ingredients
Now, it’s time to add the dry ingredients to the butter mixture. Start by adding about a third of the dry ingredients to the butter mixture, followed by half of the 1 cup of milk. Continue alternating the dry ingredients and milk until everything is combined, making sure to end with the dry ingredients. This will keep the batter smooth and prevent overmixing, which can make the cake dense.
Step 6: Bake Your Cake Layers
Divide the batter evenly between the two prepared cake pans. Use a spatula to smooth the tops. Place them in the oven and bake for 25-30 minutes, or until a toothpick inserted into the center comes out clean. Every oven is a bit different, so keep an eye on your cakes, but don’t open the oven door too early—this can cause the cakes to collapse.
Step 7: Cool the Cakes
Once your cakes are done, remove them from the oven and let them cool in the pans for about 10 minutes. After that, carefully turn them out onto a wire rack to cool completely. Cooling the cakes is crucial to prevent the frosting from melting when you apply it later.
Step 8: Make the Frosting
While your cakes are cooling, you can make the frosting. In a bowl, beat 1 ½ cups of softened butter until it’s smooth and creamy. Gradually add in 4 cups of powdered sugar, a little at a time, mixing on low speed until incorporated. Once the sugar is mixed in, add 1 tablespoon of vanilla extract and 2 tablespoons of heavy cream. Adjust the cream until you reach your desired frosting consistency. The frosting should be smooth and spreadable—not too runny, but not too thick either.
Step 9: Frost Your Cake
Once the cakes are fully cooled, it’s time for the fun part—decorating! Place the first layer of cake on a cake stand or plate, and spread a generous amount of frosting on top. Gently place the second layer of cake on top and apply frosting to the top and sides. Use an offset spatula or a butter knife to smooth out the frosting, creating a clean finish.
Step 10: Decorate & Add Personal Touches
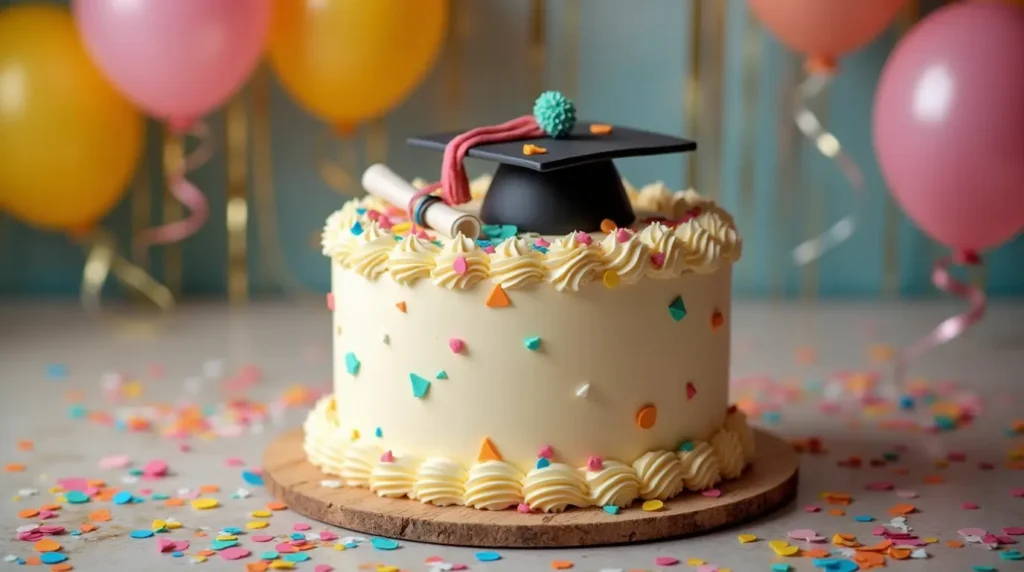
This is where your creativity can shine! You can leave the frosting simple or add some fun touches like edible glitter, sprinkles, or a fondant graduation cap on top. If you’re feeling adventurous, you could even create a fondant diploma or school logo to make your cake truly one-of-a-kind.
4. Pro Tips and Variations for Your Graduation Cake
Now that you’ve mastered the basics, let’s take your graduation cake to the next level with some pro tips and creative variations. These expert tricks and tweaks will ensure your cake is not only delicious but also a showstopper!
Pro Tips for a Perfect Graduation Cake
- Room Temperature Ingredients: Make sure your butter, eggs, and milk are at room temperature before you start. This helps everything combine smoothly, ensuring your cake has the right texture. Cold ingredients can cause your batter to seize up and create uneven results.
- Don’t Overmix: When you combine the wet and dry ingredients, mix just until everything is incorporated. Overmixing can lead to a dense, heavy cake, and nobody wants that! A light, fluffy cake is the goal here.
- Even Cake Layers: To ensure your cake layers are even, you can use a kitchen scale to weigh the batter before dividing it between the pans. This helps ensure that both layers cook evenly and come out the same size.
- Use a Toothpick to Test for Doneness: When you insert a toothpick into the center of the cake, it should come out clean or with just a few crumbs. If the toothpick comes out wet with batter, the cake needs more time in the oven.
- Chill Your Frosting for Easier Application: If you’re working with buttercream frosting, chilling it for 15-20 minutes can help make it easier to spread and achieve that smooth, professional finish.
Creative Variations to Try
- Flavor Variations:
- Chocolate Cake: Swap out ½ cup of the flour for unsweetened cocoa powder to create a rich, chocolate version of your graduation cake. You could also add chocolate chips for extra indulgence.
- Citrus Twist: Add some zest from lemons or oranges to the cake batter for a refreshing, zesty flavor. Lemon frosting pairs wonderfully with this flavor for a light, tangy twist.
- Red Velvet Cake: Want to go all out? Make a red velvet graduation cake with cream cheese frosting. It’s visually striking and has a subtle, smooth taste that’s always a crowd-pleaser.
- Fillings for Extra Flavor:
- Fruit Fillings: Add a layer of strawberry jam, raspberry preserves, or even fresh whipped cream and fresh berries between the cake layers for a fruity twist.
- Chocolate Ganache: For an extra indulgent touch, spread a layer of smooth chocolate ganache between your cake layers. It adds richness and pairs beautifully with buttercream.
- Gluten-Free Option: You can easily make your graduation cake gluten-free by swapping out the all-purpose flour with a 1:1 gluten-free baking flour. Make sure the flour blend you choose includes xanthan gum or add it separately for proper texture.
- Decorating Ideas:
- Themed Toppers: Make your cake feel extra special by using themed cake toppers. You can find fun graduation cap and diploma decorations at most baking supply stores, or make your own using fondant!
- Tassel Decorations: Create a fun fondant graduation cap with a tassel. You can also use edible gold paint or glitter to give your graduation cake a festive sparkle that catches the eye.
- Class Year & School Colors: Use food coloring to match the frosting with your graduation theme or school colors. You can even pipe the class year onto the side of the cake using contrasting colors for a personalized touch.
- Cupcake Version: If you have a large group and want to serve individual portions, why not make graduation cupcakes instead? The baking time will be shorter—around 18-22 minutes—and you can still decorate them with fun toppers, mini caps, or school-colored frosting.
Troubleshooting Tips
- Cake Sticking to the Pan: If your cake sticks to the pan, try using parchment paper or lining the sides of the pans with a light coating of flour. This ensures a smooth release.
- Frosting Too Soft? If your frosting is too runny, add more powdered sugar a little at a time until it reaches the desired consistency. If it’s too thick, thin it out with a teaspoon of milk or cream.
- Cake Sinking in the Middle? If your cake sinks in the middle, it might not have baked long enough or the oven temperature might have been too low. Ensure your oven is properly preheated and try using an oven thermometer to check the actual temperature.
5. Serving Suggestions for Your Graduation Cake
Now that you’ve baked and decorated your beautiful graduation cake, it’s time to serve it up and share it with your friends and family! How you present and serve the cake can make all the difference in turning it into a memorable centerpiece. Here are some creative and practical serving ideas that will make your cake look as good as it tastes.
Classic Presentation Ideas
- Cake Stand: If you have a cake stand, now’s the time to use it! A decorative cake stand not only elevates your cake but also adds a touch of elegance to your graduation celebration. If you don’t have a cake stand, a simple, pretty serving platter will work too.
- Cake Slices: For clean, professional-looking slices, use a hot knife to cut through the frosting. Run the knife under hot water, wipe it dry, and then slice. The warm knife will help prevent the frosting from sticking to the blade, giving you smooth, clean cuts.
- Add a Graduation Banner: Place a small graduation-themed banner or tag next to the cake. It could say something simple like “Congrats Grad!” or even the graduate’s name and class year. This small touch can add a personal flair and set the tone for your celebration.
Creative Ways to Serve
- Cupcake Style: If you’re hosting a large group or just want to make serving easier, consider turning your graduation cake into cupcakes! Just scoop the batter into cupcake liners and bake. Top them with the same frosting and decorations as you would for the full-size cake. Cupcakes are portable and easy for guests to grab and go.
- Individual Cake Jars: For a fun, unique presentation, serve the cake in individual jars. Layer the cake and frosting in mason jars for a portable, personalized treat. You can decorate each jar with a small ribbon in your school colors or even a little graduation cap on top for extra flair!
- Cake Pops: Another creative take on your graduation cake is turning it into cake pops. After baking, crumble the cake and mix it with frosting to form small balls. Insert a stick into each one, dip in melted chocolate or colored candy melts, and top with sprinkles or fondant decorations. These are perfect for party favors or a fun twist for guests to snack on.
Serving with Drinks and Snacks
- Pair with Coffee or Tea: A graduation cake pairs wonderfully with coffee, tea, or even a celebratory drink like sparkling cider or champagne. Set up a drink station near the cake so guests can grab a beverage to enjoy with their slice.
- Fresh Fruit: If you want to balance out the sweetness of the cake, serve it alongside a platter of fresh fruit. Think strawberries, raspberries, or even citrus slices for a refreshing contrast. The bright colors of the fruit will complement your cake and give your guests a lighter option.
- Ice Cream: Add a scoop of vanilla or chocolate ice cream next to each slice of cake for an extra indulgent treat. The creamy ice cream contrasts perfectly with the richness of the cake, making every bite a sweet experience.
Storage Tips for Leftovers
If you happen to have any leftover cake (which is rare, but it happens!), it’s important to store it properly to keep it fresh.
- Refrigerate: If your cake is frosted with buttercream, it’s best to store it in an airtight container in the fridge to keep it fresh for up to 3 days.
- Freeze: Want to enjoy your cake later? You can freeze leftover slices. Wrap each slice tightly in plastic wrap and place it in a freezer-safe bag. It will last for up to a month. Just thaw it at room temperature when you’re ready to enjoy it again.
6. Frequently Asked Questions (FAQs) About Graduation Cakes
1. Can I make this graduation cake ahead of time?
Absolutely! You can make the cake layers ahead of time and store them at room temperature for 1-2 days. Just wrap each cake layer tightly in plastic wrap to keep it fresh. If you need to make it even earlier, you can freeze the cake layers. Simply wrap them well and store in the freezer for up to a month. Thaw at room temperature before frosting.
2. How do I store leftover cake?
Leftover cake should be stored in an airtight container to maintain its freshness. If your cake is frosted with buttercream, keep it in the fridge, where it will stay fresh for 3-4 days. For longer storage, freeze individual slices wrapped in plastic wrap and foil. They’ll stay good for up to a month. Just thaw the slices at room temperature before enjoying!
3. Can I use a different frosting for my graduation cake?
Of course! While buttercream is a classic choice, feel free to get creative with other frostings. Cream cheese frosting, whipped cream, or even ganache would work perfectly. If you want a lighter option, a fluffy marshmallow frosting can add a sweet touch without feeling too heavy.
4. How can I make the cake more personalized?
Personalizing your graduation cake is a fun way to celebrate the graduate! Here are some ideas:
- Custom Decorations: Use fondant to create a graduation cap, diploma, or school logo.
- Color Themes: Match the frosting and decorations to the graduate’s school colors.
- Personalized Message: Pipe the graduate’s name and class year on the cake for a special touch.
5. Can I make this cake gluten-free?
Yes! You can easily make this graduation cake gluten-free by using a 1:1 gluten-free flour blend. Be sure to check that the blend contains xanthan gum for proper structure. If your frosting contains flour, be sure to use gluten-free powdered sugar to avoid cross-contamination.
6. How do I prevent the cake from sinking in the middle?
A sinking cake can happen if the oven temperature is too low or if the cake batter is overmixed. Make sure your oven is preheated properly, and use an oven thermometer to check the temperature. Also, avoid overmixing the batter after adding the dry ingredients, as that can result in dense or sunken cakes.
Graduation Cakes

Looking for the perfect treat to celebrate? Find stunning graduation cakes and easy ideas to impress your guests. Discover the best recipes today!
- 2 ½ cups all-purpose flour
- 2 tsp baking powder
- ½ tsp salt
- 1 cup unsalted butter (softened)
- 1 ½ cups granulated sugar
- 4 large eggs
- 1 tsp vanilla extract
- 1 cup whole milk
- 2 cups buttercream frosting (store-bought or homemade)
- Food coloring (optional for school colors)
- Graduation-themed decorations (fondant, toppers, etc.)
- Preheat the oven to 350°F (175°C). Grease and flour two 9-inch round cake pans, or line them with parchment paper.
- Mix dry ingredients: In a medium bowl, whisk together the flour, baking powder, and salt. Set aside.
- Cream butter and sugar: In a large mixing bowl, beat the softened butter and granulated sugar together until light and fluffy, about 3-4 minutes.
- Add eggs and vanilla: Beat in the eggs, one at a time, ensuring each is fully incorporated before adding the next. Stir in the vanilla extract.
- Alternate adding dry ingredients and milk: Gradually add the dry ingredients in three parts, alternating with the milk. Start and end with the dry ingredients, mixing just until combined after each addition.
- Bake: Divide the batter evenly between the prepared cake pans. Bake in the preheated oven for 20-25 minutes, or until a toothpick inserted into the center comes out clean.
- Cool: Let the cakes cool in the pans for 10 minutes before transferring them to a wire rack to cool completely.
- Frost the cake: Once the cakes are completely cooled, spread an even layer of buttercream frosting on top of the first layer. Add any food coloring to the frosting if desired to match the graduation theme. Place the second cake layer on top and frost the entire cake.
- Decorate: Add any final decorations such as graduation caps, fondant accents, or themed toppers.
- Serve and enjoy: Slice and serve the cake at your graduation celebration!
7. Conclusion: Celebrate in Style with Your Graduation Cake
Congratulations on creating the ultimate graduation cake! Whether you’re celebrating a high school or college graduation, this cake will be a sweet reminder of all the hard work and achievements that led to this special day. Not only does it taste delicious, but with your creativity and a few simple steps, you’ve crafted a memorable centerpiece that will leave a lasting impression on your guests.
Here’s a quick recap of the key steps:
- Start with a Moist Cake: Choose your favorite flavor—whether it’s classic vanilla, rich chocolate, or something fruity. The key is to keep the cake moist and fluffy.
- Add Your Personal Touch: Customize the decorations to reflect the graduate’s personality, school colors, or theme. Use fondant for a sleek finish or go for fun, themed toppers.
- Embrace Your Creativity: With endless frosting options, filling ideas, and decorating techniques, this cake can be as simple or extravagant as you like.
Remember, It’s About the Celebration
At the end of the day, the perfect graduation cake isn’t just about the recipe—it’s about the memories you’ll create with friends and family. Baking this cake is your way of celebrating the hard work, dedication, and milestones that have brought you to this moment.