Listen, I’ve been there—it’s 10 PM the night before your kid’s/spouse’s/best friend’s birthday, and you’re frantically Googling “Chocolate Birthday Cake Ideas” because you promised something homemade and spectacular. After years of late-night baking sessions and more than a few kitchen meltdowns (pun absolutely intended), I’ve compiled these seven chocolate cake recipes that have saved my reputation time and again. They look fancy enough to make people think you planned weeks ahead, even when we both know you didn’t.
What makes these chocolate birthday cake ideas special isn’t just that they taste amazing—though they absolutely do—it’s that they’re actually doable for normal humans without pastry degrees. Each one has been tested in my decidedly average kitchen with my decidedly average skills and still turned out impressive enough for candles and the birthday song. Some are quick, some are make-ahead friendly, but all of them have that “wow” factor that makes birthdays feel special. Because let’s be honest, nothing says “I love you” quite like layers of chocolate.
1. Triple Chocolate Fudge Layer Cake That Hides All Mistakes
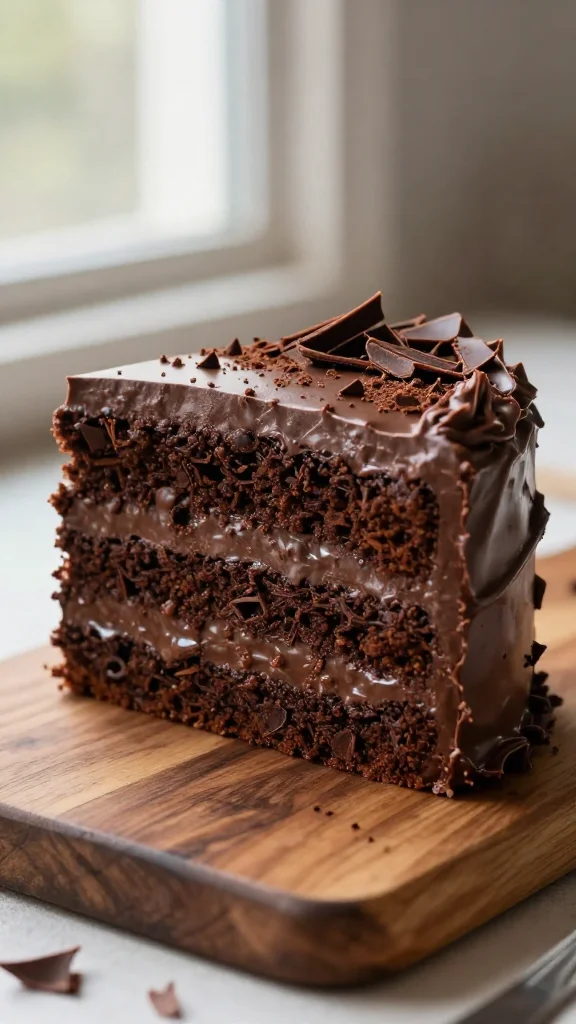
The first time I made this cake was for my husband’s 35th birthday. I accidentally dropped an entire egg—shell and all—into the batter and spent 15 panicked minutes fishing out tiny shell fragments with a spoon. Miraculously, it still turned out to be the most requested birthday cake in our family history. The secret? The fudge frosting is so rich and forgiving it could cover up almost any baking crime.
Why It’s Amazing
This triple-threat cake combines three different chocolate experiences: a moist dark chocolate cake, milk chocolate filling, and that magical fudge frosting that somehow stays soft even after refrigeration. It’s basically the chocolate lover’s equivalent of hitting the lottery. Plus, the multiple components sound impressive when you describe them, but each part is actually pretty straightforward.
Ingredients
- 2 cups all-purpose flour — sifted if you’re feeling fancy, unsifted if it’s already midnight
- 2 cups granulated sugar — yes, it seems like a lot, but birthdays aren’t the time for restraint
- 3/4 cup unsweetened cocoa powder — the darker the better
- 2 teaspoons baking soda — check expiration date unless you want a cake that doubles as a frisbee
- 1 teaspoon salt — regular table salt works fine, don’t let anyone salt-shame you
- 2 large eggs — preferably without shells, but we’ve established that’s negotiable
- 1 cup buttermilk — or regular milk with a splash of vinegar if you forgot to buy buttermilk
- 1/2 cup vegetable oil — makes it moist for days, if it lasts that long
- 2 teaspoons vanilla extract — the real stuff if possible, but I won’t tell if you use imitation
- 1 cup hot coffee — this makes the chocolate flavor pop, trust me
- 1 cup milk chocolate chips — for the filling layer
- 1/2 cup heavy cream — for the filling layer
- 4 cups powdered sugar — for the life-saving frosting
- 1 cup butter — softened, but who remembers to take it out ahead of time? Microwave it in 5-second bursts
- 1/2 cup cocoa powder — for the frosting
- 1/4 cup milk — plus more if your frosting looks like chocolate cement
Instructions
- Preheat your oven to 350°F. Grease and flour two 9-inch round cake pans, or just use parchment paper if you’re smart (unlike me who once spent 20 minutes trying to remove cake from a pan).
- In a large bowl, whisk together the flour, sugar, cocoa, baking soda, and salt. Try not to create a dust cloud that settles on everything in your kitchen.
- Add eggs, buttermilk, oil, and vanilla. Beat with a mixer until your batter looks smooth-ish. Don’t panic if there are a few lumps.
- Stir in the hot coffee by hand. Yes, the batter will look alarmingly thin. No, you didn’t mess up.
- Pour into your pans and bake for about 30-35 minutes or until a toothpick comes out mostly clean. A few moist crumbs are fine—we’re going for moist, not desert dry.
- While the cakes cool, make your filling by heating the heavy cream just until it starts to simmer, then pour it over the milk chocolate chips. Let it sit for a minute, then stir until smooth. Let this cool until it’s thick enough to spread.
- For the frosting, beat the butter until fluffy, then add cocoa powder, powdered sugar, and milk. Keep beating until it looks like frosting. Add more milk if your mixer starts to struggle—we’re not trying to burn out motors here.
- Once the cakes are completely cool (and I mean COMPLETELY—I’ve ruined too many cakes with impatience), place one layer on your cake plate, spread the milk chocolate filling on top, add the second layer, then frost the whole thing with your fudge frosting.
- If you’re feeling extra, add some chocolate shavings or sprinkles on top to hide any frosting imperfections. No one will know the difference.
Tips & Chaos Notes
If your cake layers dome too much on top, you can slice the tops off to make them flat. Then eat those scraps in the kitchen where no one can judge you. Also, this cake actually tastes better on day two, so if you can make it ahead, do it! If your frosting starts to look grainy, add a tablespoon of hot water and beat the heck out of it—usually fixes the problem. And remember, even if it’s not perfect, once you stick candles in it and dim the lights, no one will notice any flaws.
2. Midnight Mocha Birthday Cake For Coffee Lovers

I created this cake for my sister who claims she can’t function without caffeine. At her 30th birthday party, she had three slices and then stayed up until 4 AM reorganizing her closet. I’m not saying there’s definitely enough caffeine in this cake to affect your sleep, but I’m not NOT saying that either. Proceed with caution if serving to children or people who get jittery after one espresso.
Why It’s Amazing
This cake delivers that perfect balance of chocolate and coffee that makes mocha so addictive. The cake itself is infused with espresso powder, there’s a coffee-spiked ganache between the layers, and the frosting has just enough coffee flavor to keep things interesting without overwhelming the chocolate. It’s sophisticated enough for adult birthdays but still has that decadent chocolate appeal that works for anyone.
Ingredients
- 1¾ cups all-purpose flour — measure it properly if you want, or just eyeball it like I usually do
- 1¾ cups granulated sugar — diet culture doesn’t apply to birthday cakes
- ¾ cup unsweetened dark cocoa powder — the darkest you can find
- 2 tablespoons instant espresso powder — divided (more if you’re making this for a true coffee addict)
- 1½ teaspoons baking powder — the fresh stuff, not the one that’s been in your pantry since 2018
- 1½ teaspoons baking soda — see above
- 1 teaspoon salt — regular or sea salt, whatever’s handy
- 2 large eggs — room temperature is ideal, straight from the fridge works in a pinch
- 1 cup buttermilk — again, milk + vinegar works if you forgot to buy buttermilk
- ½ cup vegetable oil — makes it super moist
- 2 teaspoons vanilla extract — the good stuff
- 1 cup hot strong brewed coffee — freshly made, not the leftover morning coffee
- 8 oz semi-sweet chocolate — chopped for the ganache
- 1 cup heavy cream — for the ganache
- 1 tablespoon instant espresso powder — for the ganache
- 1 cup butter — softened for the frosting
- 3½ cups powdered sugar — more or less depending on how sweet you like it
- ½ cup cocoa powder — for the frosting
- 2 tablespoons strongly brewed coffee — cooled, for the frosting
- 3-4 tablespoons heavy cream — for the frosting
- Chocolate-covered espresso beans — for decoration and additional caffeine impact
Instructions
- Preheat oven to 350°F. Grease and line two 9-inch cake pans with parchment paper. The parchment is non-negotiable unless you enjoy cake removal disasters.
- In a large bowl, whisk together flour, sugar, cocoa powder, 1 tablespoon espresso powder, baking powder, baking soda, and salt.
- Add eggs, buttermilk, oil, and vanilla. Mix until combined, about 2 minutes. Don’t worry if it looks a little lumpy at first.
- Stir in the hot coffee. The batter will be very thin, like seriously thin. This is normal, not a sign you’ve ruined everything.
- Pour batter evenly into prepared pans and bake for 30-35 minutes or until a toothpick comes out with just a few moist crumbs.
- While the cakes cool, make the mocha ganache. Heat the heavy cream until just simmering, stir in 1 tablespoon espresso powder until dissolved, then pour over the chopped chocolate. Let sit for 2-3 minutes, then stir until smooth. Let cool until spreadable.
- For the frosting, beat the butter until creamy, then add powdered sugar, cocoa powder, cooled coffee, and enough heavy cream to make it smooth and fluffy. This might take 3-5 minutes of beating, during which time you’ll question if it’s ever going to come together. It will, eventually.
- Assemble the cake: layer, ganache, layer, then frost the top and sides. Decorate with chocolate-covered espresso beans if you’re feeling fancy.
Tips & Chaos Notes
If you’re serving this late in the evening, you might want to warn your guests about the caffeine content—or don’t, and enjoy the unexpected 2 AM group cleaning session that might follow. The ganache will firm up if refrigerated, so let the cake sit at room temperature for about 30 minutes before serving. Also, I once tried to rush the cooling process by putting the layers in the freezer and then accidentally froze them solid. Had to postpone the birthday celebration by two hours. Learn from my mistakes.
3. No-Mixer-Required Chocolate Sheet Cake For Last-Minute Panic
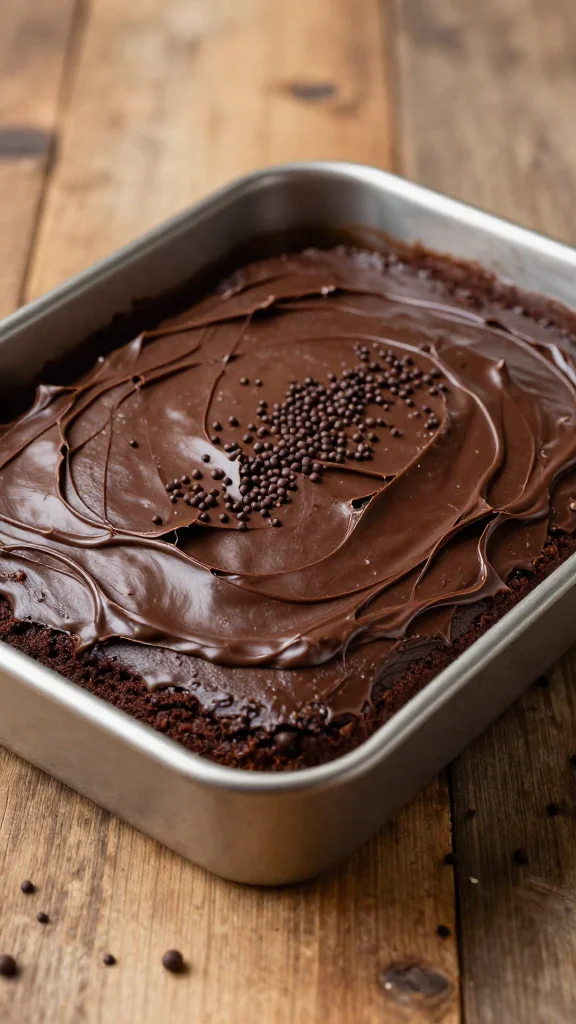
This cake saved me when my son announced at 8 PM that he needed a “homemade cake” for his classroom birthday celebration THE NEXT MORNING. After briefly considering passing off a store-bought cake as homemade (we’ve all been there), I remembered this recipe that requires zero electrical appliances and minimal brain power. Mixed it up while simultaneously helping with homework and watching Netflix. Mom of the year, right here.
Why It’s Amazing
This sheet cake is the Toyota Camry of birthday cakes—reliable, gets the job done without flashiness, and never lets you down. It’s impossibly moist with a fudgy, pourable frosting that sets into a crackly top. The entire thing is made in one pot plus a baking pan, so cleanup is minimal. It feeds a crowd and stays fresh for days, though it rarely lasts that long. Best of all, it takes about 15 minutes of active time, so you can make it even when you’re exhausted or short on time.
Ingredients
- 2 cups all-purpose flour — just scoop it straight from the bag, we’re not being precious here
- 2 cups granulated sugar — a concerning amount, but necessary
- 1 teaspoon baking soda — make sure it’s not ancient
- 1/2 teaspoon salt — whatever salt you have
- 1/2 cup butter — salted or unsalted, doesn’t really matter
- 1/2 cup vegetable oil — makes it super moist
- 4 tablespoons unsweetened cocoa powder — the regular kind, nothing fancy
- 1 cup water — from the tap is fine
- 1/2 cup buttermilk — or milk with a splash of vinegar or lemon juice
- 2 large eggs — cold from the fridge is fine
- 1 teaspoon vanilla extract — or a splash if you’re not measuring
- For the frosting:
- 1/2 cup butter — just throw it in
- 4 tablespoons cocoa powder — same as above
- 6 tablespoons milk — approximately, who’s really measuring?
- 3 1/2 cups powdered sugar — more or less to taste
- 1 teaspoon vanilla extract — again, a splash works
- 1 cup chopped nuts — optional, or replace with sprinkles for kid appeal
Instructions
- Preheat your oven to 350°F and grease a 9×13 inch baking pan. If you’re really in a rush, you can skip the preheat and just add a few minutes to the baking time. I’ve done it. The cake police won’t come for you.
- In a large bowl, whisk together flour, sugar, baking soda, and salt. Set aside.
- In a medium saucepan (the one you’ll also use for frosting later), combine butter, oil, cocoa powder, and water. Bring to a boil while stirring occasionally. It’ll look weird and separated at first—that’s normal.
- Pour the hot mixture over the dry ingredients and stir until just combined. No need to be gentle here, just get it mixed.
- Stir in buttermilk, eggs, and vanilla. The batter will be relatively thin.
- Pour into your prepared pan and bake for 25-30 minutes until a toothpick comes out mostly clean.
- About 5 minutes before the cake is done, start making the frosting. In the same saucepan you used earlier (see? fewer dishes!), combine butter, cocoa powder, and milk. Heat until the butter melts, then remove from heat.
- Add powdered sugar and vanilla to the saucepan and whisk until smooth. If it’s too thick, add a splash more milk. If too thin, add more powdered sugar. This is art, not science.
- Pour the hot frosting over the hot cake as soon as it comes out of the oven. Yes, hot on hot—this is key! Sprinkle with nuts or sprinkles if using.
- Let it cool completely before cutting. The frosting will set up with a slightly crackly top that’s completely addictive.
Tips & Chaos Notes
This cake actually gets better after sitting overnight, so it’s perfect for making ahead. I’ve transported it to school functions by just covering the whole pan with foil—no need to remove it or get fancy. If you’re really in a hurry, you can put the cake in the refrigerator to cool faster, but don’t cut it until the frosting has set or you’ll have a sticky mess. Also, don’t panic if the frosting seems too runny when you first pour it—it will set up as it cools. I once accidentally used twice the milk and had what was essentially chocolate soup on top, but even that eventually firmed up enough to be sliceable.
4. Double Chocolate Cookies & Cream Birthday Cake
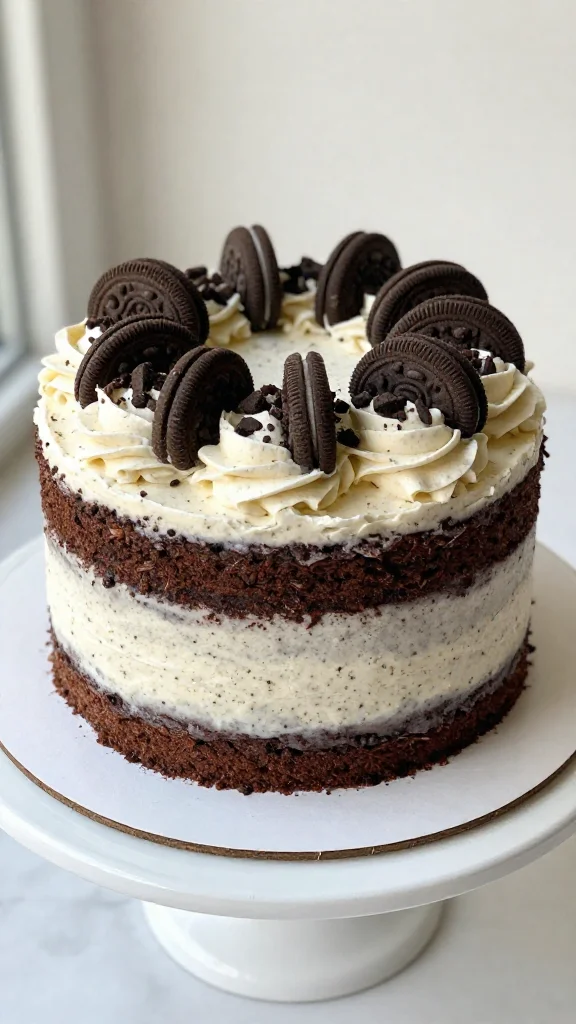
My daughter requested this cake for her 10th birthday after I’d spent weeks planning an elaborate unicorn cake. Kids, am I right? I reluctantly scrapped my unicorn plans and threw this together, only to have every single parent at the party ask for the recipe. The irony wasn’t lost on me. Now it’s our go-to celebration cake, and I’ve stopped fighting it. Sometimes the simplest ideas win.
Why It’s Amazing
This cake hits that perfect nostalgic note that appeals to both kids and adults. The chocolate cake layers are decadently dark, while the filling and frosting are loaded with crushed chocolate sandwich cookies that add texture and that familiar cookies-and-cream flavor. It looks impressive with its stark contrast between dark cake and speckled white frosting, but it’s actually one of the easier layer cakes to decorate because the cookie pieces hide any frosting imperfections.
Ingredients
- 1¾ cups all-purpose flour — sifted if you’re an overachiever
- 2 cups granulated sugar — because birthdays
- ¾ cup dark cocoa powder — the good stuff
- 2 teaspoons baking soda — check that it’s still active
- 1 teaspoon baking powder — ditto
- 1 teaspoon salt — fine salt works best
- 2 large eggs — at room temperature ideally
- 1 cup buttermilk — the real thing makes a difference here
- ½ cup vegetable oil — for moisture
- 2 teaspoons vanilla extract — pure, not imitation
- 1 cup hot water — or coffee if making for adults
- 1½ cups unsalted butter — softened for the frosting
- 5 cups powdered sugar — yes, really
- 2 teaspoons vanilla extract — for the frosting
- ¼ cup heavy cream — plus more if needed
- 30 chocolate sandwich cookies — like Oreos, divided (20 for the frosting, 10 for decoration)
- ¼ teaspoon salt — to balance the sweetness
Instructions
- Preheat oven to 350°F. Grease and line two 9-inch cake pans with parchment paper.
- Whisk together flour, sugar, cocoa powder, baking soda, baking powder, and salt in a large bowl.
- Add eggs, buttermilk, oil, and vanilla. Beat with an electric mixer on medium speed for about 2 minutes.
- Stir in hot water by hand. Don’t worry that the batter looks thin—that’s correct.
- Divide batter between prepared pans and bake for 30-35 minutes until a toothpick inserted comes out mostly clean.
- Cool in pans for 10 minutes, then remove to wire racks to cool completely. If your cakes dome a lot, you can level them with a serrated knife once cool.
- While the cakes cool, make the frosting. Crush 20 of the cookies into fine crumbs. You can use a food processor or the highly therapeutic method of putting them in a zip-top bag and smashing them with a rolling pin.
- Beat butter until creamy, then gradually add powdered sugar, vanilla, salt, and heavy cream. Beat until fluffy, about 3-4 minutes.
- Fold in the cookie crumbs by hand. The frosting will look speckled and slightly gray—this is correct and part of the charm.
- Place one cake layer on your serving plate. Spread about 1 cup of frosting on top. Add the second layer and frost the top and sides.
- Crush the remaining 10 cookies more coarsely and press them into the sides of the cake and sprinkle on top. This not only looks impressive but hides any frosting mistakes.
Tips & Chaos Notes
If you’re short on time, you can use a boxed chocolate cake mix as the base—just add a tablespoon of espresso powder to enhance the chocolate flavor, and no one will know the difference. The frosting will stiffen as it sits because the cookie crumbs absorb moisture, so work relatively quickly when frosting the cake. If it gets too firm, beat in an extra splash of cream. I once made this cake in July without air conditioning, and the frosting started sliding off the cake. Emergency solution: pop it in the fridge for 20 minutes between layers. Crisis averted.
5. Chocolate Peanut Butter Cup Cake That’s Worth The Calories
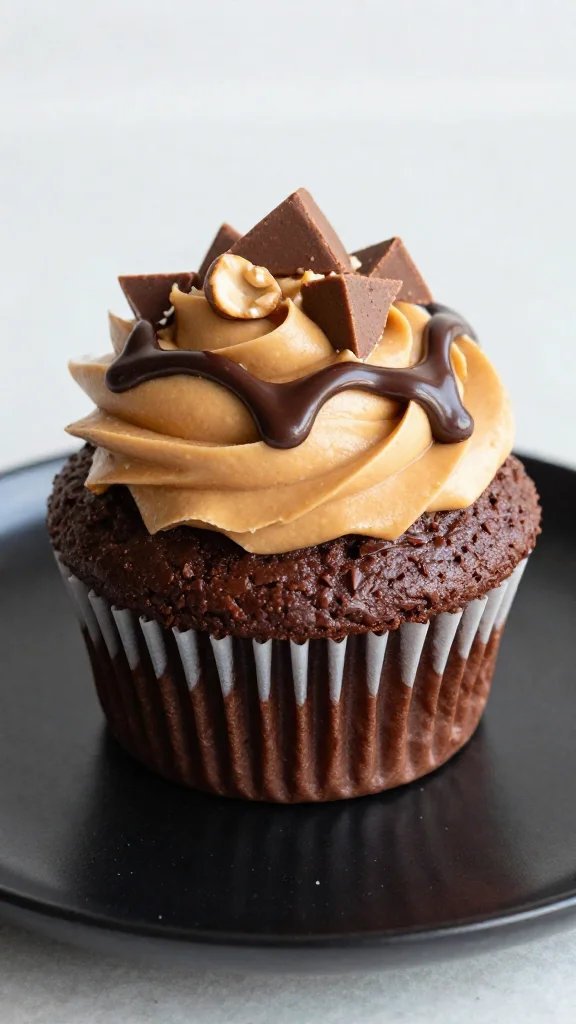
The origin story of this cake isn’t pretty. I made it for my own birthday one year when everyone else was too busy to bake for me (cue tiny violin). I was feeling pretty sorry for myself until I took the first bite and realized this cake was better than anything anyone else would have made me anyway. Silver linings! Now I “selfishly” volunteer to make my own birthday cake every year, and no one suspects it’s because I want this specific cake and don’t trust anyone else to make it right.
Why It’s Amazing
If you’ve ever eaten a peanut butter cup and thought “this should be a cake,” then this recipe is your dream come true. The chocolate cake layers are rich but not too sweet, providing the perfect backdrop for the true star: peanut butter frosting that tastes exactly like the filling of a peanut butter cup. Add a chocolate ganache drip and actual peanut butter cups as decoration, and you’ve got a cake that makes people weak at the knees. It’s indulgent in all the right ways and perfect for anyone who loves that chocolate-peanut butter combination.
Ingredients
- 2 cups all-purpose flour — nothing fancy needed
- 2 cups granulated sugar — yes, it’s a lot
- ¾ cup unsweetened cocoa powder — Dutch-processed if you have it
- 2 teaspoons baking soda — the fresh stuff
- 1 teaspoon baking powder — see above
- 1 teaspoon salt — regular table salt works fine
- 2 large eggs — room temperature if you remembered to take them out
- 1 cup buttermilk — or the milk+vinegar hack
- ½ cup vegetable oil — crucial for moisture
- 2 teaspoons vanilla extract — the real stuff
- 1 cup hot coffee — or hot water with 1 tsp espresso powder
- 1½ cups creamy peanut butter — not natural style, use the processed kind that doesn’t separate
- 1 cup unsalted butter — softened
- 4 cups powdered sugar — more or less to taste
- ¼ cup heavy cream — plus more if needed
- 2 teaspoons vanilla extract — for the frosting
- ½ teaspoon salt — to balance sweetness
- 8 oz semi-sweet chocolate — chopped, for ganache
- 1 cup heavy cream — for ganache
- 12-15 mini peanut butter cups — for decoration
Instructions
- Preheat oven to 350°F. Grease and line two 9-inch cake pans with parchment.
- In a large bowl, whisk together flour, sugar, cocoa, baking soda, baking powder, and salt.
- Add eggs, buttermilk, oil, and vanilla. Beat with an electric mixer for about 2 minutes.
- Stir in hot coffee. The batter will be very thin, but that’s normal.
- Pour into prepared pans and bake for 30-35 minutes until a toothpick comes out mostly clean.
- Cool in pans for 10 minutes, then remove to wire racks to cool completely.
- For the peanut butter frosting, beat peanut butter and butter together until very creamy, about 3 minutes.
- Gradually add powdered sugar, alternating with heavy cream. Add vanilla and salt, and beat until fluffy, about 3 more minutes. If it’s too thick, add more cream; if too thin, add more sugar.
- Once cakes are completely cool, place one layer on your serving plate. Spread a thick layer of peanut butter frosting on top. Add the second layer and frost the top and sides.
- Chill the frosted cake for about 30 minutes before adding the ganache.
- For the ganache, heat the heavy cream until just simmering, then pour over chopped chocolate. Let sit for 2-3 minutes, then stir until smooth. Let cool until slightly thickened but still pourable.
- Pour ganache over the chilled cake, allowing it to drip down the sides. You might not use all the ganache.
- Decorate the top with mini peanut butter cups before the ganache sets.
Tips & Chaos Notes
The key to this cake is patience—let each component cool properly before assembling. I’ve tried to rush it before and ended up with melting frosting and a ganache that ran straight off the cake onto the plate. Not cute. If your peanut butter frosting seems too thick to spread easily, don’t add too much liquid or it will lose structure. Instead, warm your offset spatula under hot water, dry it quickly, and then use it to spread the frosting—the heat makes it glide more easily. This cake is also RICH, so cut small slices unless you want to watch your guests slip into food comas at the party.
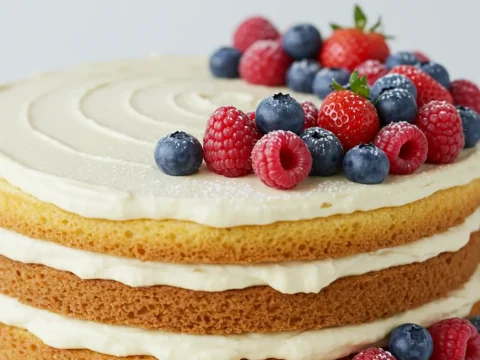
6. Chocolate Raspberry Truffle Cake For Fancy Occasions
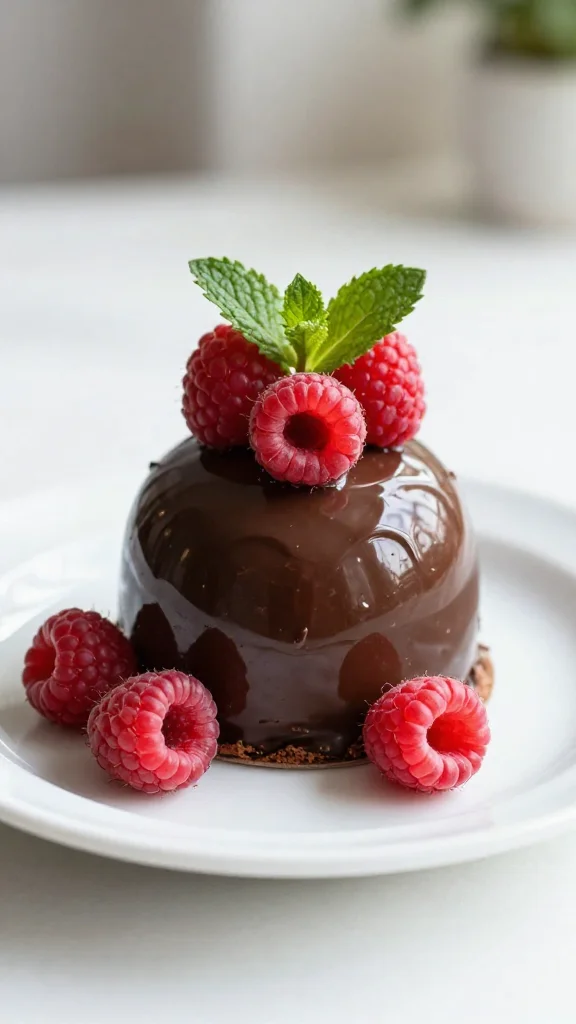
I first made this cake for my mother-in-law’s birthday, mainly because I was trying to impress her after she made a comment about how “anyone can make a chocolate cake.” The raspberry addition was a last-minute decision based on what was in my fridge. When she asked for the recipe and then made it herself for a dinner party the following month, I knew I’d finally earned her respect. Sometimes pettiness leads to delicious results.
Why It’s Amazing
This cake walks the line between sophisticated and accessible. The chocolate cake itself is rich and fudgy, almost like a giant truffle. The raspberry components—both the filling and the fresh berries on top—cut through the richness with bright acidity. It looks like something from a high-end patisserie with its glossy ganache coating and perfectly placed berries, but it’s actually quite straightforward to make. The flavor combination is classic for a reason, and the texture contrast between the dense cake, smooth ganache, and juicy berries makes every bite interesting.
Ingredients
- 1½ cups all-purpose flour — sifted for a finer texture
- 1½ cups granulated sugar — the usual excessive amount
- ¾ cup Dutch-processed cocoa powder — worth seeking out for this cake
- 1½ teaspoons baking soda — fresh is best
- ¾ teaspoon baking powder — same as above
- ¾ teaspoon salt — fine salt, not coarse
- 2 large eggs — room temperature
- ¾ cup buttermilk — the real stuff if possible
- ¾ cup warm water — just warm, not boiling
- 3 tablespoons vegetable oil — for moisture
- 1 teaspoon vanilla extract — pure, not imitation
- 12 oz fresh raspberries — divided (8 oz for filling, 4 oz for decoration)
- ¼ cup granulated sugar — for the raspberry filling
- 1 tablespoon lemon juice — freshly squeezed
- 2 teaspoons cornstarch — to thicken the filling
- 2 tablespoons water — for the cornstarch slurry
- 10 oz semi-sweet chocolate — chopped for ganache
- 1¼ cups heavy cream — for ganache
- 2 tablespoons unsalted butter — for ganache shine
- 1 tablespoon light corn syrup — also for shine (optional)
- Fresh mint leaves — for garnish (optional but makes it look fancy)
Instructions
- Preheat oven to 350°F. Grease and line two 8-inch cake pans with parchment paper.
- In a large bowl, whisk together flour, sugar, cocoa powder, baking soda, baking powder, and salt.
- Add eggs, buttermilk, warm water, oil, and vanilla. Beat with an electric mixer on medium speed for about 2 minutes until well combined.
- Divide batter between prepared pans and bake for 25-30 minutes until a toothpick comes out clean.
- Cool in pans for 10 minutes, then remove to wire racks to cool completely.
- While cakes cool, make the raspberry filling. In a saucepan, combine 8 oz raspberries, sugar, and lemon juice. Cook over medium heat until berries break down, about 5 minutes.
- Mix cornstarch with 2 tablespoons water to make a slurry. Stir into the raspberry mixture and cook until thickened, about 1 minute. Strain through a fine mesh sieve to remove seeds (or leave them in if you’re not bothered by texture). Cool completely.
- For the ganache, place chopped chocolate in a heatproof bowl. Heat heavy cream until