
Okay, I’ve burned more oatmeal than I’d like to admit, but these healthy easy recipes for breakfast have saved my mornings (and my smoke detector’s sanity). After years of grabbing granola bars while running out the door or making the same boring scrambled eggs, I finally figured out how to make breakfast that’s actually good for me AND doesn’t require a culinary degree to pull off.
Look, I’m not going to pretend these are Instagram-perfect creations that’ll make you feel like a wellness influencer. But they’re real recipes that work in real kitchens with real time constraints. Most take 15 minutes or less, use ingredients you probably already have, and taste way better than anything that comes out of a box. Plus, my kids actually eat them, which honestly might be the biggest miracle of all.
1. Fluffy Greek Yogurt Pancakes That Don’t Taste Like Cardboard
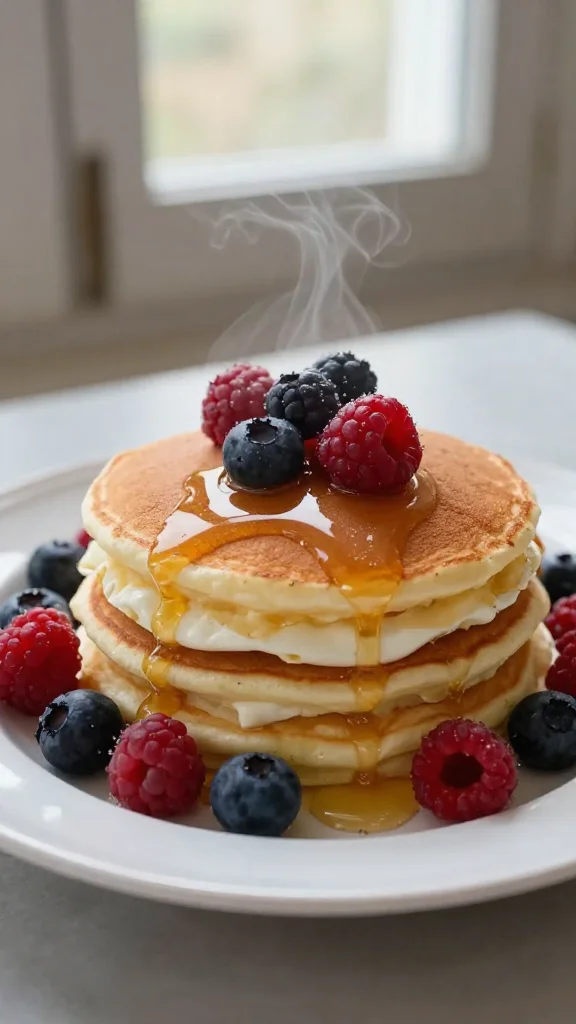
I discovered these by accident when I ran out of milk for regular pancakes and threw Greek yogurt into the mix instead. My 10-year-old took one bite and said, “Mom, these are actually good,” which is basically a five-star review in kid language. They’re way more filling than regular pancakes and somehow manage to be healthy without tasting like punishment food.
Why It’s Amazing
These pack 20 grams of protein per serving, so you won’t crash at 10 AM like with regular pancakes. The Greek yogurt makes them incredibly fluffy and tangy-sweet, plus they freeze beautifully for those chaotic weekday mornings when you’re already running late.
Ingredients
- 1 cup Greek yogurt, plain — I use the thick stuff, not the watery kind
- 2 large eggs — room temperature works better, but cold is fine if you’re impatient like me
- 1/2 cup oats, old-fashioned — quick oats turn to mush, trust me on this
- 1 tablespoon honey — or maple syrup if that’s what you have
- 1/2 teaspoon baking powder — check the expiration date, learned that the hard way
- 1/4 teaspoon salt
- 1/2 teaspoon vanilla extract — the real stuff makes a difference
- Cooking spray or butter for the pan
Instructions
- Blend everything except the cooking spray in a blender or food processor for about 30 seconds until smooth. The oats need to be completely broken down or you’ll have chunky pancakes. Let the batter sit for 5 minutes while your pan heats up — this helps the oats absorb moisture and makes them fluffier.
- Heat a non-stick pan over medium-low heat and spray with cooking spray. Pour 1/4 cup of batter per pancake. They’ll bubble around the edges after about 2-3 minutes — that’s when you flip. Don’t rush this part or they’ll fall apart.
- Cook the second side for another 2 minutes until golden. They should spring back when you gently press the center. If they’re browning too fast, turn the heat down — these burn easier than regular pancakes because of the protein.
- Serve immediately with fresh berries and a drizzle of honey. These don’t need butter because they’re already rich from the yogurt, but I won’t judge if you add it anyway.
Tips & Chaos Notes
Make a double batch on Sunday and freeze them in a single layer, then transfer to freezer bags. Pop them in the toaster for quick weekday breakfasts. If your batter seems too thick, add a tablespoon of milk. Too thin? Add more oats and blend again. My kids love these with chocolate chips mixed in, which defeats the healthy purpose but keeps them happy.
2. Overnight Chia Pudding That Actually Tastes Good
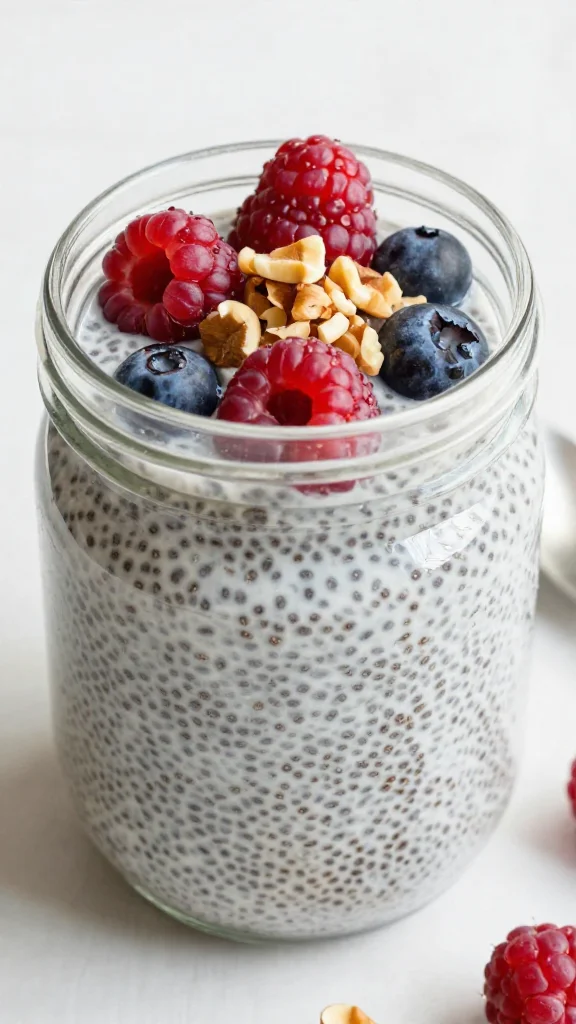
I was skeptical about chia pudding for years because the first one I tried tasted like vanilla-flavored fish eggs. But my neighbor kept raving about her version, so I finally asked for the secret. Turns out, the key is using enough sweetener and letting it sit long enough to get properly thick and creamy instead of weird and gelatinous.
Why It’s Amazing
This takes literally 2 minutes to throw together the night before, and you wake up to breakfast that’s already done. It’s loaded with omega-3s and fiber, keeps you full for hours, and tastes like dessert for breakfast without the sugar crash.
Ingredients
- 3 tablespoons chia seeds — buy them in bulk, they’re way cheaper
- 1 cup milk of choice — I use unsweetened almond milk, but dairy works too
- 2 tablespoons maple syrup — don’t skimp on this or it’ll taste like nothing
- 1/2 teaspoon vanilla extract
- Pinch of salt — seriously, don’t skip this tiny amount
- 1/4 cup fresh berries — frozen work too, just thaw them first
- 2 tablespoons chopped nuts — whatever you have on hand
Instructions
- Whisk together chia seeds, milk, maple syrup, vanilla, and salt in a mason jar or bowl. Whisk really well for at least 30 seconds to break up any clumps. The chia seeds will try to stick together at first, but keep whisking.
- Let it sit for 5 minutes, then whisk again to prevent clumping. This second whisk is crucial — skip it and you’ll have chia seed globs floating around, which is gross.
- Cover and refrigerate for at least 4 hours or overnight. It’ll thicken into a pudding-like consistency. If it’s too thick in the morning, stir in a splash more milk. Too thin? Add more chia seeds and wait 30 minutes.
- Top with berries and nuts before serving. I like to layer everything in a jar for that Instagram-worthy look, but honestly, just dumping it in a bowl works fine too.
Tips & Chaos Notes
Make three jars at once for grab-and-go breakfasts all week. Try different flavor combinations like cocoa powder and banana, or peanut butter and strawberry. If you forget to make it the night before, you can quick-set it by using hot milk and waiting 20 minutes, but overnight is definitely better. The texture won’t be quite as smooth, but it’ll work in a pinch.
3. Veggie-Packed Scrambled Eggs That Don’t Taste Like Health Food

My kids used to pick every single vegetable out of their eggs until I figured out the magic trick: cook the veggies until they’re soft and sweet, then scramble them right into the eggs so they can’t escape. Now they don’t even notice they’re eating bell peppers and spinach. Victory is mine.
Why It’s Amazing
You’re getting a full serving of vegetables before 8 AM, plus protein that’ll keep you satisfied. The veggies add natural sweetness and color, so even picky eaters don’t complain. Plus, it’s a great way to use up those sad vegetables in your crisper drawer.
Ingredients
- 6 large eggs — farm-fresh if you’re fancy, store-bought if you’re normal
- 1 bell pepper, any color, diced small — red ones are sweetest
- 1 cup fresh spinach, roughly chopped — baby spinach works too
- 1/4 cup shredded cheese — cheddar, mozzarella, whatever you have
- 2 tablespoons olive oil or butter
- 1/4 onion, diced — or skip if your kids hate onions like mine do
- 2 cloves garlic, minced — or 1/2 teaspoon garlic powder if you’re lazy
- Salt and pepper to taste
Instructions
- Heat olive oil in a large non-stick pan over medium heat. Add the diced bell pepper and onion, cooking for about 5 minutes until they start to soften and smell amazing. Don’t rush this step — soft, sweet vegetables are the key to making this taste good instead of like rabbit food.
- Add garlic and cook for another minute until fragrant. Toss in the spinach and cook until wilted, about 1-2 minutes. The pan will look really full at first, but spinach shrinks down to nothing.
- Beat the eggs with salt and pepper in a bowl, then pour them into the pan with the vegetables. Let them sit for 30 seconds without stirring, then gently scramble with a spatula. Keep the heat at medium to avoid rubbery eggs.
- When the eggs are almost set but still slightly wet, sprinkle in the cheese and fold everything together. Remove from heat and let the residual heat finish cooking them. They’ll continue cooking even off the burner, so slightly underdone is perfect.
Tips & Chaos Notes
Prep all your vegetables the night before and store them in the fridge — mornings go much smoother that way. Mushrooms, zucchini, or cherry tomatoes work great too. If your eggs turn out rubbery, you cooked them too fast or too long. Low and slow is the way to go. Serve with toast or wrap in a tortilla for a breakfast burrito that actually travels well.
4. Banana Oat Smoothie That Tastes Like a Milkshake

I started making this when I realized I was spending $8 on smoothies that were basically sugar bombs with a few berries thrown in. This version has the same creamy, dessert-like taste but actually fills you up and doesn’t make you crash an hour later. My teenager requests this every morning, which is basically a miracle.
Why It’s Amazing
It’s like drinking oatmeal, but way more fun. The frozen banana makes it thick and creamy without any ice cream, and the oats add fiber that keeps you full. Plus, you can drink it in the car, which is essential for chaotic mornings.
Ingredients
- 1 frozen banana, sliced — freeze them when they get too ripe, perfect for smoothies
- 1/2 cup rolled oats — old-fashioned, not quick oats
- 1 cup milk of choice — whole milk makes it creamiest
- 2 tablespoons peanut butter — or almond butter if you’re feeling fancy
- 1 tablespoon honey or maple syrup
- 1/2 teaspoon vanilla extract
- 1/2 teaspoon cinnamon — don’t skip this, it makes everything taste like cookies
- Pinch of salt
- 1/2 cup ice if your banana isn’t frozen
Instructions
- Add the oats to your blender first and blend for about 30 seconds until they’re ground into a fine powder. This prevents chunky bits in your smoothie that get stuck in your teeth. Trust me, nobody wants to pick oat pieces out of their molars.
- Add the frozen banana, peanut butter, honey, vanilla, cinnamon, and salt. Pour in the milk last — this helps everything blend more easily. If you put the liquid in first, the frozen fruit just sits on top and refuses to blend.
- Blend on high for 60-90 seconds until completely smooth and creamy. It should look like a milkshake. If it’s too thick, add more milk a little at a time. Too thin? Add more frozen banana or a handful of ice.
- Pour into a travel mug or tall glass and drink immediately. This doesn’t store well — the oats make it thick and gluey if it sits too long. But honestly, it’s so good you won’t have any leftovers anyway.
Tips & Chaos Notes
Always use frozen bananas for the best texture — fresh ones make it watery and you need way more ice. Keep a bag of sliced bananas in your freezer for easy smoothie making. Try adding a handful of spinach — you won’t taste it, but you’ll get extra nutrients. Cocoa powder turns this into a chocolate peanut butter smoothie that tastes completely indulgent.
5. Avocado Toast That’s Actually Filling
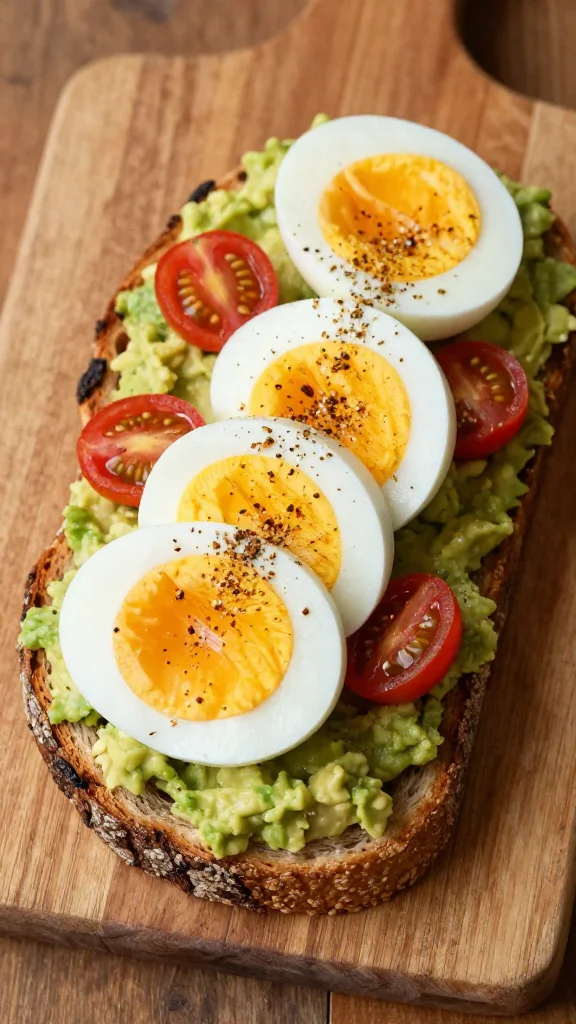
Everyone makes fun of millennials and their avocado toast, but honestly? When you do it right, it’s genius. I used to think it was just smashed avocado on bread until I learned how to layer flavors and add protein. Now it’s my go-to when I want something that feels fancy but takes five minutes to make.
Why It’s Amazing
The healthy fats from avocado keep you satisfied way longer than cereal or toast alone. Plus, it’s endlessly customizable — you can make it different every day depending on what’s in your fridge. And it looks impressive enough to serve to guests, even though it’s basically just dressed-up toast.
Ingredients
- 2 slices whole grain bread — the good stuff with seeds and texture
- 1 large ripe avocado — it should give slightly when you press it
- 1 hard-boiled egg, sliced — or fried if you have time
- 2 tablespoons everything bagel seasoning — store-bought is fine, don’t be a hero
- 1 tablespoon lemon juice — fresh is better but bottled works
- 1/4 teaspoon red pepper flakes — optional but adds nice heat
- Salt and black pepper to taste
- 2 cherry tomatoes, halved — for color and freshness
Instructions
- Toast the bread until it’s golden and crispy — you want it sturdy enough to hold all the toppings without getting soggy. While it’s toasting, cut the avocado in half, remove the pit, and scoop the flesh into a bowl.
- Mash the avocado with lemon juice, salt, and pepper until it’s creamy but still has some texture. Don’t over-mash it into baby food consistency — some chunks are good. The lemon juice keeps it from turning brown and adds brightness.
- Spread the mashed avocado evenly on both pieces of toast, making sure to go all the way to the edges. Layer the sliced egg on top, then add the cherry tomato halves. The egg adds protein that makes this actually filling.
- Sprinkle everything with the bagel seasoning and red pepper flakes. Eat immediately — avocado toast doesn’t travel well and gets soggy if it sits too long. But honestly, it’s so good you’ll finish it in about two minutes anyway.
Tips & Chaos Notes
Keep hard-boiled eggs in your fridge for easy protein additions. If your avocado is too firm, microwave it for 15-20 seconds to soften it up. Too ripe and mushy? It’ll still taste good, just won’t look as pretty. Try adding crumbled feta, sliced radishes, or microgreens if you want to get fancy. And yes, it’s worth buying good bread for this — cheap sandwich bread just falls apart.
6. Make-Ahead Breakfast Burritos That Freeze Like Magic

I meal-prepped these on a random Sunday when I was tired of spending $12 on breakfast burritos from the drive-through. Made a dozen, froze them, and suddenly had two weeks of grab-and-go breakfasts that actually tasted homemade. My husband was so impressed he thought I’d hired a personal chef. Little did he know it took me 45 minutes and cost about $15 total.
Why It’s Amazing
You do the work once and eat well for weeks. They reheat perfectly in the microwave and taste way better than anything frozen you can buy. Plus, you control exactly what goes in them — no weird preservatives or mystery meat.
Ingredients
- 12 large flour tortillas — the burrito-size ones, not taco size
- 12 large eggs, scrambled — cook them slightly underdone since they’ll cook more when reheated
- 1 pound breakfast sausage, cooked and crumbled — or bacon if you prefer
- 3 cups shredded cheese — cheddar and Monterey Jack work great
- 1 can black beans, drained and rinsed — optional but adds fiber
- 2 bell peppers, diced and sautéed — any color you like
- 1 onion, diced and sautéed until soft
- Salt, pepper, and cumin to taste
- Salsa for serving — store-bought is totally fine
Instructions
- Cook the sausage in a large skillet until browned and crumbly, about 8-10 minutes. Remove with a slotted spoon and set aside. In the same pan with the leftover grease, sauté the onions and peppers until soft and slightly caramelized, about 10 minutes. This builds so much flavor.
- Scramble the eggs in a separate pan until they’re just set but still slightly wet — they’ll finish cooking when you reheat the burritos. Season with salt, pepper, and a pinch of cumin. Let everything cool for a few minutes so the cheese doesn’t immediately melt when you assemble.
- Lay out all the tortillas on a clean counter. Divide the eggs, sausage, vegetables, beans, and cheese evenly among them. Don’t overfill or they’ll burst when you roll them — learned this the hard way after my first three exploded.
- Roll each burrito tightly by folding in the sides first, then rolling from bottom to top. Wrap individually in aluminum foil and label with the date. Freeze in a single layer, then transfer to freezer bags once solid. They’ll keep for up to 3 months.
Tips & Chaos Notes
To reheat from frozen, remove the foil and wrap in a damp paper towel. Microwave for 2-3 minutes, flipping halfway through. Or thaw overnight in the fridge and microwave for 60-90 seconds. The damp paper towel keeps the tortilla from getting tough. Make different varieties — some with just cheese for picky kids, others loaded with veggies for adults. Write the contents on the foil so you know what you’re grabbing.
7. Protein-Packed Overnight French Toast That Cooks Itself
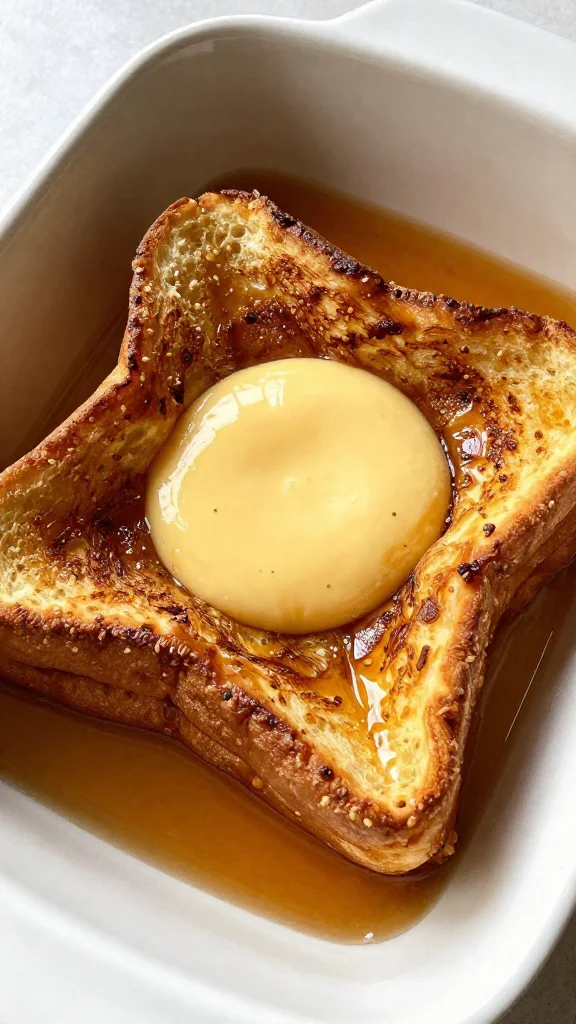
My mom used to make this for Christmas morning, and I always thought it was way too fancy for regular weekdays. Then I realized you literally just dump everything in a baking dish the night before and stick it in the oven when you wake up. It’s like having a personal breakfast chef, except the chef is your past self being responsible for once.
Why It’s Amazing
It’s French toast that requires zero morning effort and feeds a crowd. The overnight soak makes it incredibly custardy and rich, while Greek yogurt in the custard adds protein without changing the taste. Plus, your house smells like a bakery while it cooks, which is basically aromatherapy.
Ingredients
- 8 thick slices day-old bread — challah or brioche if you’re fancy, Texas toast if you’re practical
- 6 large eggs
- 1 cup milk — whole milk makes it richest
- 1/2 cup Greek yogurt, plain — this is the secret protein boost
- 1/4 cup maple syrup — plus more for serving
- 1 teaspoon vanilla extract — the real stuff makes a difference
- 1/2 teaspoon cinnamon
- 1/4 teaspoon nutmeg — optional but makes it taste fancy
- Pinch of salt
- Butter for greasing the pan
Instructions
- Grease a 9×13 baking dish with butter and arrange the bread slices in a single layer, overlapping slightly if needed. Day-old bread works best because it soaks up the custard without falling apart. If your bread is fresh, leave it out overnight or toast it lightly.
- Whisk together eggs, milk, Greek yogurt, maple syrup, vanilla, cinnamon, nutmeg, and salt until completely smooth. The yogurt might be lumpy at first, but keep whisking until it disappears into the mixture. Pour this custard evenly over the bread.
- Press the bread down gently with a spatula to make sure every piece is soaked. Cover with plastic wrap and refrigerate overnight, or at least 4 hours. The bread needs time to absorb all that custardy goodness — don’t skip this step.
- In the morning, preheat your oven to 350°F and remove the plastic wrap. Bake for 35-40 minutes until the top is golden brown and the center is set but still slightly jiggly. It’ll puff up beautifully and smell incredible. Let it cool for 5 minutes before serving with maple syrup.
Tips & Chaos Notes
This feeds 6-8 people easily, so it’s perfect for weekend family breakfasts or when you have guests. You can assemble it up to two days ahead — just keep it covered in the fridge. Try adding fresh berries on top before baking, or sprinkle with powdered sugar after. If the top browns too quickly, cover with foil for the last 10 minutes. Leftovers reheat well in the microwave, though they won’t be quite as fluffy as fresh from the oven.
Look, I’m not going to pretend these recipes will transform you into a morning person or make you suddenly love getting up at 6 AM. But they will make breakfast something you actually look forward to instead of just another thing to check off your list. And honestly, when you’re starting your day with real food that tastes good and keeps you full, everything else feels a little more manageable.
The best part? Most of these can be prepped ahead or made in batches, so even on those mornings when you can barely remember to put on matching socks, you’ll still eat something decent. Let me know which one you try first — I’m genuinely curious to see which breakfast becomes your new obsession. Happy cooking!