
Okay, I’ve hosted more dinner parties that turned into absolute chaos than I’d like to admit, but here’s what I’ve learned: spring dinner party recipes don’t need to be complicated to be impressive. After years of overcomplicating everything and watching my stress levels spike while my guests awkwardly offered to help in my disaster zone kitchen, I finally figured out the secret. These seven recipes let you actually enjoy your own party instead of hiding in the kitchen all night, panicking about whether the roast is done or if you remembered to start the potatoes.
What makes these spring dinner party recipes work isn’t fancy techniques or Instagram-worthy plating—it’s smart planning and flavors that actually deliver. Most of these can be prepped ahead, several cook themselves while you’re getting ready, and a few are so simple your guests will think you’re some kind of kitchen wizard. Plus, they all use ingredients you can actually find at a regular grocery store, because nobody has time to hunt down specialty items when you’re already stressed about cleaning the house and remembering to buy wine.
1. Make-Ahead Herb-Crusted Salmon with Lemon Butter
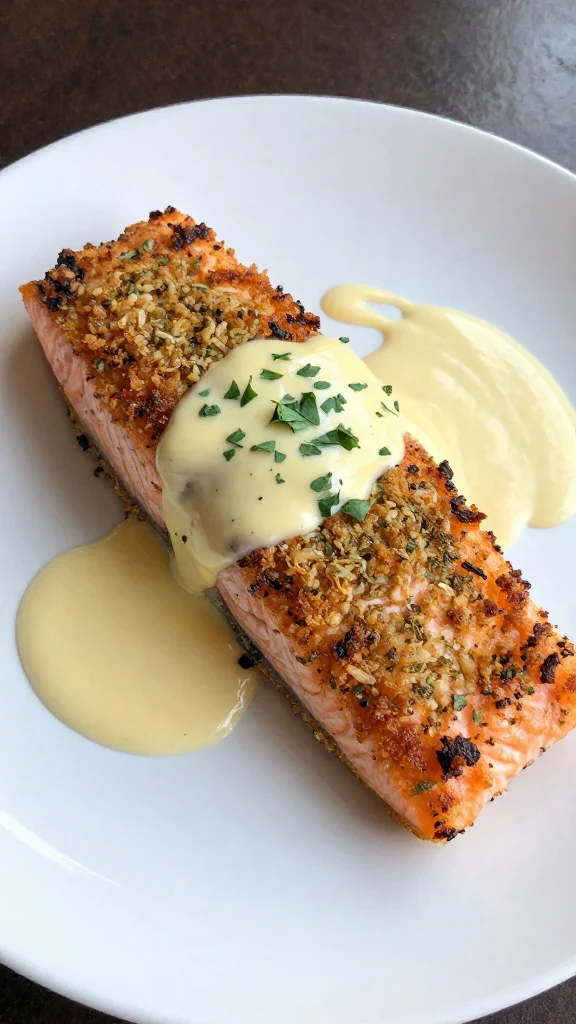
Last spring, I was hosting my first dinner party in our new house and completely panicked about timing. I’d planned this elaborate menu that required me to be in the kitchen for the entire party, which defeated the whole point. My neighbor suggested this salmon recipe, and I was skeptical—how good could something this simple actually be? Turns out, it’s been my go-to impressive-but-easy main dish ever since. The herb crust gives it that fancy restaurant look, but it’s literally just mixing herbs with breadcrumbs.
Why It’s Amazing
This salmon looks absolutely stunning on a platter, cooks in under 20 minutes, and you can prep the herb mixture hours ahead. The lemon butter sauce comes together in two minutes and makes everything taste like you spent way more effort than you actually did. Plus, even people who claim they don’t like fish usually love this because the herbs mask any fishy taste.
Ingredients
- 2 pounds salmon fillet, skin removed — ask the fish counter to do this, don’t be a hero
- 1 cup panko breadcrumbs — the coarse texture is key here
- 1/4 cup fresh parsley, chopped — flat-leaf looks fancier than curly
- 2 tablespoons fresh dill, chopped — or 1 tablespoon dried if that’s what you have
- 2 tablespoons fresh chives, chopped — these add the prettiest green color
- 3 cloves garlic, minced — I use 4 because I’m obsessed
- 1/4 cup olive oil — extra virgin makes a difference here
- 4 tablespoons butter — for the lemon sauce
- 2 lemons, juiced — about 1/4 cup juice
- Salt and pepper — don’t skip the pepper, it adds bite
Instructions
- Preheat your oven to 400°F and line a baking sheet with parchment paper. Pat the salmon completely dry with paper towels—any moisture will make the crust soggy, and nobody wants that. Season both sides with salt and pepper, then place on the prepared baking sheet.
- Mix the panko, herbs, garlic, and olive oil in a bowl until it looks like wet sand. Press this mixture firmly onto the top of the salmon fillet—really press it down so it sticks. If some falls off, just pat it back on. The oil helps it adhere and turn golden.
- Bake for 12-15 minutes, depending on thickness. The salmon should flake easily with a fork and the crust should be golden brown. Don’t overcook it—salmon goes from perfect to dry in about 2 minutes, so start checking at 12 minutes.
- While the salmon finishes, melt the butter in a small saucepan over medium heat. Add the lemon juice and whisk until smooth. Taste and add salt if needed. Pour this over the salmon just before serving, or let people drizzle it themselves.
Tips & Chaos Notes
You can make the herb crust mixture up to 4 hours ahead and just press it onto the salmon right before baking. If you’re feeling fancy, slice the salmon into individual portions before adding the crust—it looks more restaurant-like. Leftovers are amazing flaked into salads the next day. And here’s something I learned the hard way: don’t try to flip this salmon. The crust is on top for a reason, and flipping will just make a mess.
2. Slow Cooker Spring Vegetable and White Bean Stew
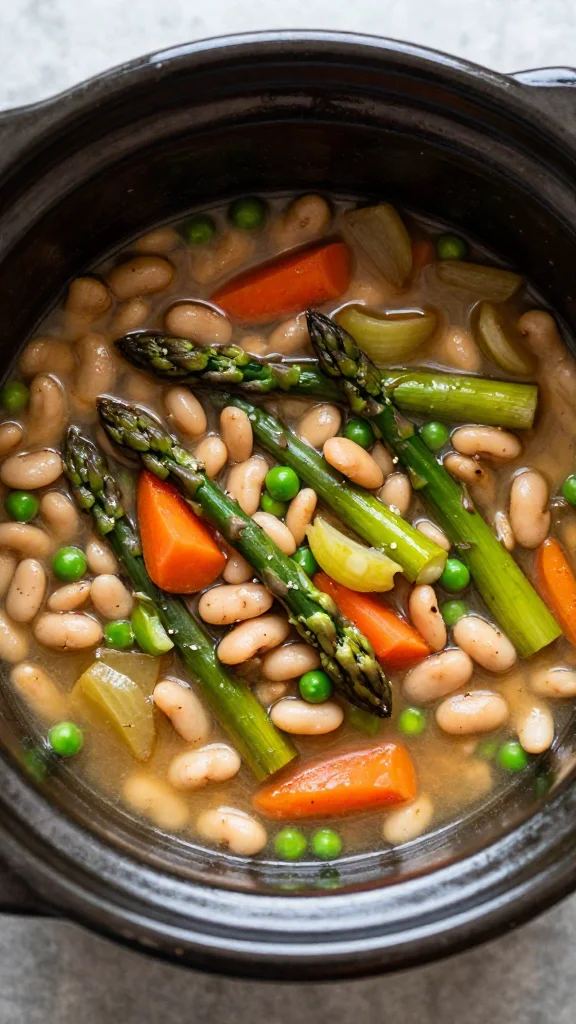
I started making this three years ago when I realized I needed a vegetarian option that wasn’t just “remove the meat from everything else.” My vegetarian friends were always getting sad desk salads at dinner parties, and I felt terrible about it. This stew has become so popular that even my meat-loving husband requests it specifically. The slow cooker does all the work while you’re cleaning or getting ready, and your house smells incredible when guests arrive.
Why It’s Amazing
This is completely hands-off once you dump everything in the slow cooker, it feeds a crowd, and it tastes even better the next day. The vegetables get perfectly tender without turning to mush, and the white beans make it hearty enough that nobody misses meat. Plus, it’s naturally gluten-free and vegan if you skip the parmesan garnish.
Ingredients
- 2 cans white cannellini beans, drained and rinsed — don’t skip the rinsing step
- 1 bunch asparagus, cut into 1-inch pieces — snap off the woody ends first
- 1 cup fresh peas — frozen works too, just add them in the last hour
- 1 large onion, diced — yellow onion is fine, sweet onion is even better
- 3 carrots, sliced into rounds — baby carrots work if you’re feeling lazy
- 3 celery stalks, chopped — leaves and all, they add flavor
- 4 cloves garlic, minced — because garlic makes everything better
- 4 cups vegetable broth — low-sodium lets you control the salt
- 1 can diced tomatoes — fire-roasted adds extra flavor
- 2 tablespoons olive oil — for sautéing the aromatics
- 1 teaspoon dried thyme — or 1 tablespoon fresh if you have it
- 1/2 teaspoon dried rosemary — crush it between your fingers first
- Salt and pepper to taste — taste and adjust at the end
- Parmesan cheese for serving — optional but highly recommended
Instructions
- Heat the olive oil in a large skillet over medium heat and sauté the onion, carrots, and celery for about 5 minutes until they start to soften. Add the garlic and cook for another minute until fragrant. This step isn’t required but adds so much more flavor than just dumping raw vegetables in the slow cooker.
- Transfer the sautéed vegetables to your slow cooker along with the beans, tomatoes, broth, thyme, and rosemary. Stir everything together and season with salt and pepper. Put the lid on and cook on LOW for 6-7 hours, or HIGH for 3-4 hours if you’re in a rush.
- About 30 minutes before serving, add the asparagus and peas. They don’t need as much time as the other vegetables and will get mushy if you add them too early. Taste and adjust seasoning—it usually needs more salt and pepper than you think.
- Serve in bowls with a sprinkle of parmesan and some crusty bread for dipping. The stew will be thick but not super thick—more like a hearty vegetable soup consistency. If it seems too thin, leave the lid off for the last 15 minutes to let some liquid evaporate.
Tips & Chaos Notes
This makes a huge batch, so it’s perfect for feeding a crowd or having leftovers for days. You can prep all the vegetables the night before and store them in the fridge. If you want to make it heartier, add some small pasta during the last hour of cooking. The stew won’t look super colorful since slow cookers tend to mute colors, but the flavor is incredible. Don’t expect crispy vegetables—everything will be tender and soft, which is exactly what you want in a comfort stew.
3. One-Pan Lemon Garlic Chicken Thighs with Spring Vegetables
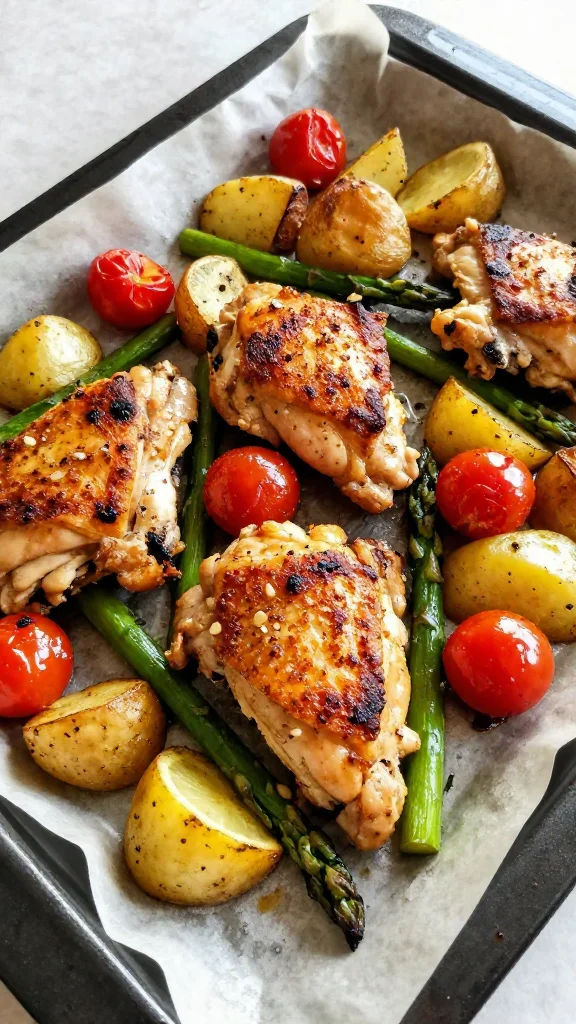
This recipe saved my sanity during a particularly chaotic dinner party last month. I’d planned to make three separate dishes and realized halfway through prep that I was going to be washing dishes until midnight. I threw everything onto one sheet pan, crossed my fingers, and hoped for the best. Not only did it work perfectly, but everyone kept asking for the recipe. Sometimes the best discoveries happen when you’re too overwhelmed to overthink things.
Why It’s Amazing
Everything cooks together on one pan, which means minimal cleanup and maximum flavor as all the ingredients meld together. The chicken skin gets crispy in the oven, the vegetables caramelize beautifully, and the lemon garlic combination makes everything taste bright and fresh. Plus, it looks gorgeous served straight from the pan.
Ingredients
- 8 chicken thighs, bone-in, skin-on — don’t use boneless, they’ll dry out
- 1 pound small potatoes, halved — baby potatoes work perfectly
- 1 bunch asparagus, trimmed — snap off the woody ends
- 1 pint cherry tomatoes — leave them whole, they’ll burst beautifully
- 1 large onion, cut into wedges — thick wedges so they don’t burn
- 6 cloves garlic, smashed — just whack them with the side of your knife
- 2 lemons, sliced into rounds — seeds and all, don’t be precious about it
- 1/4 cup olive oil — enough to coat everything generously
- 2 teaspoons dried oregano — or 2 tablespoons fresh
- 1 teaspoon dried thyme — crush it between your fingers
- Salt and pepper — be generous with both
- Fresh parsley for garnish — optional but pretty
Instructions
- Preheat your oven to 425°F and line a large sheet pan with parchment paper. Pat the chicken thighs dry and season generously with salt and pepper on both sides. Place them skin-side up on one side of the pan—don’t crowd them or the skin won’t crisp properly.
- Toss the potatoes, onion wedges, and smashed garlic with half the olive oil, oregano, thyme, salt, and pepper. Arrange them around the chicken, making sure the potatoes are cut-side down for maximum browning. Drizzle the remaining oil over the chicken skin.
- Roast for 25 minutes, then add the asparagus, cherry tomatoes, and lemon slices to the pan. Toss the vegetables gently but leave the chicken undisturbed. Continue roasting for another 15-20 minutes until the chicken skin is golden and crispy and the vegetables are tender.
- Check that the chicken is cooked through—the juices should run clear when you cut into the thickest part. If the vegetables are done but the chicken needs more time, just move the vegetables to a serving dish and give the chicken another 5-10 minutes. Let everything rest for 5 minutes before serving.
Tips & Chaos Notes
The key to crispy skin is starting with completely dry chicken and not overcrowding the pan. If your vegetables are browning too quickly, cover them loosely with foil. This recipe scales up easily—just use two sheet pans if you’re feeding more people. The lemon slices get slightly caramelized and are actually delicious to eat, but warn guests about the seeds. Leftovers reheat beautifully in the oven, though the skin won’t be quite as crispy the second time around.
4. Make-Ahead Spinach and Ricotta Stuffed Shells

I used to be terrified of making stuffed shells because it seemed so fiddly and time-consuming. Then my Italian neighbor showed me her trick: you don’t actually have to cook the shells perfectly before stuffing them, and you can assemble the whole thing a day ahead. Game changer. Now this is my go-to when I want something that looks impressive but doesn’t require me to be in the kitchen while guests are over. The first time I made these, I accidentally overstuffed them and they looked like little pasta purses, but they still tasted amazing.
Why It’s Amazing
You can assemble this completely ahead of time and just pop it in the oven when guests arrive. The shells get perfectly tender as they bake in the sauce, and the ricotta mixture is creamy and flavorful without being heavy. It’s comfort food that feels fancy, and even picky eaters usually love it because it’s basically pasta and cheese.
Ingredients
- 1 box jumbo pasta shells — buy an extra box in case some break
- 2 cups ricotta cheese — whole milk ricotta tastes so much better
- 1 cup mozzarella cheese, shredded — save some for topping
- 1/2 cup parmesan cheese, grated — the real stuff, not the powdered
- 1 egg, beaten — helps bind everything together
- 10 oz frozen spinach, thawed and drained — squeeze out as much water as possible
- 3 cloves garlic, minced — because garlic makes everything better
- 1/4 cup fresh basil, chopped — or 2 tablespoons dried
- 1 jar marinara sauce — about 24 oz, use your favorite brand
- Salt and pepper to taste — don’t skip the pepper
- 1/4 teaspoon nutmeg — optional but adds warmth
Instructions
- Cook the pasta shells according to package directions but undercook them by about 2 minutes—they’ll finish cooking in the oven. Drain and rinse with cool water to stop the cooking process. Spread them out on a clean kitchen towel so they don’t stick together while you make the filling.
- Squeeze the thawed spinach in a clean kitchen towel to remove as much water as humanly possible—seriously, keep squeezing until no more water comes out. Mix the spinach with ricotta, half the mozzarella, parmesan, egg, garlic, basil, salt, pepper, and nutmeg until well combined. Taste and adjust seasoning.
- Spread about 1 cup of marinara sauce in the bottom of a 9×13 baking dish. Using a spoon or your hands, stuff each shell with about 2 tablespoons of the ricotta mixture. Don’t overstuff or they’ll burst open. Arrange the stuffed shells in the baking dish seam-side down.
- Pour the remaining marinara sauce over the shells and sprinkle with the remaining mozzarella. Cover tightly with foil and bake at 375°F for 25-30 minutes until the sauce is bubbling and the cheese is melted. Remove the foil for the last 5 minutes to brown the cheese slightly.
Tips & Chaos Notes
You can assemble this up to 24 hours ahead and refrigerate covered—just add an extra 10 minutes to the baking time if it’s going straight from the fridge to the oven. If some shells break while you’re stuffing them, just patch them together in the dish—nobody will notice once they’re covered in sauce. The nutmeg might seem weird, but it’s a traditional Italian addition that adds warmth without being identifiable. These freeze beautifully too, just thaw completely before baking.
5. Honey Glazed Carrots with Fresh Herbs
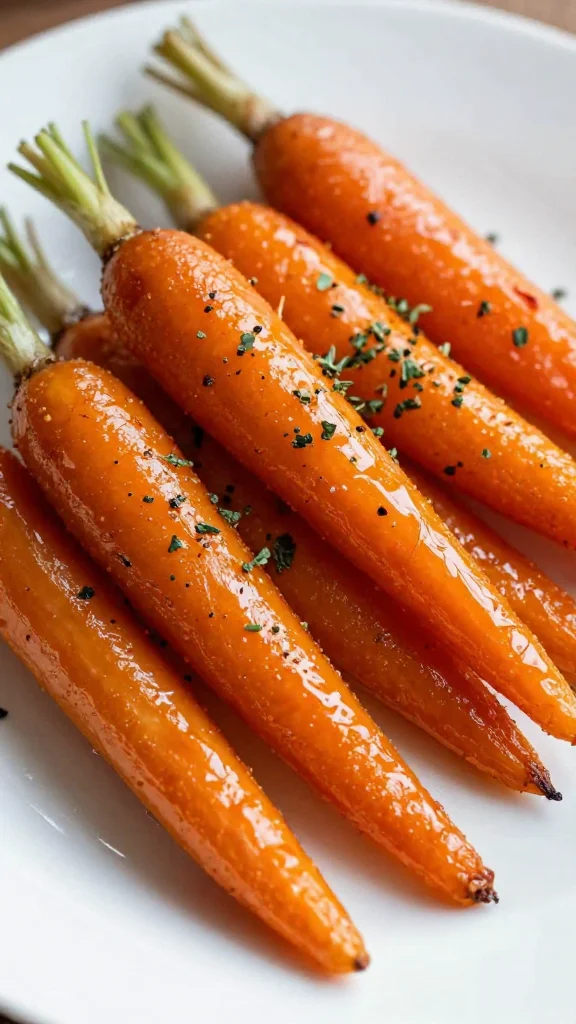
For years, I thought glazed carrots were just for Thanksgiving, but then I realized they’re actually the perfect spring side dish—sweet, colorful, and way more interesting than plain steamed vegetables. The first time I made these for a dinner party, I accidentally used way too much honey and they turned out like candy, but everyone loved them anyway. Now I’ve perfected the balance, though I still lean toward the sweeter side because life’s too short for bland carrots.
Why It’s Amazing
These carrots are naturally sweet and beautiful on the plate, they cook quickly on the stovetop, and the honey glaze makes them taste like you put way more effort in than you actually did. The fresh herbs add a pop of color and freshness that balances the sweetness perfectly. Plus, they’re naturally gluten-free and can easily be made vegan.
Ingredients
- 2 pounds carrots, peeled and cut into 2-inch pieces — baby carrots work if you’re lazy
- 3 tablespoons butter — or olive oil for dairy-free
- 3 tablespoons honey — don’t use the fake stuff, it tastes weird when heated
- 2 tablespoons fresh thyme leaves — or 1 tablespoon dried
- 2 tablespoons fresh parsley, chopped — for color and freshness
- 1 tablespoon fresh chives, chopped — these add a mild onion flavor
- Salt and pepper to taste — don’t forget the salt, it brings out the sweetness
- 1/4 cup water — for steaming
Instructions
- Cut the carrots into uniform pieces so they cook evenly—about 2 inches long and 1/2 inch thick. If you’re using baby carrots, just cut the larger ones in half lengthwise. Heat the butter in a large skillet over medium-high heat until it starts to foam.
- Add the carrots to the skillet and sauté for about 3-4 minutes until they start to get slightly caramelized on the edges. They should sizzle when they hit the pan—if not, your heat isn’t high enough. Season with salt and pepper.
- Add the water and honey to the pan and stir to combine. The mixture will bubble up dramatically, so don’t panic. Cover the pan and reduce heat to medium-low. Cook for 8-10 minutes until the carrots are tender when pierced with a fork but still have a little bite.
- Remove the lid and increase heat to medium-high. Cook for another 2-3 minutes, stirring frequently, until the liquid reduces to a glossy glaze that coats the carrots. Remove from heat and stir in the fresh herbs. Taste and adjust seasoning—you might need more salt or honey depending on your carrots.
Tips & Chaos Notes
The key is not to overcook the carrots—they should be tender but not mushy. If your glaze gets too thick, just add a splash more water. If it’s too thin, cook uncovered a bit longer. You can prep the carrots and herbs ahead of time, but don’t cook them until you’re ready to serve since they’re best hot. These reheat okay in the microwave, but they won’t have that glossy glaze anymore. If you want to make them vegan, olive oil works great instead of butter.
6. No-Knead Crusty Bread Rolls
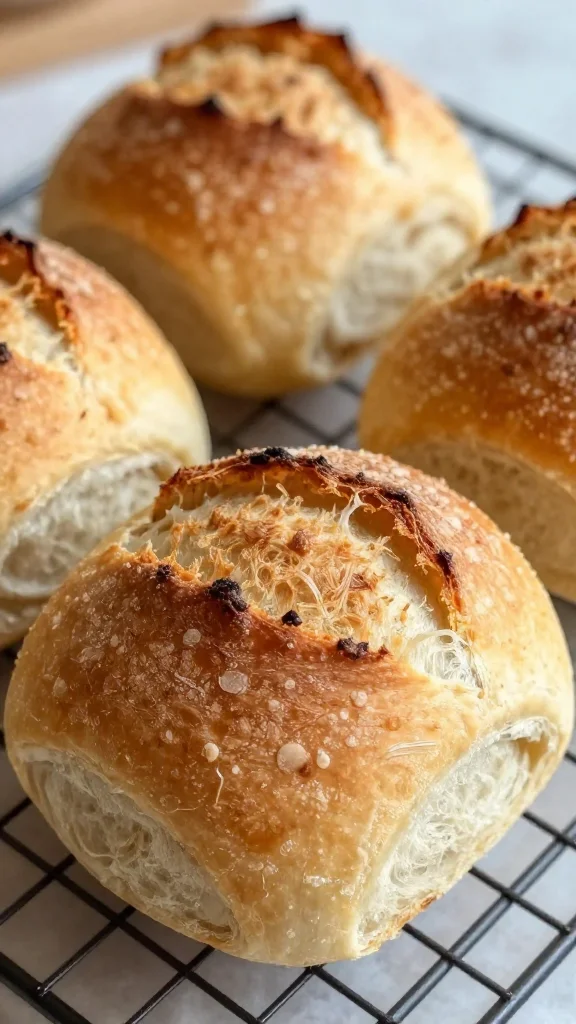
I discovered this recipe during the pandemic when I was obsessed with making bread but too impatient for traditional recipes that required actual kneading skills. These rolls look like they came from a fancy bakery, but they’re literally just flour, water, yeast, and salt mixed together and left to sit overnight. The first batch I made, I was convinced I’d messed something up because the dough looked like a shaggy mess, but they turned out perfect. Now I make them for every dinner party because fresh bread makes everything feel more special.
Why It’s Amazing
These require zero kneading skills and most of the work happens while you sleep. The long fermentation creates incredible flavor and texture, and they bake up with a crispy crust and soft, airy interior. Your guests will think you’re some kind of bread wizard, but it’s actually easier than making cookies.
Ingredients
- 3 cups all-purpose flour — bread flour works too but isn’t necessary
- 1/4 teaspoon active dry yeast — yes, just 1/4 teaspoon, that’s not a typo
- 1 1/4 teaspoons salt — don’t use table salt, kosher or sea salt is better
- 1 5/8 cups warm water — slightly more than 1 1/2 cups
- Cornmeal or flour for dusting — prevents sticking
Instructions
- Mix the flour, yeast, and salt in a large bowl. Add the warm water and stir with a wooden spoon until you have a shaggy, sticky dough. It will look like a mess and nothing like traditional bread dough—this is normal and correct. Don’t add more flour even if you’re tempted.
- Cover the bowl tightly with plastic wrap and let it sit at room temperature for 12-18 hours. The dough will bubble up and smell slightly sour and yeasty. It should roughly double in size and look very wet and sticky when you peek at it.
- Turn the dough out onto a heavily floured surface and fold it over itself a few times—don’t knead, just fold. Divide into 8 portions and shape each into a rough ball. Place on a parchment-lined baking sheet, cover with a kitchen towel, and let rise for 2 hours until puffy.
- Preheat your oven to 450°F with a baking stone or heavy sheet pan inside. Dust the hot surface with cornmeal, carefully transfer the rolls using a spatula, and bake for 15-20 minutes until golden brown and hollow-sounding when tapped. Cool on a wire rack for at least 10 minutes before serving.
Tips & Chaos Notes
The timing is flexible—you can let the initial rise go up to 24 hours if needed. If your kitchen is cold, the dough might take longer to rise. The rolls are best eaten the day they’re baked, but they freeze beautifully and can be reheated in a 350°F oven for 5 minutes. Don’t skip the cornmeal dusting—it prevents sticking and adds texture. These won’t have the perfect round shape of store-bought rolls, but the rustic look is part of their charm. The crust will be crispy when they come out of the oven but will soften slightly as they cool.
7. Strawberry Rhubarb Crisp with Oat Topping
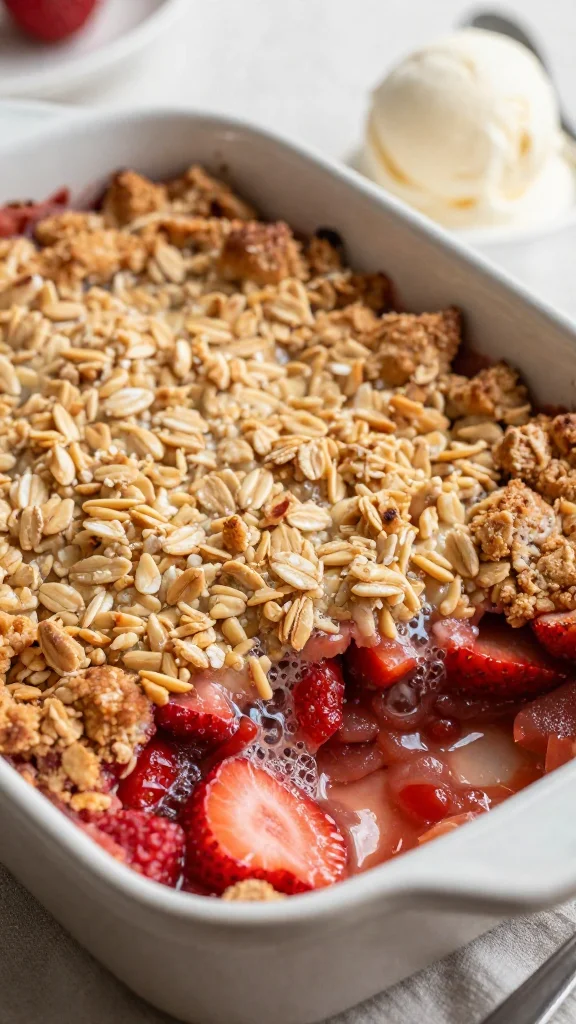
Last spring, my rhubarb plant went absolutely crazy and I had more rhubarb than I knew what to do with. I’d never actually cooked with rhubarb before—I just planted it because it looked pretty—but my mom suggested this crisp recipe. The first time I made it, I was worried the rhubarb would be too tart, but combined with strawberries and that crunchy oat topping, it’s the perfect balance of sweet and tangy. Now it’s my signature spring dessert, and people actually request it specifically.
Why It’s Amazing
This tastes like spring in a bowl, with bright strawberries and tangy rhubarb under a buttery, crunchy topping that’s way easier than making pie crust. It can be assembled hours ahead and baked while you’re eating dinner, so your house smells amazing when it’s time for dessert. Plus, it’s equally good warm with ice cream or cold for breakfast the next day.
Ingredients
- 4 cups strawberries, hulled and sliced — fresh is best, but frozen works if thawed
- 4 cups rhubarb, chopped into 1/2-inch pieces — remove any leaves, they’re toxic
- 3/4 cup granulated sugar — for the fruit mixture
- 2 tablespoons cornstarch — helps thicken the juices
- 1 tablespoon lemon juice — brightens the fruit flavors
- 1 cup old-fashioned oats — not instant, they turn to mush
- 1/2 cup all-purpose flour — binds the topping together
- 1/2 cup brown sugar — packed, adds molasses flavor
- 1/2 cup cold butter, cubed — keep it cold for the best texture
- 1/2 teaspoon cinnamon — adds warmth
- 1/4 teaspoon salt — enhances all the other flavors
- Vanilla ice cream for serving — not optional in my opinion
Instructions
- Preheat your oven to 375°F and butter a 9×13 baking dish. Toss the strawberries and rhubarb with granulated sugar, cornstarch, and lemon juice until well coated. Let this sit for about 10 minutes while you make the topping—the fruit will start releasing juices.
- For the topping, mix the oats, flour, brown sugar, cinnamon, and salt in a bowl. Add the cold butter cubes and use your fingers or a pastry cutter to work it in until the mixture looks like coarse crumbs with some larger butter pieces. Don’t overwork it—you want some texture.
- Spread the fruit mixture evenly in the prepared baking dish. Sprinkle the oat topping over the fruit, covering it completely but don’t pack it down. Bake for 35-40 minutes until the topping is golden brown and the fruit is bubbling around the edges.
- Let it cool for at least 15 minutes before serving—the filling will be molten hot and needs time to thicken up slightly. Serve warm with vanilla ice cream, or let it cool completely and serve at room temperature. Both ways are delicious.
Tips & Chaos Notes
If you can’t find rhubarb, you can use all strawberries or substitute with tart apples or pears. The crisp can be assembled up to 4 hours ahead and refrigerated before baking—just add 5 extra minutes to the bake time. If the topping is browning too quickly, cover loosely with foil. Leftovers keep for 3 days covered at room temperature and are honestly amazing for breakfast with coffee. The fruit won’t look super bright and colorful after baking—rhubarb tends to turn everything a bit brown-pink, but the flavor is incredible.
Look, hosting doesn’t have to be perfect to be memorable. These spring dinner party recipes have saved me from so many kitchen meltdowns, and more importantly, they’ve let me actually sit down and enjoy dinner with my guests instead of frantically checking on fifteen different things in the kitchen. Not every recipe here is glamorous—some are downright simple—but every single one delivers on flavor and lets you be a host instead of a stressed-out cook.
The real secret to stress-free entertaining isn’t complicated techniques or expensive ingredients—it’s choosing recipes that work with your schedule instead of against it. Try the make-ahead options first if you’re nervous, or go with the one-pan meals if you hate doing dishes. Either way, your guests will be impressed, and you’ll actually remember to eat your own food while it’s still warm. Let me know which one you’re trying first—I’m genuinely curious which recipes speak to your chaos level! Happy cooking 🥘✨