

Turkey roll-ups saved my sanity on a chaotic Tuesday night when my kids were hangry, my fridge was nearly empty, and I had exactly 15 minutes to get dinner on the table. These protein-packed, flavor-loaded roll-ups are my go-to when life gets messy—because they’re fast, flexible, and foolproof. Whether you’re meal-prepping for the week or need a last-minute lunchbox hero, turkey roll-ups deliver big flavor with minimal effort. Plus, at just 275 calories and 26g of protein per serving, they’re as nutritious as they are delicious.
Table of Contents :

Why You’ll Love This Recipe
Turkey roll-ups are the ultimate kitchen hack—simple enough for weeknights but impressive enough for guests. Here’s why they’re a staple in my home:
- Ready in 15 minutes: No oven required! Just roll, stack, and serve.
- Endlessly customizable: Swap fillings based on what’s in your fridge or pantry.
- Kid-approved: My picky eater devours these (especially when I add a drizzle of honey mustard).
- Meal-prep friendly: Make a batch on Sunday, and enjoy them all week.
- Low-carb & high-protein: Perfect for fueling busy days without the crash.
- No fancy tools needed: Just a cutting board, knife, and your hands.
Ingredients For Turkey Roll-Ups
You only need a handful of fresh ingredients to make these roll-ups shine. Here’s what I always keep on hand:
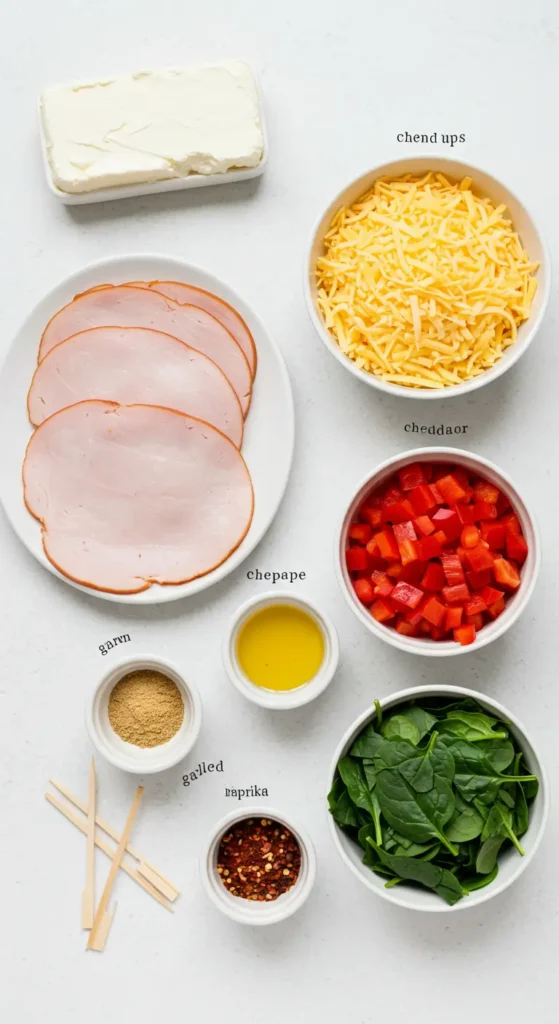
- 8 large slices of turkey breast: Look for nitrate-free, thinly sliced varieties (I love Applegate or Boar’s Head).
- 4 oz cream cheese, softened: Full-fat for richness, or whipped for easier spreading.
- 1/2 cup shredded cheddar cheese: Sharp cheddar adds a tangy punch, but pepper jack works too.
- 1/4 cup finely diced red bell pepper: For crunch and sweetness (sub with sun-dried tomatoes for a deeper flavor).
- 2 tbsp chopped fresh spinach or arugula: Adds a peppery bite and vibrant color.
- 1 tsp garlic powder: A flavor booster that melds everything together.
- 1/4 tsp smoked paprika: Just a pinch makes these taste gourmet.
- Toothpicks: Essential for keeping the rolls snug (remove before serving!).
Step-by-Step Instructions For Turkey Roll-Ups
Don’t let the elegant look fool you—these come together in minutes. Here’s how:

- Prep your filling: In a bowl, mix softened cream cheese, shredded cheddar, bell pepper, spinach, garlic powder, and smoked paprika. The mixture should be thick but spreadable—like a chunky dip.
- Lay out the turkey slices: Place them flat on a cutting board. If they’re small, overlap two slices slightly to create a wider base.
- Spread the filling: Use a butter knife to dollop about 1 tbsp of the cream cheese mixture onto each slice. Spread it evenly, leaving a 1/2-inch border to prevent oozing.
- Roll it tight: Starting at one end, gently roll the turkey slice into a cylinder, tucking in any stray filling. Think “cinnamon roll” technique—firm but not squished.
- Secure with toothpicks: Pierce each roll-up diagonally to hold its shape. If serving later, cover with damp paper towels to prevent drying.
- Chill (optional): For cleaner slices, refrigerate for 10 minutes. Otherwise, dig in immediately!
Timing
- Prep Time: 10 minutes
- Cook Time: 0 minutes (no cooking required!)
- Total Time: 10 minutes
Pro tip: Double the filling and store it in a sealed container for up to 3 days. Spread and roll whenever hunger strikes!
Substitutions & Variations
Turkey roll-ups are a blank canvas. Try these twists:
- Spicy: Add diced jalapeños or a dash of hot sauce to the filling.
- Mediterranean: Swap cheddar for feta, and add kalamata olives + oregano.
- Low-carb: Skip the tortilla—these are naturally gluten-free!
- Vegetarian: Use grilled eggplant slices or extra-firm tofu instead of turkey.
- Sweet & savory: Spread with fig jam and goat cheese for a fancy appetizer.

Mistakes To Avoid
After making these 100+ times, here’s what I’ve learned:
- Don’t overstuff: Too much filling causes messy spills. Less is more!
- Use room-temperature cream cheese: Cold cheese tears the turkey slices.
- Pat turkey dry: Excess moisture makes rolls slippery.
- Slice diagonally: For pretty pinwheels, use a serrated knife at a 45-degree angle.
- Remove toothpicks: Label them with a warning so no one bites into one!
Storage & Reheating
- Fridge: Store in an airtight container for up to 3 days. Layer with parchment paper to prevent sticking.
- Freezer: Wrap individually in foil and freeze for up to 1 month. Thaw overnight in the fridge.
- Reheating: Best served cold, but you can warm them in a 300°F oven for 5 minutes if desired.
What to Serve It With
Turkey roll-ups pair beautifully with:
- Crunchy sides: Celery sticks, cucumber slices, or baked sweet potato fries.
- Dips: Honey mustard, ranch, or a tangy Greek yogurt dill sauce.
- Salads: A simple arugula lemon salad or quinoa pilaf.
- Soup: Tomato basil or a creamy cauliflower soup for a cozy combo.
Final Thoughts
Turkey roll-ups are proof that great food doesn’t have to be complicated. They’ve bailed me out of countless dinner dilemmas, and I hope they do the same for you. Give them a try, tweak the fillings to your taste, and let me know how they turn out—snap a pic and tag me on Instagram! Happy rolling!