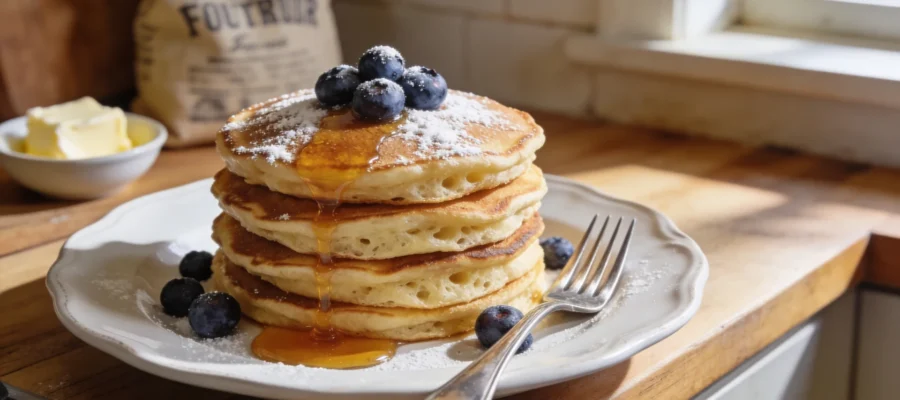
Searching for the perfect American pancake recipe consumed my weekends for months. You know how it goes – you start with the back-of-the-box instructions, try your mom’s version, then fall down a rabbit hole of internet recipes claiming to be “the best.” After countless Saturday mornings of too-dense, too-thin, or oddly-flavored attempts, I finally cracked the code to pancakes that are legitimately better than what you’ll get at IHOP. Light, fluffy, golden-edged with that perfect balance of sweetness – these aren’t just good for homemade pancakes; they’re the pancakes other pancakes aspire to be.
Table of Contents :
Why Most American Pancake Recipes Let You Down
Let’s be honest about pancakes for a minute. Most homemade ones are…fine. Edible but forgettable. And the worst part? Nobody tells you why. I’ve made pancakes that looked like sad deflated frisbees and ones that were essentially flour-flavored chewing gum. The first time I tried making “fluffy” pancakes, I added way too much baking powder because a recipe convinced me “more is better.” My husband took one bite and asked if I was trying to poison him because all he could taste was metallic bitterness.
I once made the rookie mistake of overmixing the batter until it was smooth as cake mix – disaster. Complete disaster. Those pancakes could have replaced hockey pucks. I learned the hard way that pancake batter actually NEEDS those small lumps everyone warns about. And temperature control? Don’t get me started on the time I thought high heat would speed things up. I ended up with pancakes that were simultaneously burnt and raw inside. But after all these failures (and many more I’m too embarrassed to share), I finally figured out what makes the difference between mediocre and magnificent when it comes to an American pancake recipe.
Ingredients for Truly Amazing American Pancakes
The secret to exceptional pancakes isn’t exotic ingredients or complicated techniques – it’s understanding exactly what each ingredient contributes and treating the batter with proper respect. I’ve tested every possible combination, and trust me, you don’t need buttermilk or special equipment for amazing results (though I’ll explain when those extras might be worth it).
Something I’ve learned after making literally hundreds of pancakes: ingredients at room temperature blend more evenly and create a better texture. If you’re in a rush, cold ingredients will work, but taking that extra 20 minutes makes a noticeable difference. Also, measuring matters – especially for the flour. Too much and you’ll make cardboard, too little and you’ll make crepes.
All-Purpose Flour (2 cups)
Regular all-purpose flour gives the best balance of structure and tenderness. I’ve tried cake flour (too delicate), bread flour (too chewy), and whole wheat (too heavy unless mixed with AP). Don’t bother sifting it, but do use the fluff-scoop-level method for measuring. Spooning the flour into your measuring cup rather than scooping directly from the bag prevents packing too much in – the #1 reason for dense pancakes.
Granulated Sugar (¼ cup)
This amount gives just enough sweetness without making the pancakes cloying or causing them to burn. The sugar also helps with browning – those golden edges everyone loves. I’ve tried reducing it to 2 tablespoons and the pancakes weren’t quite right. I’ve also swapped in brown sugar, which adds a subtle caramel note that’s amazing with banana slices folded in.
Baking Powder (2 tablespoons)
Yes, tablespoons – not teaspoons. This seems excessive but it’s not, I promise. This is what gives you those gloriously fluffy pancakes without the need for separating eggs or other fussy steps. Make sure yours is fresh though – baking powder loses potency after about 6 months. The old “fizz test” in water is worth doing if your can has been sitting around.
Salt (½ teaspoon)
Just regular table salt works perfectly here. Don’t skip this or your pancakes will taste flat and one-dimensional. I tried fancy flaky sea salt once – complete waste since it just dissolves anyway. The salt balances the sweetness and brings out the vanilla flavor. It’s that background note you can’t quite identify but would definitely miss.
Whole Milk (1½ cups)
Whole milk gives the richest flavor, but 2% works nearly as well. I’ve used plant-based milks too – oat milk makes surprisingly good pancakes, while almond milk makes them a bit thin. If you want to use buttermilk instead (which does make them extra tender), reduce the baking powder to 1 tablespoon and add ½ teaspoon baking soda.
Eggs (2 large)
Eggs provide structure, richness, and help with rising. They’re non-negotiable. Room temperature eggs incorporate better than cold ones straight from the fridge. If you’re in a hurry, place them in warm (not hot) water for 5 minutes. I’ve tried separating them and beating the whites separately – the improvement wasn’t worth the extra bowl to wash, honestly.
Butter (4 tablespoons, melted and slightly cooled)
Use unsalted butter here. I’ve tried substituting oil, and while it works, butter adds flavor that you just can’t get any other way. Let it cool slightly after melting or you risk cooking the eggs when you add it. Don’t skip the butter in the batter thinking you’ll just use more on top – it makes a huge difference to the flavor and texture of the pancakes themselves.
Vanilla Extract (2 teaspoons)
Real vanilla extract, please. The imitation stuff just doesn’t have the same depth. This might seem like a lot, but vanilla is what gives these pancakes that special something that makes people ask for your recipe. I’ve used vanilla bean paste when feeling fancy – amazing but not essential.
Instructions for Perfect American Pancakes Every Time
Making great pancakes isn’t complicated, but there are a few critical moments where things can go wrong. The entire process takes about 30 minutes if you’re organized, 45 if you’re me and keep stopping to sip coffee between flips. The most important thing to remember is that pancake batter is delicate – treat it gently and you’ll be rewarded with cloud-like texture.
One thing to know before starting: these pancakes won’t look Instagram-perfect on your first try. Mine certainly didn’t. The first pancake is always a sacrifice to the pancake gods – it’ll be either too pale or too dark as you figure out your heat level. By the second or third one, you’ll hit your stride. Oh, and don’t stack the pancakes as they come off the griddle unless you want them to steam and get soggy. Spread them on a wire rack or serve immediately.
STEP 1: Mix the dry ingredients thoroughly.
In a large bowl, whisk together the flour, sugar, baking powder, and salt. Make sure the baking powder is evenly distributed – nobody wants that one bite that tastes like chemicals because of a pocket of baking powder. I learned to really get into the corners of the bowl after serving a pancake with a powdery center to my mother-in-law. Whisk for at least 30 seconds, which feels like forever but makes a difference.
STEP 2: Combine the wet ingredients separately.
In another bowl, whisk the milk, eggs, cooled melted butter, and vanilla until well combined. The butter might solidify a bit if your other ingredients are cold – that’s actually fine and creates little pockets of richness. If your melted butter is still hot, add it to the cold milk first and stir quickly to cool it down before adding eggs. Otherwise, you’ll end up with scrambled eggs in your pancake batter (ask me how I know).
STEP 3: Create the batter with minimal mixing.
Pour the wet ingredients into the dry ingredients and stir with a wooden spoon or rubber spatula – NOT a whisk. This is crucial. Mix just until no large streaks of flour remain but the batter still looks lumpy. It should take about 10-15 folding motions. The batter will look alarmingly lumpy and you’ll be tempted to keep mixing. Don’t. I repeat: DO NOT KEEP MIXING. Tiny flour lumps are your friends. Overmixing develops gluten which makes tough, rubbery pancakes.
STEP 4: Let the batter rest.
Now walk away for 10 minutes. Seriously. Go refill your coffee. Check your phone. This resting time allows the gluten to relax and the baking powder to start working its magic. The first time I tried this, I was skeptical it would make any difference. It does. The batter will get slightly bubbly and noticeably thicker. Those visible bubbles are future air pockets in your fluffy pancakes.
STEP 5: Heat your cooking surface properly.
Heat a large non-stick pan or griddle over medium heat. The right temperature is critical – too hot and the outsides burn before the centers cook, too cool and your pancakes won’t get those beautiful golden edges. My trick: flick a few drops of water onto the surface. If they sizzle and evaporate within a couple of seconds, you’re good to go. If they disappear instantly, it’s too hot. Grease the surface lightly with butter or a neutral oil using a paper towel – you want just enough to prevent sticking.
STEP 6: Pour and cook the first side.
Pour about ¼ cup of batter per pancake onto the hot surface. Don’t overcrowd the pan – leave at least 2 inches between pancakes. They’ll start to form little bubbles on top – this is good! Wait until many bubbles have formed and the edges look set and slightly dry. This takes about 2-3 minutes. Resist the urge to press down on the pancakes with your spatula (I used to do this constantly). You’re just squashing all those lovely air bubbles you’ve worked to create.
STEP 7: Flip with confidence and finish cooking.
When the bubbles on top start to pop and leave little holes that don’t fill back in with batter, it’s time to flip. Get your spatula completely under the pancake and flip decisively – hesitation causes folding and tearing. The second side needs less time, about 1-2 minutes until golden brown. If you’re unsure, it’s okay to peek by lifting an edge. The centers should spring back slightly when touched, not feel squishy. If your pancakes are browning too quickly, lower the heat.
STEP 8: Keep warm properly or serve immediately.
Transfer finished pancakes to a wire rack set over a baking sheet in a 200°F oven if you’re making a big batch. Don’t stack them on a plate under foil – they’ll steam and get soggy. I made this mistake at a brunch once and ended up with a sad stack of damp pancakes that stuck together like wet napkins. Not my proudest hosting moment. If serving immediately, plate them individually or in small stacks of 2-3 with butter right away.
Tips & Variations for Your American Pancake Recipe
Storage: These pancakes actually freeze beautifully. Let them cool completely, then freeze in a single layer on a baking sheet before transferring to a zip-top bag. Reheat in the toaster for a quick breakfast. The texture won’t be quite as ethereal as fresh, but they’re still miles better than frozen store-bought ones.
For blueberry pancakes, fold 1 cup of fresh (not frozen) blueberries into the batter after resting. Or sprinkle a few berries directly onto each pancake right after pouring the batter – this prevents blue streaking throughout. For chocolate chip, use mini chips (about ⅔ cup) so they distribute more evenly. Banana pancakes are amazing if you fold in ¾ cup of diced ripe banana – don’t use slices as they make flipping difficult.
If your pancakes aren’t as tall and fluffy as the ones in professional food photos, that’s completely normal. Food stylists use special techniques and super-thick batters for those impossible stacks. Real pancakes from this recipe will be about ½-inch thick, which is perfect for absorbing butter and maple syrup while still having a lovely texture.
Final Thoughts on Making the Perfect American Pancake
Look, I’m not saying these are the absolute best pancakes in the universe – somewhere there’s probably a diner cook with 50 years of experience who could show us all up. But these pancakes consistently get “these are better than restaurant ones” comments at my table, and my teenager has stopped asking to go out for breakfast on weekends. That’s about as high praise as it gets in my house.
If you try this American pancake recipe, let me know how it goes. I actually read the comments and love hearing about your successes or how you adapted it to make it your own. And don’t worry if your first batch isn’t perfect – pancakes are forgiving that way. Each time you make them, you’ll get better at reading the signs of when to flip and how to get that perfect golden color. Happy pancaking!
Classic American Pancake Recipe (Fluffy, Golden & Better Than IHOP)
This classic American pancake recipe results in light, fluffy pancakes with a perfect balance of sweetness, making them better than those served at restaurants.