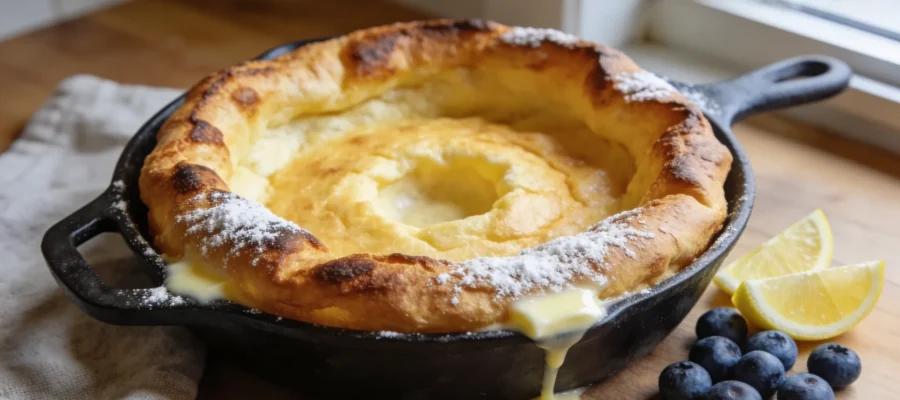
The dutch baby pancake recipe I’m sharing today has literally changed my weekend breakfast game forever. This gloriously puffy oven pancake with its dramatically crisp edges and custardy center falls somewhere between a pancake, popover, and crepe—but requires none of the flipping or babysitting. The first time I watched one rise in the oven like some magical breakfast soufflé, I actually called my husband over to witness the spectacle through the oven door.
Table of Contents :
Why I’m Obsessed with Dutch Baby Pancakes
Look, I’m going to be honest—I used to be terrible at making regular pancakes. Like, embarrassingly bad. My flipping technique was a disaster, I could never get the temperature right, and somehow I’d end up with pancakes that were simultaneously burnt on the outside and gooey in the middle. Not exactly the relaxing weekend breakfast experience I was going for.
Then about five years ago, I was flipping through an old cookbook at my mother-in-law’s house when I found a dog-eared page with a recipe for something called a “Dutch baby.” The photograph showed this impressive puffed golden pancake with dramatically raised edges. The best part? You just poured the batter into a hot pan and stuck it in the oven. No flipping required. I was skeptical but desperate.
My first attempt was… well, let’s just say the smoke detector got more action than my taste buds. I’d used a pan that was too small, and the batter bubbled over like a science experiment gone wrong. But the parts that didn’t overflow? Absolutely delicious. I’ve spent years tweaking this recipe since then, and now it’s my most-requested weekend breakfast. My kids actually cheer when they see me pulling out the blender on Saturday mornings.
Ingredients dutch baby pancake recipe
What I love about a dutch baby is how simple the ingredients are. You probably have everything you need in your pantry right now. And unlike regular pancakes that need special ingredients like buttermilk or baking powder to get their lift, the dutch baby relies on eggs and heat for its dramatic rise.
One thing I’ve learned: temperature matters for almost every ingredient here. Cold eggs straight from the fridge won’t incorporate as much air, room temperature milk blends better, and that screaming hot pan and oven are non-negotiable for getting that signature puff.
Eggs (3 large)
The eggs are absolutely the star of the show here. They provide all the structure and lift, so use large ones—not medium, not jumbo. I’ve found that taking them out of the fridge about 30 minutes before mixing gives the best rise. If you’re in a hurry, you can put them in a bowl of warm (not hot) water for 5 minutes.
All-purpose flour (½ cup)
Just regular all-purpose flour works perfectly here. I’ve tried fancy bread flour and cake flour, but honestly couldn’t tell much difference. If you want to make this gluten-free, a 1:1 gluten-free baking blend works surprisingly well—it won’t rise quite as dramatically, but it’s still delicious.
Milk (½ cup)
Whole milk gives the richest flavor, but I’ve made this with 2%, oat milk, and even almond milk in a pinch. The higher the fat content, the more custardy the center will be. Whatever you do, don’t use fat-free milk—I tried this once and ended up with something closer to edible cardboard than a pancake.
Vanilla extract (1 teaspoon)
This is technically optional, but it adds that warm, aromatic quality that makes this feel like a special breakfast rather than just eggs and flour. I splash in a little extra when no one’s looking. If you have vanilla bean paste, even better—those little flecks look gorgeous in the finished pancake.
Salt (¼ teaspoon)
Just regular table salt is fine. It balances the sweetness and makes the other flavors pop. Don’t skip this—I forgot it once and the whole thing tasted oddly flat, even with maple syrup on top.
Unsalted butter (3 tablespoons)
The butter serves two critical purposes: it coats the hot pan to prevent sticking, and it gives the edges that gorgeous golden-brown color and crispy texture. Salted butter works too, just reduce the additional salt a bit. I’ve tried using clarified butter (ghee) which works amazingly well since it doesn’t burn at high heat.
Fresh lemon (for serving)
This is traditional and cuts through the richness beautifully. Just a quick squeeze over each portion brightens everything up. I keep a cut lemon on standby whenever I make this. If you’re out of lemons, a little orange zest works too.
Powdered sugar (for serving)
The classic topping is just a light dusting of powdered sugar. It melts slightly into the hot pancake creating these little pockets of sweetness. I use a small fine-mesh strainer to get that picture-perfect dusting. Pro tip: don’t try to substitute granulated sugar—I tried that when I ran out once and it was like eating sweet sand.
Instructions dutch baby pancake recipe
The process for making a dutch baby is deceptively simple, but there are a few crucial moments where things can go sideways. The first time might feel a bit intimidating with that screaming hot pan, but I promise it gets easier. The whole thing takes about 25 minutes from “I want pancakes” to “pass the syrup, please.”
One thing I’ve learned from many, many attempts: the blender isn’t just a convenience; it actually creates a smoother batter with fewer lumps than hand-mixing. And don’t open that oven door while it’s baking unless you want a sad, deflated pancake! The dramatic collapse after it comes out is normal, though—don’t panic when your glorious puff starts to sink in the middle.
STEP 1: Preheat your oven and pan.
Place a 10-inch cast iron skillet (or oven-safe pan) in your oven and preheat to 425°F. This needs to be HOT hot—like, “been preheating for at least 20 minutes” hot. I learned the hard way that a lukewarm pan leads to a lukewarm rise. If your oven has hot spots like mine does, rotate the pan halfway through preheating. The pan should be screaming hot when you add the batter.
STEP 2: Blend the batter.
While the pan heats, add the eggs to a blender and blend on medium-high speed for about 1 minute until frothy and pale yellow. This aerates the eggs which is crucial for the rise. Then add the flour, milk, vanilla, and salt. Blend for another 30-45 seconds until completely smooth. You shouldn’t see any flour lumps—I once rushed this step and ended up with what looked like pancake acne. Let the batter rest while the oven finishes preheating.
STEP 3: Prepare the hot pan.
CAREFULLY remove the screaming hot pan from the oven using serious oven mitts—not those thin decorative ones. Trust me on this, I have the burn scar to prove it. Add the butter to the hot pan and swirl to coat the bottom and sides as it melts. It should sizzle aggressively and might even brown slightly, which is fine. Just don’t let it burn or smoke. This whole process should take less than 30 seconds.
STEP 4: Add the batter.
Give your batter one final, quick pulse in the blender, then immediately pour it into the hot buttered pan. Work quickly but carefully here—I’ve splashed myself with hot butter more than once when pouring too aggressively. The batter should make a satisfying sizzle sound when it hits the hot butter. If it doesn’t sizzle, your pan wasn’t hot enough.
STEP 5: Bake until dramatically puffed.
Immediately place the pan back in the oven and bake for 18-22 minutes. DO NOT open the oven during the first 15 minutes or your pancake will deflate like a sad balloon. You’ll know it’s done when the edges are dramatically puffed up several inches high and deeply golden brown, while the center is set but still custardy. Mine usually takes exactly 20 minutes, but every oven is different.
STEP 6: Serve immediately.
Remove the pan from the oven—again, serious oven mitts required—and watch the magic happen. The dutch baby will begin to deflate almost immediately, creating a perfect crater for your toppings. Squeeze fresh lemon juice over the top and dust with powdered sugar while it’s still hot. Cut into wedges and serve right away. The contrast between the crispy golden edges and the tender, slightly custardy center is what makes this so special.
Tips & Variations dutch baby pancake recipe
If you’re not serving this immediately after baking, know that the texture changes quickly. The crisp edges will soften within about 10 minutes. It’s still delicious, just different. I sometimes make a savory version by skipping the vanilla and topping with sautéed mushrooms, herbs and a sprinkle of parmesan instead of sugar. For fruit lovers, you can add thinly sliced apples or pears to the pan before adding the batter—just make sure they’re very thin or they’ll prevent the proper rise.
If your dutch baby doesn’t puff as dramatically as those perfect Instagram photos, don’t worry. Mine sometimes rises unevenly or more on one side—it depends on how level your oven is and how evenly it heats. It’ll still taste amazing, and honestly, those imperfections are proof you made it at home rather than in a food stylist’s kitchen.
Final Thoughts dutch baby pancake recipe
This dutch baby pancake recipe has genuinely saved my weekend breakfast reputation. It looks impressive enough for company but is actually easier than flipping a stack of regular pancakes. The first time you make one, you might have a moment of panic when you see how high it’s puffing in the oven—I definitely did. But that dramatic rise and fall is exactly what makes it so fun to make.
If you try this recipe, shoot me a comment about how it turned out. I especially want to hear about your topping combinations—my kids have created some wild ones over the years, and I’m always looking for new ideas to steal. Seriously, there’s something weirdly satisfying about watching someone’s face the first time they see a dutch baby rise in the oven.
Dutch Baby Pancake
This gloriously puffy oven pancake features crisp edges and a custardy center, offering a delightful and easy breakfast option without the need for flipping.