
Okay, so I’ve been hosting Christmas parties for like five years now, and let me tell you—I’ve learned the hard way that nobody actually wants to sit down for a formal dinner when there’s a party happening. People want to grab something delicious, keep mingling, and not worry about balancing a plate while holding wine. That’s where easy Christmas finger foods come in clutch.
Last year I made the mistake of trying to do a whole elaborate meal situation, and half the food got cold while people were still arriving. This year? I’m going full finger food mode, and honestly, it’s so much better. Less stress for me, more fun for everyone, and people can actually eat what they want when they want it.
Table of Contents :
Here are my go-to easy Christmas finger foods that actually get eaten (unlike that weird cheese ball I attempted in 2022 that looked like a sad snowman).
1. Cranberry Brie Bites That Disappear in Minutes

I’m obsessed with these. Like, genuinely obsessed. I made them for Thanksgiving as a test run and my brother-in-law ate seven of them before dinner even started.
Why they’re amazing: You get that fancy appetizer vibe without actually doing anything fancy. The combo of melty brie, sweet cranberry sauce, and flaky pastry is chef’s kiss. Plus they look impressive, which means people think you tried way harder than you did.
Ingredients:
- 1 sheet puff pastry (the frozen stuff, thawed—don’t try making it from scratch, we’re not on Bake Off)
- 8 oz brie cheese (cut into small cubes, and yes, you can leave the rind on)
- 1/2 cup cranberry sauce (homemade or canned, literally doesn’t matter)
- Fresh rosemary for garnish (optional but makes you look fancy)
- 1 egg, beaten (for that golden look)
Instructions:
- Preheat your oven to 375°F. Line a muffin tin with cooking spray or those little paper cups if you’re fancy.
- Roll out the puff pastry and cut it into squares—about 12 of them. Press each square into a muffin cup. Don’t stress if they’re not perfect. Mine never are.
- Drop a cube of brie into each cup. Then add a small spoonful of cranberry sauce on top.
- Brush the edges with beaten egg so they get all golden and pretty.
- Bake for 15-18 minutes until the pastry is puffy and golden. Your kitchen will smell incredible.
- Let them cool for like 2 minutes (they’re MOLTEN inside at first), then top with a tiny sprig of rosemary if you’re feeling it.
Real talk: The cranberry sauce will bubble over a bit and that’s totally fine. Actually makes them look more rustic and homemade. Also, these are best served warm, so I usually make them right before people arrive.
2. Bacon-Wrapped Dates That Cause Actual Fights
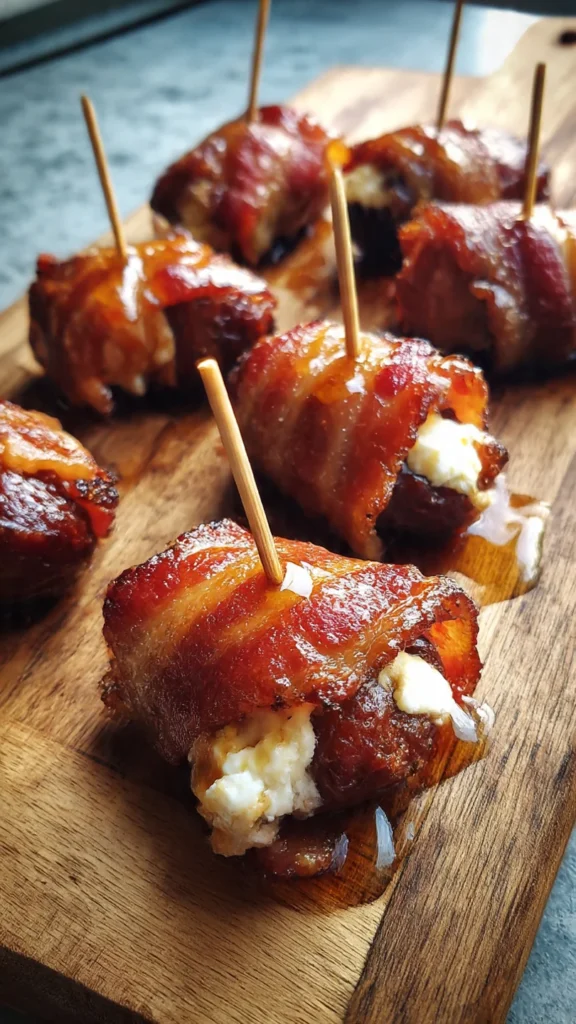
I’m not even exaggerating. Last Christmas, my cousin and my uncle literally argued over the last one. It was hilarious and also slightly concerning.
Why they’re amazing: Sweet, salty, savory all in one bite. The bacon gets crispy, the dates get caramelized, and if you add the goat cheese (which you should), it’s game over.
Ingredients:
- 24 Medjool dates (pitted—don’t forget this step unless you want someone to break a tooth)
- 8 oz goat cheese (room temperature, easier to work with)
- 12 slices bacon (cut in half)
- Toothpicks (the fancy ones if you want to feel like you have your life together)
- Honey for drizzling (optional but YES)
Instructions:
- Preheat oven to 400°F. Line a baking sheet with foil because bacon grease is a pain to clean.
- Make a small slit in each date and stuff with about a teaspoon of goat cheese. I use my finger. A spoon works too but seems like extra dishes.
- Wrap each stuffed date with a half slice of bacon and secure with a toothpick.
- Place them on the baking sheet seam-side down so they don’t unravel (learned this the hard way).
- Bake for 20-25 minutes, flipping halfway through. The bacon should be crispy and everything should look caramelized.
- Drizzle with honey while they’re still warm if you’re into that sweet-savory life.
Chaos notes: Sometimes the bacon doesn’t get crispy enough. If that happens, just throw them under the broiler for a minute or two. Watch them though—broilers are aggressive. Also, you can make these ahead and reheat them. They’re still good, just not AS good as fresh.
3. Spinach Artichoke Phyllo Cups Because Dip in Cup Form

Spinach artichoke dip is basically a Christmas party requirement at this point. But making it into little phyllo cups means people don’t have to commit to a whole plate of dip.
Why they’re amazing: All the flavor of spinach artichoke dip without needing a separate bowl and chips. Plus they’re portion-controlled, which means I can eat six and tell myself it’s fine.
Ingredients:
- 30 mini phyllo cups (store-bought, in the freezer section)
- 1 cup frozen spinach, thawed and SQUEEZED DRY (this is important, nobody wants soggy cups)
- 1 can (14 oz) artichoke hearts, drained and chopped
- 8 oz cream cheese, softened
- 1/2 cup sour cream
- 1 cup shredded mozzarella
- 1/2 cup grated parmesan
- 2 cloves garlic, minced (or more, I always use more)
- Salt and pepper to taste
Instructions:
- Preheat oven to 350°F. Arrange phyllo cups on a baking sheet.
- Mix everything together in a bowl. Seriously, just dump it all in there and stir. The cream cheese is easier to mix if it’s room temp.
- Spoon the mixture into each phyllo cup. Fill them up good—they’ll shrink a bit as they bake.
- Bake for 12-15 minutes until the tops are bubbly and starting to brown.
- Let cool for a few minutes before serving because molten cheese is not a friend to your mouth.
Tips: You can make the filling the night before and just fill the cups right before baking. Also, if you have leftover filling (which I always do), just bake it in a small dish and eat it with crackers later. You’re welcome.
4. Caprese Skewers That Look Like You Tried
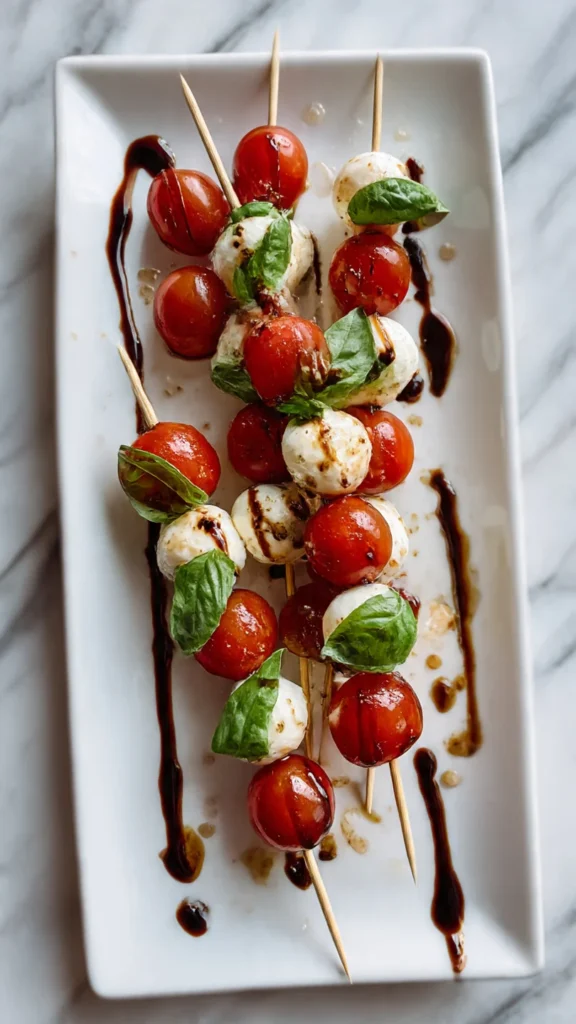
These are so simple it feels like cheating, but they look festive and people love them.
Why they’re amazing: Fresh, light, and they balance out all the heavy, cheesy stuff. Plus they’re red, white, and green—very Christmas-y without being themed in a tacky way.
Ingredients:
- Cherry tomatoes (get the small ones)
- Fresh mozzarella balls (the little ones called bocconcini or ciliegine)
- Fresh basil leaves (don’t use dried, it’s weird)
- Balsamic glaze (not regular balsamic—get the thick syrupy stuff)
- Small skewers or toothpicks
- Salt and pepper
- Olive oil
Instructions:
- Thread one tomato, one basil leaf (folded), and one mozzarella ball onto each skewer.
- Arrange them on a platter. This is where you can get creative with the layout—I usually do a circular pattern or just random clusters.
- Drizzle with balsamic glaze and a little olive oil right before serving.
- Sprinkle with salt and pepper.
That’s it. That’s the whole recipe.
Real talk: Don’t assemble these too far in advance or they get soggy. Like, an hour before the party max. Also, I’ve tried those pre-made caprese skewers from the store and they’re just not as good. Making them yourself takes like 10 minutes and tastes way better.
5. Mini Meatballs in Cranberry BBQ Sauce
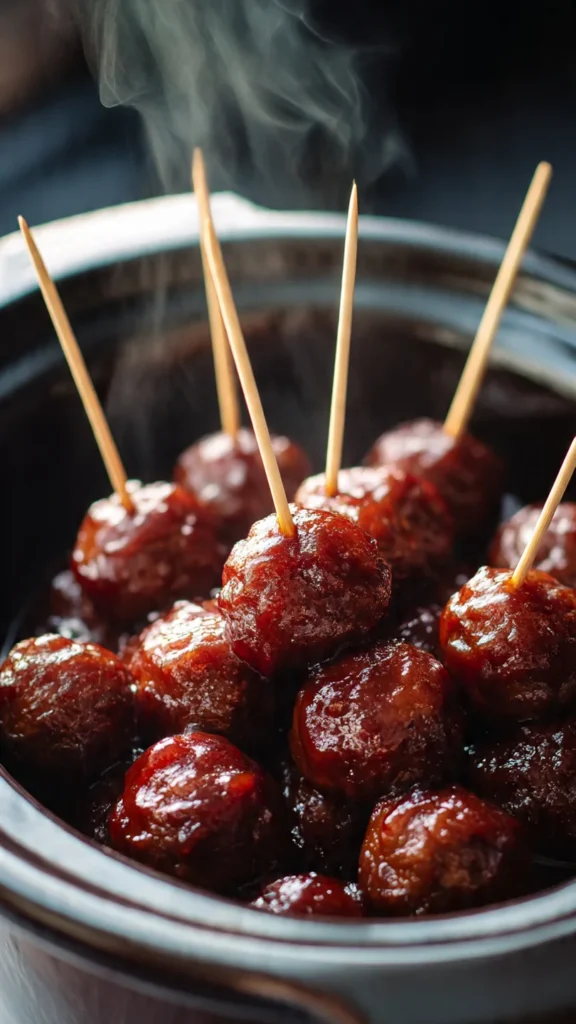
These are a crowd favorite with the dads at my parties. Don’t ask me why, but every dad gravitates toward these.
Why they’re amazing: Sweet, tangy, and the cranberry makes them feel Christmas-y. Plus you can make them in a slow cooker and just leave them there all party long.
Ingredients:
- 2 lbs frozen meatballs (Italian style or regular, doesn’t matter)
- 1 can (14 oz) jellied cranberry sauce
- 1 cup BBQ sauce (use your favorite brand)
- 2 tbsp brown sugar (optional but adds depth)
- 1 tbsp apple cider vinegar (cuts the sweetness a bit)
Instructions:
- Throw the frozen meatballs in your slow cooker. Don’t thaw them first.
- In a bowl, mix the cranberry sauce, BBQ sauce, brown sugar, and vinegar. I usually microwave it for 30 seconds to make mixing easier.
- Pour sauce over meatballs and stir to coat.
- Cook on low for 3-4 hours or high for 2 hours. Stir occasionally if you think about it.
- Serve straight from the slow cooker with toothpicks nearby.
Chaos notes: The sauce thickens as it cooks, which is good. If it gets TOO thick, just add a splash of water. Also, I’ve tried making homemade meatballs for this and honestly? Not worth it. The frozen ones are perfectly fine.
6. Puff Pastry Cheese Straws That Look Professional

These look like you went to culinary school. They didn’t even take 20 minutes.
Why they’re amazing: Crispy, cheesy, and you can make them ahead. Also, they’re pretty enough to photograph, which apparently matters now.
Ingredients:
- 1 sheet puff pastry, thawed
- 1 egg, beaten
- 1 cup shredded sharp cheddar
- 1/2 cup grated parmesan
- 1 tsp garlic powder
- 1 tsp dried Italian herbs
- Paprika for sprinkling
Instructions:
- Preheat oven to 400°F. Line a baking sheet with parchment paper.
- Roll out the puff pastry into a rectangle. Brush with beaten egg.
- Mix the cheeses, garlic powder, and herbs together. Sprinkle ALL OVER the pastry.
- Cut the pastry into strips about 1/2 inch wide. Twist each strip a few times and place on the baking sheet.
- Sprinkle with a little paprika for color.
- Bake for 12-15 minutes until golden and crispy.
Tips: These are best the day you make them, but you can store them in an airtight container for a day or two. Just re-crisp them in a 350°F oven for 5 minutes if needed. Also, if you want to get fancy, you can use different cheese combos—gruyere and parmesan is really good.
7. Swedish Meatballs That Are Better Than IKEA

I know everyone thinks IKEA has the market cornered on Swedish meatballs, but trust me on this one.
Why they’re amazing: That creamy, slightly sweet sauce is addictive. And serving them as finger food with toothpicks makes them perfect for parties.
Ingredients:
- 2 lbs frozen meatballs (sensing a theme here with the frozen meatballs)
- 2 tbsp butter
- 2 tbsp flour
- 2 cups beef broth
- 1 cup heavy cream
- 2 tbsp Worcestershire sauce
- 1 tsp Dijon mustard
- Salt and pepper
- Fresh parsley for garnish
Instructions:
- Cook the meatballs according to package directions. I usually bake them.
- Meanwhile, make the sauce. Melt butter in a large skillet, add flour, and cook for 1 minute while stirring. This is a roux, which sounds fancy but just means you’re making the base for the sauce.
- Slowly whisk in the beef broth, then the cream. Keep whisking so it doesn’t get lumpy.
- Add Worcestershire sauce, mustard, salt, and pepper. Let it simmer and thicken for about 5 minutes.
- Add the cooked meatballs to the sauce and let them hang out for a few minutes to soak up the flavor.
- Transfer to a serving dish, sprinkle with parsley, and put out toothpicks.
Real talk: The sauce will thicken as it sits, so if you’re making these ahead, you might need to add a splash of broth or cream when you reheat them. Also, don’t skip the Dijon—it adds a little something that makes people ask “what’s in this?”
8. Buffalo Chicken Dip Cups

This is that buffalo chicken dip everyone loves, but in wonton wrapper form so it’s actually portable.
Why they’re amazing: Spicy, creamy, and you can pick them up without getting your hands messy. Plus they’re a little less heavy than a bowl of dip.
Ingredients:
- 24 wonton wrappers
- 2 cups cooked chicken, shredded (rotisserie chicken is your friend)
- 8 oz cream cheese, softened
- 1/2 cup ranch dressing
- 1/2 cup buffalo sauce (Frank’s is the classic)
- 1 cup shredded cheddar
- Green onions for topping
- Blue cheese crumbles if you’re into that
Instructions:
- Preheat oven to 375°F. Spray a muffin tin with cooking spray and press one wonton wrapper into each cup.
- Bake the wrappers for 5 minutes until they start to get crispy. Take them out.
- Mix the chicken, cream cheese, ranch, buffalo sauce, and half the cheddar in a bowl.
- Spoon mixture into each wonton cup. Top with remaining cheddar.
- Bake for another 10-12 minutes until everything is hot and bubbly.
- Top with green onions and blue cheese if using.
Chaos notes: The wonton wrappers can burn easily, so watch them. If the edges start getting too dark, you can cover the tin with foil. Also, adjust the buffalo sauce to your spice preference. I like it spicy so I always add extra.
9. Prosciutto-Wrapped Asparagus Because Vegetables
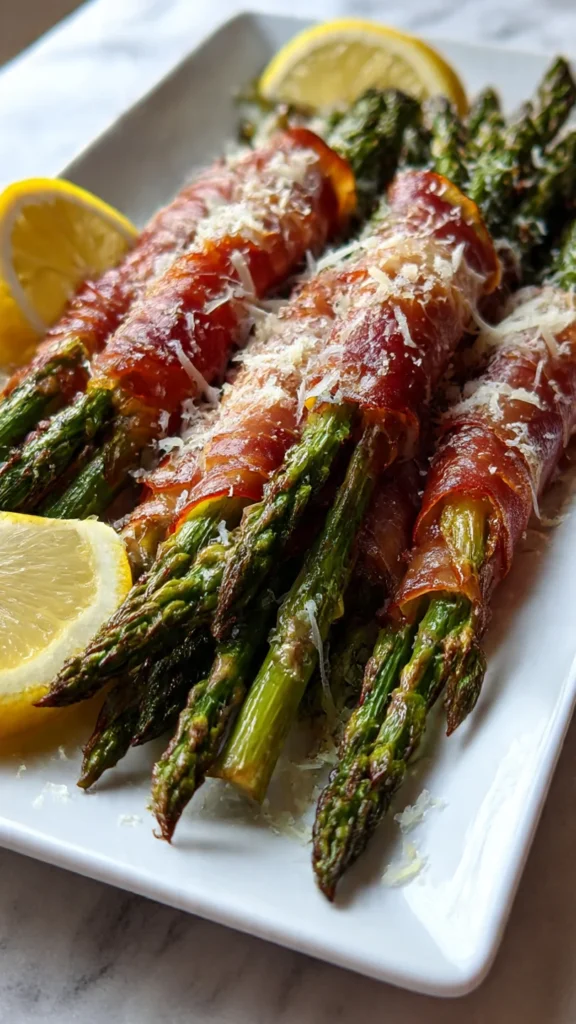
Okay, I know this sounds like “health food at a party,” but hear me out. These are actually really good and they make you feel slightly less guilty about eating 15 bacon-wrapped dates.
Why they’re amazing: The prosciutto gets crispy and salty, the asparagus stays tender, and there’s something about the combination that just works.
Ingredients:
- 24 asparagus spears (medium thickness, not the super thin ones)
- 12 slices prosciutto (cut in half lengthwise)
- 2 tbsp olive oil
- Black pepper
- Lemon wedges for serving
- Parmesan for shaving over top if you want
Instructions:
- Preheat oven to 400°F. Line a baking sheet with parchment.
- Trim the woody ends off the asparagus. Just bend them until they snap—they break naturally at the right spot.
- Wrap each asparagus spear with a half slice of prosciutto. It’ll stick to itself.
- Arrange on the baking sheet, drizzle with olive oil, and crack some black pepper over them.
- Roast for 12-15 minutes until the prosciutto is crispy and the asparagus is tender.
- Squeeze fresh lemon over them before serving. Trust me on the lemon.
Tips: You can make these a few hours ahead and serve at room temp, or reheat them for a few minutes before serving. They’re good either way. Also, don’t use thick asparagus—it takes too long to cook and the prosciutto burns.
10. Pigs in a Blanket But Make It Christmas

Yes, I know pigs in a blanket are basic. But they’re basic because they WORK. Plus we’re elevating them a bit here.
Why they’re amazing: Everyone secretly loves these. Even people who claim they don’t will eat three when no one’s looking. I’ve seen it happen.
Ingredients:
- 1 package mini smoked sausages or cocktail weiners
- 2 cans crescent roll dough
- Everything bagel seasoning (this is the upgrade)
- Mustard and ketchup for dipping
Instructions:
- Preheat oven to 375°F. Line a baking sheet with parchment.
- Roll out the crescent dough and cut each triangle into 3 smaller triangles.
- Wrap each little sausage in dough, starting at the wide end. Don’t overlap too much or they get doughy.
- Place seam-side down on the baking sheet. Sprinkle generously with everything bagel seasoning.
- Bake for 12-15 minutes until golden brown.
- Serve with mustard and ketchup for dipping.
Real talk: The everything bagel seasoning is a game-changer. Makes these feel less like kids’ party food and more like something you’d actually serve adults. You can also brush them with melted butter before adding the seasoning for extra flavor.
11. Stuffed Mushrooms That Even Mushroom Haters Eat

I used to hate mushrooms. Then I tried stuffed mushrooms. Now I get it.
Why they’re amazing: The mushrooms basically become little edible bowls for cheese and sausage. What’s not to love?
Ingredients:
- 24 large button mushrooms
- 8 oz Italian sausage (removed from casing)
- 8 oz cream cheese, softened
- 1/2 cup breadcrumbs (panko is best)
- 1/2 cup grated parmesan
- 2 cloves garlic, minced
- Fresh parsley, chopped
- Salt and pepper
Instructions:
- Preheat oven to 375°F. Clean the mushrooms and remove the stems. Don’t throw the stems away—chop them up.
- In a skillet, cook the sausage until browned. Add the chopped mushroom stems and garlic. Cook for a few more minutes.
- Remove from heat and mix in cream cheese, breadcrumbs, half the parmesan, parsley, salt, and pepper.
- Stuff each mushroom cap with the mixture. Really pack it in there.
- Place on a baking sheet, sprinkle with remaining parmesan, and bake for 20 minutes until the mushrooms are tender and the tops are golden.
Chaos notes: These can get a little watery because mushrooms release moisture when they cook. Just drain any excess liquid from the pan halfway through baking. Also, you can use turkey sausage instead of pork if you want something lighter.
12. Chocolate-Covered Pretzel Rods Dipped in Holiday Chaos

Okay, this is technically dessert, but it counts as finger food and people need something sweet at parties.
Why they’re amazing: Sweet, salty, and you can make them look super festive with different toppings. Plus kids can help make these, which either makes things easier or creates total chaos. Usually both.
Ingredients:
- 1 bag pretzel rods
- 12 oz white chocolate chips
- 12 oz dark or milk chocolate chips
- Crushed candy canes
- Holiday sprinkles
- Crushed nuts (optional)
- Sea salt flakes
Instructions:
- Line a baking sheet with wax paper.
- Melt the chocolates separately. I use the microwave in 30-second intervals, stirring between each.
- Dip each pretzel rod about 2/3 of the way into chocolate. Let excess drip off.
- Immediately roll in or sprinkle with your chosen toppings before the chocolate sets.
- Place on the wax paper to harden. You can stick them in the fridge to speed this up.
- Once set, you can drizzle the opposite chocolate over them for a fancy look.
Tips: Work quickly with the toppings because chocolate sets fast. Also, you can package these in cellophane bags with ribbons and give them as gifts if you’re feeling extra. They last for weeks in an airtight container, which means you can make them way ahead of time.
So there you have it—12 easy Christmas finger foods that actually get eaten instead of sitting there looking sad on a platter. Not every single one is groundbreaking or revolutionary, but they’re all reliable crowd-pleasers that won’t stress you out.
The best part? You can make most of these ahead, which means you’re not stuck in the kitchen while everyone else is having fun. And honestly, that’s the whole point of finger foods—less work for the host, more fun for everyone.
Let me know which one you’re trying first. I’m genuinely curious if anyone else is as obsessed with those cranberry brie bites as I am.
Happy holidays! (and may your oven not burn anything this year)