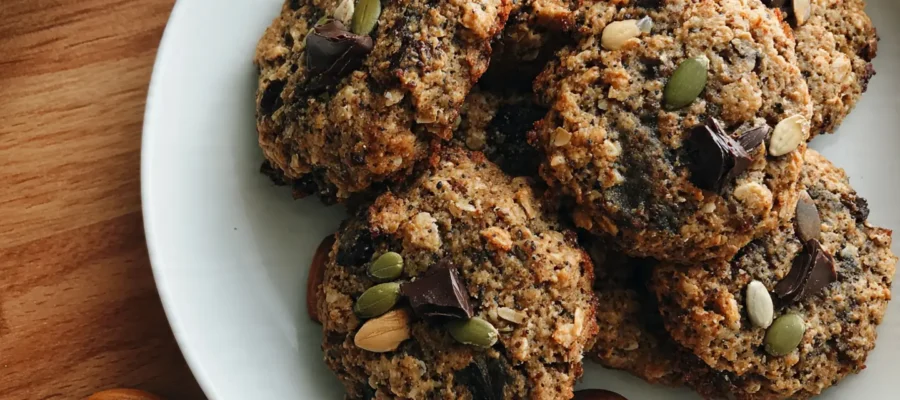
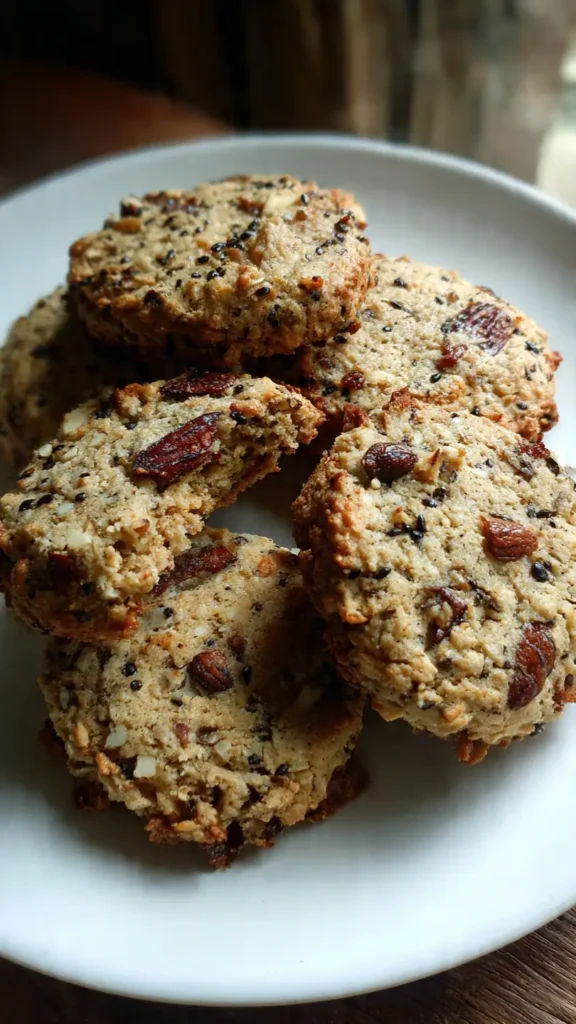
Healthy nut & seed energy cookies are basically my go-to when I need something that doesn’t make me feel like garbage after eating six of them. Which, let’s be honest, happens more often than I’d like to admit.
Look, I’m gonna be real with you, I didn’t wake up one day knowing how to make these. The first batch? Absolute hockey pucks. My husband literally tried to use one as a coaster. True story. But after maybe four or five disasters (I lost count), I figured out what actually works.
Table of Contents :
Why I’m Obsessed With These Healthy Nut & Seed Energy Cookies
Here’s the thing… I needed something I could grab at 3 PM when my energy crashes and I’m about to murder someone. Store-bought energy bars are either full of weird ingredients I can’t pronounce or they taste like sweetened cardboard. And don’t even get me started on those “healthy” cookies that are basically just dates and sadness.
These healthy nut and seed energy cookies are different. They’ve got actual flavor. My neighbor Sarah—who’s diabetic and super picky about what she eats—asked for the recipe after trying one. Said they didn’t spike her blood sugar like other snacks. (Note: I’m not a doctor, so if you’re looking for healthy nut & seed energy cookies for diabetics, definitely check with your healthcare person first.)
I think… no, I know these work because they’re packed with good fats and protein. None of that sugar crash nonsense.
What Makes These Actually Good
So basically, most healthy nut & seed energy cookies recipes you find online are either too complicated or they require ingredients from some fancy health food store three towns over. Mine? You can get everything at a regular grocery store. Well, except maybe the chia seeds, but even Walmart has those now.
The secret is—oh wait, I forgot to mention—you DON’T need a food processor for this. I don’t even own one. Just a bowl and a spoon. Maybe a fork if you’re feeling fancy.
The Ingredients (aka My Shopping List from Last Tuesday)
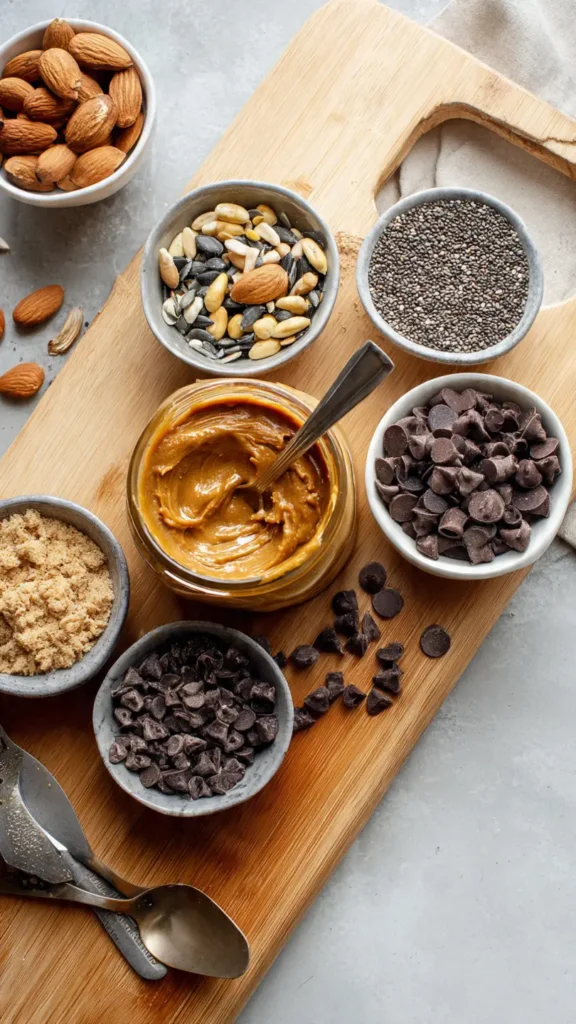
- 1 cup mixed nuts (I use almonds and walnuts because that’s what I had)
- 1/2 cup sunflower seeds (pumpkin seeds work too, whatever)
- 1/4 cup chia seeds (these make it stick together, trust me on this one)
- 1/4 cup flax seeds (or flaxseed meal, same thing basically)
- 1/2 cup almond butter (the natural kind, not the super smooth Jif stuff)
- 1/3 cup honey (or maple syrup if you’re vegan or whatever)
- 1 teaspoon vanilla extract (the real stuff, not imitation)
- 1/2 teaspoon cinnamon
- Pinch of salt (sea salt if you’re fancy, regular salt if you’re normal like me)
- Optional: 1/4 cup dark chocolate chips (because life is short)
Quick note on the almond butter—get the kind that’s just almonds. The other day I accidentally bought the one with added sugar and palm oil and it made everything too sweet. Learned that the hard way.
And about those nuts? You can honestly use whatever. Last week I used cashews because they were on sale. Worked fine. My sister swears by pecans. The world is your oyster or whatever.
How to Actually Make These (Without Screwing Up)
Step 1: Preheat your oven to 325°F. Or don’t preheat it yet. I always forget this step anyway and just turn it on after I mix everything. ¯_(ツ)_/¯
Step 2: Roughly chop your nuts. Don’t go crazy here. Some big chunks are good. Gives it texture. I use my sharpest knife because my food processor died during the pandemic and I never replaced it.
Step 3: Throw the nuts, sunflower seeds, chia seeds, and flax seeds into a big bowl. Mix them around. This is the therapeutic part. Very calming. Unless your three-year-old is screaming in the background. Then it’s less calming.
Step 4: In a smaller bowl (or a measuring cup, whatever’s clean), mix the almond butter, honey, vanilla, cinnamon, and salt. Microwave this for like 20-30 seconds so it’s easier to stir. It’ll look kinda weird and separated at first, but that’s totally normal.
Step 5: Pour the wet stuff into the dry stuff. Now here’s where people mess up—they don’t mix it enough. You gotta really get in there with a spoon and make sure everything’s coated. Your arm will get tired. That’s how you know it’s working.
Step 6: If you’re adding chocolate chips (which, why wouldn’t you?), fold them in now. Not before. I learned this after making one batch where all the chocolate melted into the warm almond butter mixture. Tasted good but looked like a mess.
Step 7: Line a baking sheet with parchment paper. Do NOT skip this step. I tried using just a greased pan once and spent twenty minutes scraping burnt cookie bits off with a spatula. Not fun.
Step 8: Scoop out about 2 tablespoons of dough per cookie. I use an ice cream scoop because it’s easier and they all come out the same size. Flatten them a bit with your hand because they don’t spread much while baking. Actually, you know what? They barely spread at all.
Step 9: Bake for 12-15 minutes. Set a timer. Then inevitably get distracted by Instagram and panic at 17 minutes. They should look slightly golden on the edges but still soft in the middle. They firm up as they cool. (If you burn the bottom like I did the first time, just scrape it off. Nobody will know.)
Step 10: Let them cool on the pan for 10 minutes. I know it’s tempting to eat them immediately but they’ll fall apart. Trust me. I’ve tried. Multiple times.
Random Tips I Discovered By Accident
Anyway… here are some things I figured out after making these way too many times:
The cookies keep for like a week in an airtight container. Or three days if you live in my house. My kids eat them for breakfast, which probably makes me a questionable parent, but whatever. They’re healthier than Pop-Tarts.
Oh, and another thing—these freeze REALLY well. I make a double batch now and freeze half. Then I can just grab one when I need it. Pop it in the microwave for 10 seconds and it’s perfect.
Some people ask about substitutions. If you can’t have nuts, use all seeds. Sunflower seed butter instead of almond butter. Works totally fine. My friend’s kid has a nut allergy and she makes them this way all the time.
The chia seeds are kinda essential though. They absorb moisture and help everything stick together. I tried making a batch without them once (because I ran out) and they crumbled everywhere. Disaster. Complete disaster.
Why These Are Better Than Store-Bought
Look, I used to buy those fancy energy balls from Whole Foods. You know the ones—they’re like $8 for a container of six. These homemade healthy nut & seed energy cookies cost maybe $10 to make and you get like 20 cookies. Math.
Plus you actually know what’s in them. No weird preservatives or “natural flavors” that could mean literally anything. Just real food that happens to taste really good.
My personal trainer (yeah, I have one, doesn’t mean I don’t eat cookies) actually approved of these. She said the protein and healthy fats make them a solid post-workout snack. So now I feel extra virtuous eating them. Even when I haven’t worked out. Please don’t judge me.
The Diabetic-Friendly Angle
So about the healthy nut & seed energy cookies for diabetics thing—Sarah (my neighbor I mentioned) loves these because they don’t mess with her blood sugar. She says it’s because they’re low in refined sugar and high in protein and fiber. But again, I’m not a nutritionist. I just make food.
She actually swaps the honey for sugar-free maple syrup sometimes. Says it works great. Personally, I haven’t tried that because I don’t usually keep sugar-free stuff around, but it’s good to know it’s an option.
Final Thoughts (Before I Eat Another One)
These healthy nut & seed energy cookies are honestly one of my better kitchen victories. They’re not fancy. They’re not Instagram-perfect. But they’re good and that’s what matters. Plus they make your house smell amazing while they’re baking. Kinda like a mix between a bakery and a health food store. In a good way.
Try making these on a Sunday and you’ll have snacks for the whole week. Or for three days if you have zero self-control like me. Either way, you win.
Let me know how yours turn out! Seriously, I’m always curious if other people’s batches look as weirdly lumpy as mine or if I’m just special.
Happy baking! (And may your cookies actually stick together on the first try, unlike mine.)
The Best Healthy Nut & Seed Energy Cookies You'll Ever Make
Healthy nut & seed energy cookies packed with protein, healthy fats, and natural ingredients. Easy homemade recipe perfect for snacking, diabetic-friendly options, and meal prep. No food processor needed!