Heart shaped pancakes might seem like one of those Pinterest-worthy breakfasts that require special equipment and Martha Stewart-level skills, but I’m here to tell you that’s complete nonsense. I’ve been making these adorable little love cakes for years with nothing fancier than a squeeze bottle (or honestly, just a ziplock bag with the corner snipped off). They’re ridiculously simple once you know the trick, and they make even a regular Tuesday morning feel special—not just Valentine’s Day.
Table of Contents :
How I Discovered the Easy Way to Make Heart Shaped Pancakes
So a few years back, my daughter requested “fancy pancakes” for Valentine’s Day breakfast. Being the overachieving mom I occasionally pretend to be, I immediately hopped online and ordered a heart-shaped pancake mold. Big mistake. The batter leaked everywhere, the hearts looked more like blobs, and I nearly threw the stupid metal mold across the kitchen.
After that disaster, I noticed a squeeze bottle of chocolate syrup sitting on my counter and had one of those rare “aha” moments. What if I just… drew the pancake shapes? My first attempts were laughable—more like anatomically correct hearts than the cute valentine kind. But by the third try, I had figured out the technique: draw an upside-down “V” and then connect the bottom with two curved lines to form the rounded part. Boom. Perfect heart shaped pancakes without the special equipment or the muttered curse words.
What makes this method so much better than those silly molds is that you control the batter flow completely. The molds always leak, they’re a pain to clean, and you have to awkwardly lift them while the batter’s still wet. With the squeeze method, you get crisp edges, perfect shape control, and you can make them as big or small as you want. Game changer.
Ingredients for Heart Shaped Pancakes
Let’s talk about what goes into these pancakes. I’m going to share my go-to pancake recipe that’s fluffy but still sturdy enough to hold its shape when squeezed into a heart. The viscosity matters here—if your batter is too runny, you’ll end up with pancake puddles instead of defined hearts. Too thick, and you’ll be wrestling with your squeeze bottle like it’s toothpaste at the end of the tube.
You can absolutely use a boxed pancake mix if that’s your jam (no judgment here), but the homemade version takes literally two extra minutes and tastes noticeably better. Plus, you probably already have all these ingredients in your pantry anyway.
1 1/2 cups all-purpose flour
Regular old all-purpose flour works perfectly here. I’ve tried the fancy cake flour route, and honestly, it makes the pancakes a bit too delicate for the squeeze bottle technique. If you’re gluten-free, a 1:1 replacement flour works well too—I’ve used Bob’s Red Mill with good results, but the batter might need a touch more milk to get the right consistency.
3 1/2 teaspoons baking powder
This might seem like a lot, but trust me on this one. The extra leavening gives you fluffy pancakes that still have structure. Make sure your baking powder isn’t expired—I learned that lesson the hard way when I made sad, flat heart pancakes for my husband’s birthday. Check the date before you start!
1 tablespoon granulated sugar
Just enough sweetness to enhance the flavor without making them dessert. If you want to dial up the valentine vibes, you can use 2 tablespoons and add a tiny drop of red food coloring for pale pink heart pancakes. My kids go nuts for this version, though I personally think the natural golden color with maple syrup is prettier.
1/4 teaspoon salt
Don’t skip this! Salt balances the sweetness and makes the pancakes taste like actual food instead of cardboard. I use kosher salt because that’s what’s in my salt cellar, but table salt works perfectly fine too. Salt is what makes your pancakes taste like more than just flour and milk.
1 1/4 cups milk
Any kind works here—whole milk makes richer pancakes, but I’ve used everything from skim to oat milk with good results. The key is getting the batter consistency right for the squeeze bottle, so you might need to adjust slightly. You want it pourable but not watery—like a slightly thinner pancake batter than usual.
1 large egg
The egg provides structure so your hearts hold their shape. Room temperature works best (I stick mine in a bowl of warm water for a few minutes if I’ve just pulled it from the fridge). If you’re going egg-free, a flax egg (1 Tbsp ground flaxseed + 3 Tbsp water) works surprisingly well in this recipe.
3 tablespoons butter, melted
Melted butter in the batter creates tender pancakes with good flavor. Let it cool slightly before adding or you might scramble bits of the egg. In a pinch, neutral oil like canola works too, but butter adds that special morning richness. And yes, salted or unsalted both work fine here.
1 teaspoon vanilla extract (optional)
This isn’t strictly necessary, but a splash of vanilla makes these taste like the fancy pancakes you’d get at a brunch spot. If you’re feeling extra, try almond extract instead—it pairs beautifully with fresh berries if you’re going for a full Valentine’s spread.
Cooking spray or additional butter for the pan
Critical for non-stick success! Nothing ruins heart shaped pancakes faster than having them stick to the pan. I usually wipe the pan with a paper towel between batches to avoid buildup that can cause sticking or burning.
Instructions for Heart Shaped Pancakes
Okay, so making these heart pancakes isn’t hard, but there is a bit of technique involved. The first one or two hearts might be a little wonky, and that’s perfectly normal. Consider them the chef’s tax—you get to eat the ugly ones while you’re cooking the pretty ones. The whole process takes about 20 minutes, including mixing the batter.
The biggest trick is getting the pan temperature right. Too hot, and the bottom of your heart will burn before you can finish drawing the top curves. Too cool, and the batter spreads too much, losing definition. I find medium-low heat works perfectly—you want the pan hot enough that the batter starts to bubble slightly after about 30 seconds, but not so hot that it instantly sizzles when it hits the pan.
STEP 1: Mix your dry ingredients.
In a medium bowl, whisk together the flour, baking powder, sugar, and salt. This even distribution matters—I once skipped this step and had weird bitter pockets of baking powder in my pancakes. Take the 15 seconds to mix these properly. If you see any lumps in your flour, break them up now with your whisk or your hearts might end up with flour bombs.
STEP 2: Combine your wet ingredients separately.
In another bowl (or a large measuring cup, which makes pouring easier), whisk together the milk, egg, cooled melted butter, and vanilla if using. The butter might solidify a bit if your milk is cold—that’s totally fine as long as you whisk it well. The small butter pieces actually create nice pockets of richness in your finished pancakes.
STEP 3: Make the batter.
Pour the wet ingredients into the dry ingredients and stir just until combined. THIS IS CRITICAL: do not overmix! Stop when you still see a few small lumps—overmixing creates tough, rubbery pancakes. I literally count to about 10-12 stirs and then force myself to stop, even when my brain is screaming about those tiny flour pockets. They’ll cook out, I promise.
STEP 4: Rest the batter.
Let the batter rest for about 5 minutes. I know you’re eager to start, but this little break allows the gluten to relax and the baking powder to start working its magic. I learned this trick from a diner cook, and it makes a noticeable difference in the fluffiness. While it rests, prepare your squeeze bottle or ziplock bag and heat your pan.
STEP 5: Prepare your heart-making tool.
Transfer about half the batter to a squeeze bottle (those clear plastic condiment bottles work perfectly) or a ziplock bag with a small corner snipped off. Don’t cut too large a hole—about 1/4 inch diameter gives you good control. If using a bag, don’t overfill it or you’ll have batter squeezing out the top when you press. Been there, cleaned that mess up.
STEP 6: Heat your pan and do a test heart.
Heat a non-stick skillet or griddle over medium-low heat. When a few drops of water dance and evaporate on the surface (but don’t immediately sizzle violently), you’re ready. Lightly coat with cooking spray or a thin swipe of butter. Draw a small test heart to check your batter consistency and pan temperature. If the batter flows too freely, refrigerate it for 5 minutes to thicken. If it’s too thick to squeeze, add 1-2 tablespoons of milk.
STEP 7: Draw your hearts!
Now for the fun part! To make each heart, start by drawing an upside-down “V” shape, then draw two curved lines that connect at the bottom to form the rounded part of the heart. The trick is to work quickly but confidently—hesitation creates wobbly lines. If your first heart looks more like a blob or a weird anatomical diagram (my specialty), don’t stress. By the third one, you’ll be a pro. Fill in the outline with more batter in a spiral motion.
STEP 8: Wait for the bubbles.
This is the hardest part—resisting the urge to flip too early! Wait until the surface of your hearts forms small bubbles that begin to pop, and the edges look slightly set, about 2-3 minutes. The first side takes longer than the second. If you flip too soon, you’ll destroy your beautiful heart shape. Ask me how I know. (Pancake massacre of 2019, we don’t talk about it.)
STEP 9: Flip with confidence.
When it’s time to flip, commit to the motion! A tentative flip is a ruined pancake. Slide a thin spatula completely under the heart and flip in one quick, decisive movement. The second side needs only about 1-2 minutes to cook through. It won’t be as perfectly shaped as the first side, but that’s okay—that’s your presentation side.
STEP 10: Keep them warm properly.
As you finish each batch, transfer to a baking sheet in a 200°F oven to keep warm. Don’t stack them on a plate with foil—they’ll steam and get soggy. If you’re making a big batch, the oven method keeps them warm without sacrificing that slight crispness on the outside. Wipe your pan between batches if there’s any residue that might burn.
Tips & Variations for Heart Shaped Pancakes
For a Valentine’s Day upgrade, try adding 1/4 cup of mini chocolate chips or 1/2 cup of fresh strawberries finely diced to the batter. If you go the strawberry route, pat them dry with paper towels first so they don’t make the batter too wet. Red velvet heart pancakes are also adorable—just add 1-2 tablespoons of cocoa powder and enough red food coloring to get that classic red velvet hue.
Make-ahead tip: The dry and wet ingredients can be mixed separately the night before. Keep the wet ingredients refrigerated, then combine everything in the morning. You can even make the pancakes completely ahead and refrigerate. To reheat, don’t microwave (they’ll get rubbery)—instead, place them on a baking sheet in a 350°F oven for about 5 minutes.
If your heart shapes start spreading too much during cooking, your pan might not be hot enough or your batter might be too thin. Add an extra tablespoon of flour to the remaining batter to thicken it up. And don’t worry if they’re not perfect—homemade charm is what makes these special. The Instagram-perfect ones probably taste like cardboard anyway.
Final Thoughts on Heart Shaped Pancakes
Heart shaped pancakes are one of those little kitchen tricks that make you look way more impressive than the actual effort involved. They take basically the same amount of time as regular pancakes, but suddenly you’re the parent/partner/friend who makes magical breakfasts. I’ve been making these for years now, and the reaction is always the same—people can’t believe how simple the technique is once they see it in action.
If you try making these, I’d love to hear how they turn out! Drop a comment below, especially if you come up with a fun variation I haven’t thought of. And if your first few hearts look more like anatomically correct organs than valentine hearts, just know you’re in good company. The pancake learning curve is real, but totally worth it.
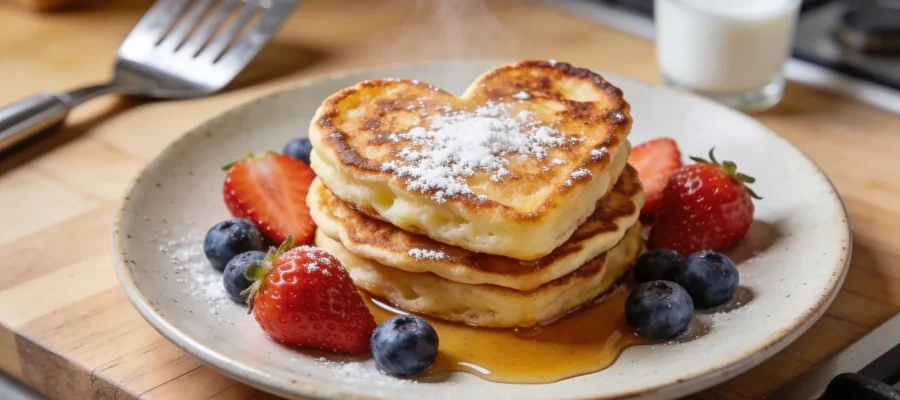
Easy Heart Shaped Pancakes
Delightfully cute heart shaped pancakes that are easy to make without any special equipment, perfect for a Valentine's Day breakfast.