You know that moment when you’re staring into your fridge at 6 PM, wondering what to make for dinner, and you spot some leftover rice from last night’s takeout? That’s exactly how this recipe was born in my kitchen about two years ago. I had some day-old rice, a pack of chicken thighs that needed to be used, and a serious craving for something crispy and garlicky.
What started as a “let’s just throw some stuff together” dinner has become one of my family’s most requested meals. My husband literally asks for it at least twice a week, and I don’t blame him. This High Protein Crispy Garlic Chicken Fried Rice hits every single comfort food note while sneaking in way more protein than your typical fried rice.
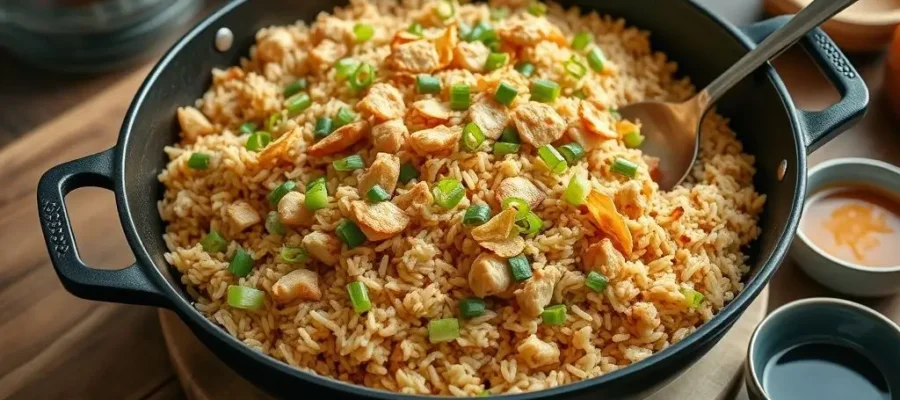
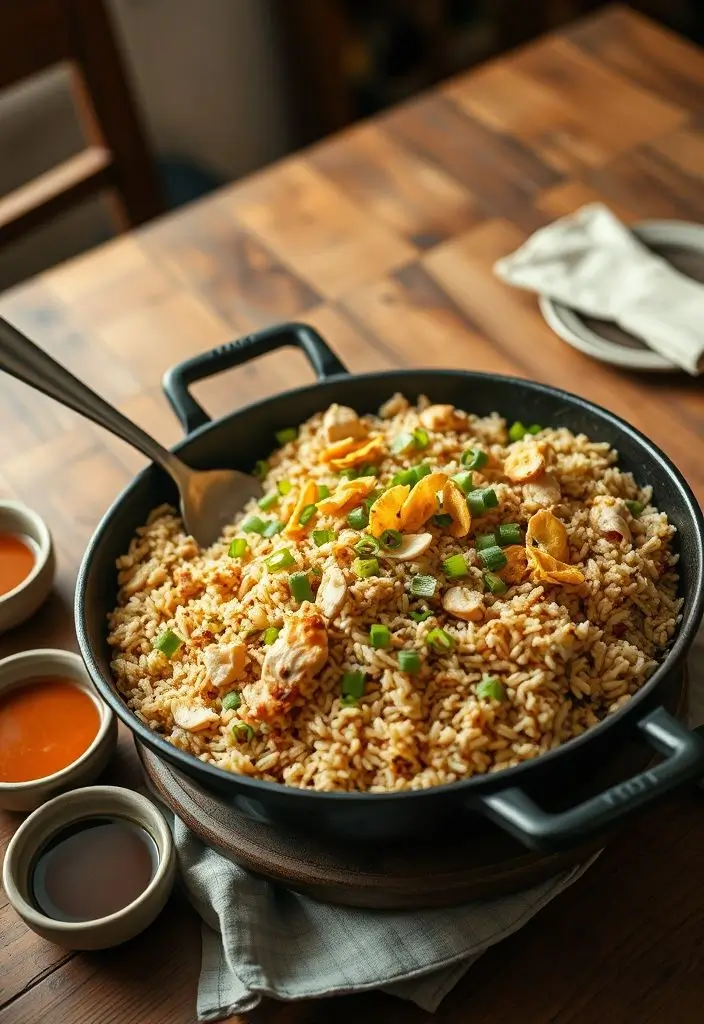
The secret? We’re not just tossing in leftover chicken here. We’re creating these incredible crispy, golden chicken pieces that get coated in the most amazing garlic-infused oil, then mixed with perfectly seasoned rice that’s been given the proper wok treatment. It’s like the best parts of your favorite Chinese takeout, but with about triple the protein and way more garlic than any restaurant would dare to use.
Table of Contents :
Why You’ll Love This Recipe
This isn’t your average fried rice, and I mean that in the best possible way. First off, the protein content is seriously impressive – we’re talking around 35 grams per serving, which makes this perfect for anyone trying to hit their protein goals without resorting to another boring chicken breast and rice combo.
The texture game is absolutely on point too. You get these crispy, caramelized edges on the chicken that contrast beautifully with the tender rice and whatever vegetables you decide to throw in. And can we talk about the garlic situation? We’re using garlic three different ways in this recipe, because I firmly believe that if you’re going to do garlic, you might as well really do it.
The best part is how customizable this whole thing is. Got leftover vegetables in your fridge? Throw them in. Want to use brown rice instead of white? Go for it. Need to make it dairy-free? Easy swap. This recipe is basically a template for using up whatever you have on hand while still creating something that tastes intentional and delicious.
Key Recipe Features
High Protein Content: Each serving packs about 35g of protein, making it perfect for post-workout meals or anyone trying to increase their protein intake
Crispy Texture Perfection: The chicken gets incredibly crispy edges while staying tender inside, and the rice gets that coveted wok-fried texture
Garlic Lover’s Dream: We’re using fresh garlic, garlic powder, and crispy garlic oil for maximum flavor impact
Meal Prep Friendly: This reheats beautifully and actually tastes even better the next day
Quick Preparation: From start to finish, you’re looking at about 25 minutes of active cooking time
What You’ll Need

For the Chicken:
- 1.5 lbs boneless, skinless chicken thighs, cut into bite-sized pieces
- 2 tablespoons cornstarch
- 1 teaspoon garlic powder
- 1 teaspoon salt
- 1/2 teaspoon black pepper
- 3 tablespoons neutral oil (like vegetable or canola)
For the Rice:
- 4 cups day-old cooked rice (this is crucial – fresh rice gets mushy)
- 4 cloves fresh garlic, minced
- 2 tablespoons soy sauce
- 1 tablespoon oyster sauce
- 1 teaspoon sesame oil
- 3 large eggs, beaten
- 3 green onions, sliced thin
- 1 cup frozen peas and carrots (or any vegetables you prefer)
For the Garlic Oil:
- 4 cloves garlic, thinly sliced
- 3 tablespoons neutral oil
- Pinch of red pepper flakes (optional)
Let me tell you about the rice situation first, because this is where so many people go wrong with fried rice. You absolutely need day-old rice that’s been sitting in the fridge overnight. Fresh rice has too much moisture and will turn your fried rice into a mushy mess. I learned this the hard way during my first attempt at homemade fried rice, and trust me, you don’t want to make that mistake.
The chicken thighs are non-negotiable for me. I know boneless, skinless thighs cost a bit more than breasts, but they stay so much more tender and flavorful during the high-heat cooking process. Plus, they have more natural fat, which helps create those crispy edges we’re after.
Let’s Make It
Step 1: Prep Your Chicken
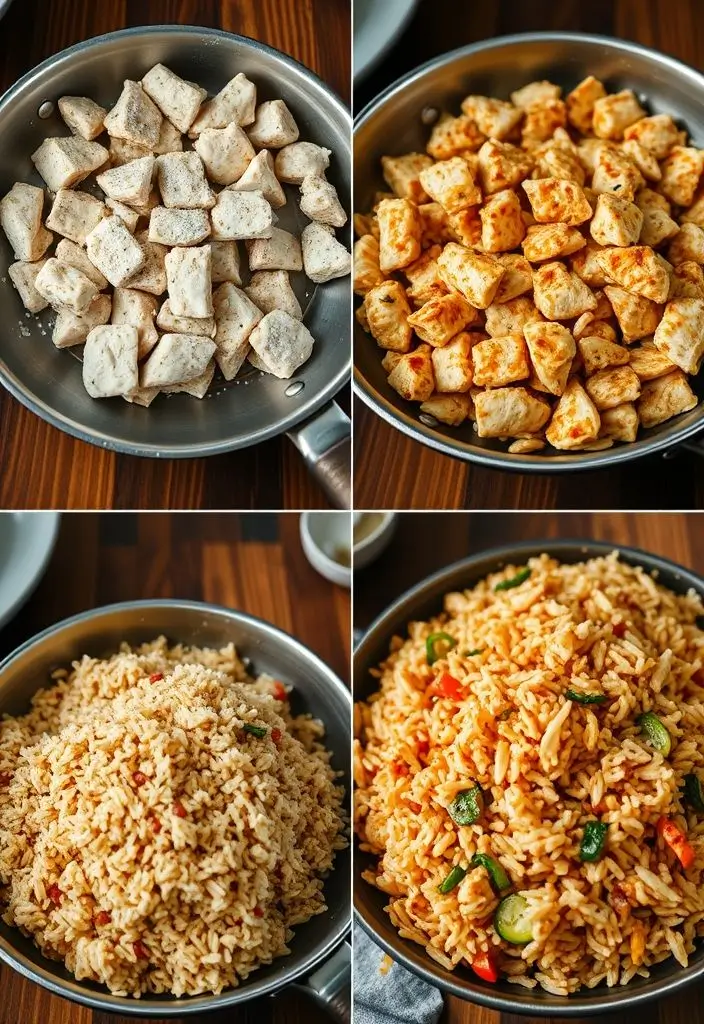
Start by cutting your chicken thighs into bite-sized pieces, about 1-inch chunks. Pat them completely dry with paper towels – this step is crucial for getting that crispy exterior. In a bowl, toss the chicken pieces with cornstarch, garlic powder, salt, and pepper. Make sure every piece is well-coated. The cornstarch is going to create the most amazing crispy coating when it hits the hot oil.
Step 2: Create the Crispy Garlic Oil
In a large wok or heavy-bottomed skillet, heat 3 tablespoons of oil over medium heat. Add your sliced garlic and let it slowly cook until it turns golden brown and crispy, about 2-3 minutes. You want to watch this carefully because garlic can go from perfect to burnt in seconds. Once it’s golden, remove the garlic chips with a slotted spoon and set them aside on a paper towel. Keep that garlic-infused oil in the pan – it’s liquid gold.
Step 3: Cook the Chicken
Turn your heat up to medium-high and add the seasoned chicken pieces to the garlic oil. Don’t overcrowd the pan – work in batches if you need to. Let the chicken sit undisturbed for about 3-4 minutes to develop that golden crust, then stir and cook for another 3-4 minutes until the chicken is cooked through and beautifully crispy. Remove the chicken and set it aside.
Step 4: Scramble the Eggs
In the same pan (don’t clean it – all those crispy bits are flavor gold), add a bit more oil if needed and scramble your beaten eggs. I like to keep them slightly underdone since they’ll continue cooking with the rice. Remove the eggs and set them aside with the chicken.
Step 5: Fry the Rice
Now for the fun part. Add your day-old rice to the pan, breaking up any clumps with your spoon. Let it sit for about 2 minutes to get some color on the bottom, then start tossing and stirring. Add your minced fresh garlic and cook for another minute until fragrant.
Step 6: Bring It All Together
Add your frozen vegetables and stir-fry for about 2 minutes until they’re heated through. Return the chicken and eggs to the pan, then add your soy sauce, oyster sauce, and sesame oil. Toss everything together for another 2-3 minutes until everything is heated through and well combined.
Step 7: Finish and Serve
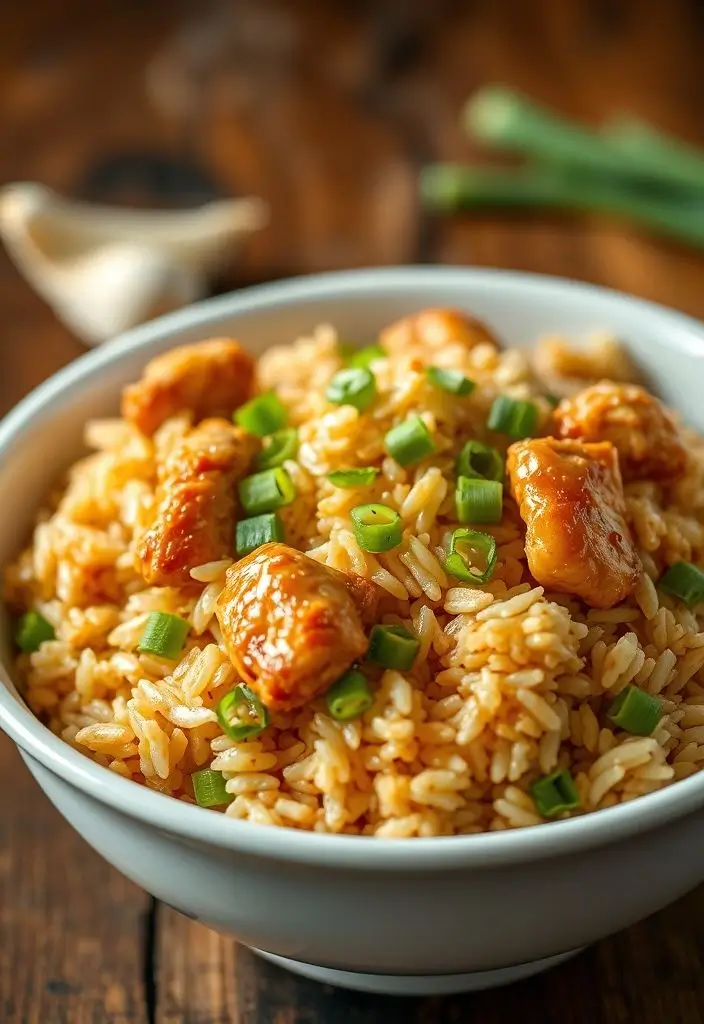
Remove from heat and stir in your sliced green onions and those crispy garlic chips we made earlier. Taste and adjust seasoning – you might want a bit more soy sauce or a pinch of salt.
Tips from My Kitchen
The Rice Rule: I cannot stress this enough – use day-old rice. If you’re planning to make this and don’t have leftover rice, cook your rice in the morning and spread it out on a baking sheet to cool completely before refrigerating.
High Heat is Your Friend: Don’t be afraid to really crank up that heat. Fried rice needs high heat to get that slightly smoky, wok-fried flavor. Just make sure your pan is heavy enough to handle it.
Batch Cook the Chicken: If you’re doubling this recipe, cook the chicken in batches. Overcrowding the pan will steam the chicken instead of crisping it, and nobody wants soggy protein.
Mise En Place: Get everything prepped and ready before you start cooking. Fried rice moves fast once you get going, and you don’t want to be chopping garlic while your rice is burning.
Ingredient Flexibility Tips
Vegetable Swaps: Use whatever vegetables you have on hand. Bell peppers, snap peas, broccoli, mushrooms – they all work great. Just adjust cooking times based on what you’re using.
Protein Alternatives: Ground turkey, shrimp, or even firm tofu work well if you want to switch up the protein. Just adjust cooking times accordingly.
Rice Variations: Brown rice works beautifully here, though it takes a bit longer to fry up nicely. Cauliflower rice is also a great low-carb option.
Sauce Adjustments: Add sriracha for heat, or a splash of rice vinegar for extra tang. Some people love a drizzle of chili oil at the end.
Pro Cooking Hints
Don’t Stir Too Much: Let things sit and develop color before stirring. This applies to both the chicken and the rice.
Taste as You Go: Fried rice should be well-seasoned but not salty. Add sauces gradually and taste frequently.
Keep It Moving: Once you add the sauces, keep everything moving in the pan to prevent sticking and ensure even distribution.
The Garlic Test: Your garlic oil is ready when the garlic slices are golden brown and crispy. If they’re still pale, keep cooking. If they’re dark brown, you’ve gone too far.
Storage & Reheating
Refrigerator Storage: This keeps beautifully in the fridge for up to 4 days in an airtight container. The flavors actually develop and improve overnight.
Freezer-Friendly: You can freeze portions for up to 3 months, though the texture of the vegetables might change slightly.
Reheating Tips: The best way to reheat this is in a skillet with a tiny bit of oil over medium heat. It brings back that crispy texture way better than the microwave. If you must use the microwave, add a splash of water and cover to prevent drying out.
Serving Suggestions
This dish is pretty complete on its own, but I love serving it with some simple steamed broccoli or a quick cucumber salad to cut through the richness. A sprinkle of sesame seeds or a drizzle of chili oil takes it to the next level.
The protein content makes this perfect for post-workout meals, and the leftovers are honestly better than most takeout options. My teenagers love packing this for lunch – it reheats well and keeps them full through their afternoon classes.
This High Protein Crispy Garlic Chicken Fried Rice has become such a staple in our house that I actually keep the ingredients on hand at all times. It’s proof that sometimes the best recipes come from just working with what you have and not being afraid to make it your own.