Japanese pancakes recipe development has been my personal Mount Everest for the last three years. You know those impossibly fluffy, jiggly pancakes that look like they’re made of clouds? Yeah, I failed at making those about nine times before finally cracking the code. The internet is full of recipes that honestly set you up for disappointment — they look gorgeous in photos but collapse the moment you try to make them at home. After countless eggy disasters and deflated soufflé sadness, I’ve finally developed a version that actually works in a regular kitchen, without special equipment or pastry chef skills.
Table of Contents :
Why I Had to Master These Fluffy Pancakes
I first encountered these magical Japanese soufflé pancakes at a specialty café in Tokyo during a vacation in 2019. They were unlike anything I’d ever tasted — impossibly light, subtly sweet, and with this amazing jiggle that made everyone at the table whip out their phones. I became obsessed.
My first attempt back home was… well, let’s just call it what it was: flat, rubbery egg discs. I tried again with a different recipe. Same disaster. I tried following a popular food blogger’s method that promised “easy results” and ended up with something that looked more like a failed science experiment than breakfast. The problem with most recipes? They gloss over the crucial techniques or assume you have ring molds, perfect heat control, and the patience of a saint. After about a dozen tests (and some choice words muttered in my kitchen), I finally developed this method that works consistently. And trust me, if I can do it, with my notoriously uneven stovetop, you absolutely can too.
Ingredients for Japanese Pancakes Recipe
The ingredients list might look basic, but don’t be fooled — each component plays a critical role in creating that signature height and fluffiness. I’ve tested cutting corners, and let’s just say I have the flat pancake graveyard photos to prove it. The good news is you probably have most of these things in your kitchen already.
Temperature matters more than you’d think here. Cold eggs won’t whip properly, and your pancakes will never reach their fluffy potential. I learned this the hard way after ruining a batch because I was too impatient to let the eggs come to room temperature. So please, learn from my mistakes.
Eggs (2 large, separated)
Separation is critical here — even a drop of yolk in your whites will prevent them from whipping properly. I separate each egg into a small bowl first, then transfer the white to the mixing bowl. This way, if you mess up one egg, you haven’t ruined the whole batch. Been there, done that, had the temper tantrum.
All-purpose flour (1/4 cup)
I’ve tried fancy cake flours and honestly couldn’t tell the difference in the final product. Regular all-purpose works perfectly fine, just make sure to sift it to avoid any lumps. Those little flour pockets will create dense spots in your otherwise perfect pancakes.
Milk (2 tablespoons)
Whole milk gives the best flavor, but any milk works, including non-dairy options. I’ve made these with oat milk when my lactose-intolerant brother visited, and they turned out nearly identical. The small amount means the type matters less than in other recipes.
Vanilla extract (1/2 teaspoon)
Real vanilla extract makes a subtle but noticeable difference. If you have vanilla bean paste, even better — you’ll get those gorgeous little flecks throughout. In a pinch, almond extract creates an interesting variation, though use just a drop as it’s stronger.
Granulated sugar (3 tablespoons, divided)
We’re using sugar in two ways here: some goes into the egg yolk mixture for sweetness, and some goes into the egg whites to help stabilize the meringue. Don’t substitute with liquid sweeteners like honey or maple syrup — they’ll mess with your meringue structure. Trust me on this one, I ruined a whole batch thinking maple syrup would make them more “breakfast-y.”
Baking powder (1/4 teaspoon)
This gives insurance against deflating. Check that yours is still active by putting a pinch in some hot water — it should fizz immediately. One time my pancakes refused to rise, and I later discovered my baking powder had expired two years earlier. Not my proudest kitchen moment.
Salt (Tiny pinch)
Just a small amount balances the sweetness and enhances flavor. I once forgot it and the pancakes tasted oddly flat, even with all the other ingredients. It’s amazing what a difference this tiny pinch makes.
Neutral oil for cooking (2 teaspoons)
Use something with a high smoke point and neutral flavor like vegetable or canola oil. Butter will burn during the longer cooking time these pancakes need. I learned this the hard way when I set off my smoke detector at 7am trying to use butter. My neighbors were not impressed.
Instructions for Japanese Pancakes Recipe
Okay, here’s where most recipes set you up for failure — they don’t warn you about the timing and technique sensitivities. These aren’t your standard flip-and-forget pancakes. They require attention and a bit of finesse. But don’t panic! I’m going to walk you through each step exactly as I do it, including all the little tricks I’ve figured out through multiple failures.
This process takes about 30 minutes from start to finish if you’re organized. For me, it’s more like 40 minutes because I’m always searching for my sifter. You can prepare the yolk mixture ahead of time, but don’t whip your egg whites until you’re ready to cook — they’ll start to deflate if they sit too long. And yes, these pancakes really do need to cook slowly, so patience is key.
STEP 1: Prepare your workspace and separate the eggs.
Start with room temperature eggs — this is non-negotiable for proper whipping. Separate your eggs, being absolutely fanatical about not getting any yolk in the whites. Even a tiny speck can prevent your whites from reaching stiff peaks. I separate each egg over a small bowl, then transfer the white to your mixing bowl once I’m sure it’s yolk-free. You’ll beat the whites later, so a stand mixer or hand mixer is essential here — doing this by hand is technically possible but will give you an arm workout you didn’t sign up for.
STEP 2: Make the yolk base mixture.
In a medium bowl, whisk together the egg yolks, 1 tablespoon of sugar, milk, and vanilla until smooth. The mixture should be pale yellow and slightly thickened. Now sift in the flour, baking powder and salt. Yes, actually sift it — I’ve skipped this step before thinking “how bad could a few lumps be?” and ended up with flour pockets in my pancakes. Whisk until just combined, but don’t overmix. The batter will be quite thick, almost like a paste. That’s exactly what you want.
STEP 3: Whip the egg whites into a meringue.
This is where the magic happens. In a clean, completely grease-free bowl, beat the egg whites on medium speed until frothy. Gradually add the remaining 2 tablespoons of sugar, a little at a time, while continuing to beat. Increase to high speed and beat until stiff peaks form — this means when you lift the beater, the peaks stand up straight without flopping over. This usually takes about 3-4 minutes with an electric mixer. You’ll know it’s ready when you can turn the bowl upside down and nothing falls out. Yes, I actually test it this way, though maybe do it over the sink the first time.
STEP 4: Fold the meringue into the yolk mixture.
This is the most crucial step where things often go wrong. Add about 1/3 of the meringue to the yolk mixture and gently fold it in with a spatula to lighten the base. “Fold” doesn’t mean stir — it’s more of a gentle scooping motion where you literally fold the mixture over itself. Then add the remaining meringue and continue folding until just incorporated. You’ll see a few white streaks, and that’s FINE. In fact, it’s better to undermix slightly than to overmix and deflate all that air you’ve worked to create. The first time I made these, I mixed until perfectly smooth and ended up with pancake crackers instead of fluffy soufflés.
STEP 5: Prepare your pan and cooking rings.
If you have 3-inch metal ring molds, great! If not, you can make your own by cutting the top and bottom off of tuna cans or using extra-large cookie cutters. In a pinch, you can even make free-form pancakes — they won’t be as tall, but they’ll still be fluffy. Heat a non-stick pan over LOW heat. I cannot stress this enough: LOW HEAT. These need to cook slowly to set properly. Once warm, lightly oil the inside of your rings and place them in the pan. Also put about 1/2 teaspoon of oil inside each ring.
STEP 6: Cook the pancakes (patience required).
Spoon the batter into each ring until about 3/4 full. Don’t overfill — these will rise! Now for the hard part: cover the pan with a lid (a clear one is best so you can monitor progress) and cook for 5-6 minutes. You’ll see the pancakes slowly rising and setting around the edges. Small bubbles will appear on the surface, but unlike regular pancakes, you’re not waiting for the entire top to bubble. After 5-6 minutes, very carefully flip each pancake, ring and all. This takes some practice. I’ve definitely had a pancake make a break for freedom during this step. Cook covered for another 4-5 minutes until golden on the bottom.
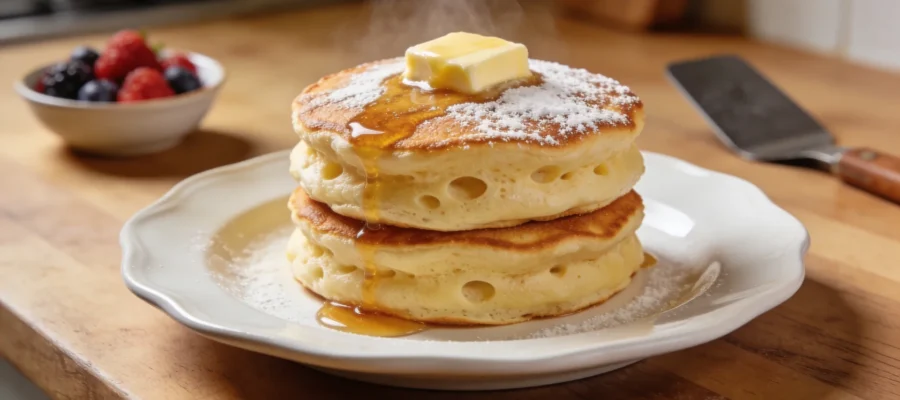
STEP 7: Serve immediately with style.
These pancakes wait for no one. They’re at their jiggly, soufflé-like best when served immediately. Gently remove the rings (they should release easily if properly oiled) and transfer to plates. Top with fresh berries, a dusting of powdered sugar, and maple syrup if desired. Take that Instagram-worthy photo quickly, because they will slowly deflate as they cool — that’s just the nature of soufflés. Even deflated, they’re still delicious, just less dramatically tall.
Tips & Variations for Japanese Pancakes Recipe
The first time you make these, follow the recipe exactly. Once you’ve mastered the basic technique, then you can play around. I’ve successfully added 1/4 teaspoon of matcha powder to the flour mixture for a green tea version that’s subtly earthy. Lemon zest in the batter makes a bright variation that pairs beautifully with berries. For chocolate lovers, folding in 1 tablespoon of cocoa powder (sifted with the flour) creates a light chocolate version.
If yours don’t rise as tall as the pictures you see online, don’t despair! Many commercial photos are taken with ridiculous ring heights or are actually several pancakes stacked together. Even a modest rise of 1-1.5 inches is a success for homemade versions. And if you don’t have rings at all? Make silver dollar-sized dollops of the batter — they’ll be fluffier than traditional pancakes, just not as dramatically tall.
These don’t store well, so only make what you’ll eat immediately. That said, the batter can be prepared up to the point of whipping the egg whites and stored in the refrigerator for a few hours. Just remember to bring the yolk mixture back to room temperature before continuing.
Final Thoughts on Japanese Pancakes Recipe
The first time you successfully make these pancakes, with their dramatic jiggle and cloud-like texture, you’ll feel like you’ve conquered the culinary world. And honestly, you kind of have! These aren’t easy, and that’s exactly why they’re so satisfying to master. Even now, after making them dozens of times, I still do a little victory dance when I flip them perfectly.
If you try this recipe, please let me know how it goes. I genuinely want to hear about your experience — your triumphs, your failures, your variations. And if your first attempt isn’t perfect? Welcome to the club. Just remember that even “failed” soufflé pancakes are usually delicious, if slightly less photogenic than planned. After all, they’re still pancakes, and when has a pancake ever really disappointed anyone?
Fluffy Japanese Pancakes (Soufflé Style)
A detailed guide to making impossibly fluffy Japanese soufflé pancakes that are light, sweet, and have a perfect jiggle.