Maple banana bread recipe testing is something I’ve been obsessing over for months now. I mean, regular banana bread is fine and all, but after tasting my neighbor’s maple-infused version at last year’s block party, I knew my standard recipe needed a serious upgrade. There’s something magical about the way real maple syrup deepens the banana flavor while adding its own distinct woodsy sweetness. And that maple glaze on top? It’s not optional in my kitchen anymore.
Table of Contents :
How This Recipe Came to Be
So here’s the embarrassing truth – I ruined three loaves before getting this recipe right. The first time, I just dumped maple syrup into my regular banana bread batter without adjusting the other liquids. Disaster. Complete disaster. The center never set properly, and I ended up with a gooey (not in a good way) mess that even my teenage son wouldn’t eat. And that kid will eat anything.
The second attempt wasn’t much better. I reduced the liquid but used fake maple syrup (I know, I know – what was I thinking?). The artificial flavor left this weird aftertaste that no amount of butter could mask. My husband politely suggested I “keep working on it” while discreetly tossing his slice in the trash when he thought I wasn’t looking.
It wasn’t until I started treating the maple flavor as the star – not just an add-on – that everything clicked. Real maple syrup, a touch of maple extract for intensity, and that glorious maple glaze that creates this crackly sweet top… I brought it to my book club and three people asked for the recipe. That’s when I knew I’d finally nailed it.
Ingredients for the Perfect Maple Banana Bread
Let’s talk ingredients. The quality really matters here, especially when it comes to the maple syrup. I’m not saying you need to remortgage your house for the fancy stuff, but please don’t use the artificial “breakfast syrup” that comes in a plastic bottle shaped like a woman. Real maple syrup is non-negotiable for this recipe – otherwise, you might as well just make regular banana bread.
The bananas need to be seriously overripe – I’m talking brown, spotty, and soft. Those sad bananas that nobody wants to eat anymore? They’re perfect for this. The riper they are, the more natural sweetness and banana flavor they bring to the bread.
Overripe Bananas (3 medium-large)
Look for bananas with dark spots all over and that are soft to the touch. If yours aren’t quite there yet, place them in a paper bag with an apple overnight to speed up ripening. I’ve tried this recipe with just-yellow bananas, and the flavor just isn’t the same. You want them practically black – the ones you’d normally throw away. That’s banana bread gold right there.
Pure Maple Syrup (½ cup)
Please, for the love of all things delicious, use real maple syrup, not pancake syrup. I prefer Grade A Dark Robust (what used to be called Grade B) because it has a stronger maple flavor that really comes through in baking. Yes, it’s more expensive, but you’re only using a half cup, and the difference is absolutely worth it. This is what makes this maple banana bread recipe special.
Unsalted Butter (½ cup, melted)
I’ve tried this with oil instead of butter, and while it works in a pinch, butter adds a richness that complements the maple flavor beautifully. Melt it just until liquid but not hot – if it’s too hot when you add it to the eggs, you’ll end up with scrambled eggs in your batter. Not appetizing, trust me. I learned that lesson the hard way while making this at 6 AM before a brunch.
All-Purpose Flour (2 cups)
Regular all-purpose flour works perfectly here. I’ve tested with whole wheat flour, and while it technically works, it makes the bread denser and masks some of the delicate maple flavor. You could do a 50/50 blend if you want to add some whole grain goodness. I’ve also used gluten-free cup-for-cup flour successfully when baking for my celiac friend Beth.
Eggs (2 large, room temperature)
Room temperature eggs blend more evenly into the batter. If you forgot to take them out ahead of time (I always do), just place them in a bowl of warm water for about 5 minutes. They incorporate air better when beaten at room temp, which helps with the texture of the bread. In a serious pinch, I’ve used flax eggs (1 Tbsp ground flax + 3 Tbsp water per egg), but the texture isn’t quite the same.
Maple Extract (½ teaspoon)
This is optional but recommended if you want that pronounced maple flavor. Real maple syrup alone can sometimes get lost in baking. The extract amplifies that maple goodness without having to use excessive amounts of syrup, which would throw off the liquid balance. I found mine at a specialty baking store, but you can order it online if your local grocery doesn’t carry it.
For the Maple Glaze:
The combination of powdered sugar (1 cup), maple syrup (3 tablespoons), and a splash of heavy cream creates this gorgeous, pourable glaze that sets up with a slight crackle. It’s the crown jewel of this maple banana bread recipe. I’ve tried making it with just syrup and sugar, but the cream adds a silkiness that makes it special. If you’re dairy-free, coconut cream works beautifully too.
Instructions for Maple Banana Bread Recipe
Okay, this recipe isn’t complicated, but there are a few key moments where things can go wrong (and I’ve experienced ALL of them). The whole process takes about 15 minutes of active time, plus an hour for baking. But be warned – the smell of this bread baking will drive you absolutely crazy. My neighbor once texted me “What are you making?! It smells amazing all the way over here” while this was in the oven.
The most important thing is not to overmix the batter once the flour goes in. I used to beat the heck out of it thinking it would make the bread lighter, but it actually does the opposite – overmixing develops gluten, which makes quick breads tough. And nobody wants tough banana bread.
STEP 1: Prep your equipment and ingredients.
Preheat your oven to 350°F (177°C) and grease a 9×5 inch loaf pan. I line mine with parchment paper with overhanging edges to make removing the bread foolproof. One time I skipped this step and half my beautiful loaf stayed stuck in the pan. Learn from my mistakes. Also, set your butter out to melt and eggs to come to room temperature if you didn’t already.
STEP 2: Mash those bananas like they’ve personally offended you.
In a large bowl, mash your overripe bananas with a fork. You want them mostly smooth but a few small chunks add nice texture to the finished bread. I aim for the consistency of chunky applesauce. You should end up with about 1½ cups of mashed banana – if you have significantly more or less, adjust accordingly. Too much banana will make the bread too wet and dense.
STEP 3: Mix in the wet ingredients.
Add the melted (but not hot) butter, maple syrup, eggs, and vanilla extract to your mashed bananas. If you’re using maple extract, add it here too. Whisk until everything is well combined – it’ll look slightly separated and not perfectly smooth, and that’s totally fine. The mixture should smell amazing at this point – sweet bananas with that distinct maple aroma coming through.
STEP 4: Combine the dry ingredients separately.
In another bowl, whisk together the flour, baking soda, salt, and cinnamon. The cinnamon is subtle but works beautifully with the maple flavor – don’t skip it! Mixing the dry ingredients separately ensures everything is evenly distributed. I once dumped the baking soda directly into the wet ingredients and ended up with bitter little pockets in the finished bread. Not delicious.
STEP 5: Create your batter, but don’t get carried away.
Add the dry ingredients to the wet ingredients and stir JUST until combined. I mean it – count to about 12 gentle stirs and then stop, even if you still see a few streaks of flour. The batter should be thick but pourable, like a really thick pancake batter. Overmixing is the number one way to ruin the texture of quick breads. I’m speaking from extensive disappointing experience here. When in doubt, undermix.
STEP 6: Bake until perfection.
Pour the batter into your prepared loaf pan and smooth the top. Bake for 55-65 minutes, or until a toothpick inserted into the center comes out with just a few moist crumbs (not wet batter). The exact time will depend on your oven – mine usually takes around 60 minutes. The top will get quite brown due to the maple syrup, so don’t be alarmed. If it’s browning too quickly, tent with foil for the last 15 minutes of baking.
STEP 7: The torturous waiting game.
Let the bread cool in the pan for about 15 minutes (I set a timer because I get impatient), then use the parchment overhang to lift it out onto a wire rack. Allow it to cool for at least another 30 minutes before glazing. I know waiting is painful when your kitchen smells this good, but the bread needs to set up, and the glaze needs a slightly cooled surface. Trust me on this one.
STEP 8: Make the maple glaze while you wait.
In a small bowl, whisk together the powdered sugar, maple syrup, and heavy cream until smooth. You want a pourable consistency that will set up a bit as it dries – think honey thickness. If it’s too thick, add a tiny bit more cream. If it’s too thin, add a bit more powdered sugar. The glaze should coat the back of a spoon and drizzle off slowly, not run off in a fast stream.
STEP 9: Glaze and devour (I mean, serve).
When the bread is cooled but still slightly warm, pour the glaze over the top, allowing it to drip down the sides. Let it set for about 10 minutes (if you can wait that long) before slicing. The first slice is always the hardest to get out cleanly – I consider it the baker’s sample. The glaze will form a slight crust as it sets, creating this amazing textural contrast with the soft bread.
Tips & Variations for Maple Banana Bread Recipe
This bread keeps well at room temperature for 3-4 days if wrapped tightly (though it’s never lasted that long in my house). You can refrigerate it for up to a week, but the texture gets a bit more dense when cold. I like to warm refrigerated slices for about 10 seconds in the microwave to bring back that fresh-baked softness.
For a more indulgent version, try folding in ½ cup of toasted chopped walnuts or pecans – the nuttiness pairs beautifully with the maple. Or add ½ cup chocolate chips if you’re feeling wild. I’ve also swapped the cinnamon for ¼ teaspoon of nutmeg for a different warm spice profile. Both versions are delicious.
If you want to freeze this bread, I recommend doing so without the glaze. Wrap it tightly in plastic wrap, then foil, and freeze for up to 3 months. Thaw overnight in the refrigerator, then bring to room temperature and add fresh glaze before serving.
Final Thoughts on Maple Banana Bread Recipe
Look, I’m not saying this is the world’s most sophisticated baked good, but it hits that perfect spot between “impressive enough to serve guests” and “easy enough to make while half-asleep on a Sunday morning.” The maple element transforms a basic banana bread into something special that people actually notice and comment on. My picky mother-in-law asked for the recipe, which is basically the culinary equivalent of winning an Olympic gold medal.
If you try this maple banana bread recipe, please let me know how it turns out! I’m especially curious if anyone tries different mix-ins or manages to make the glaze even better somehow. And if you take a picture before devouring the whole loaf (a real challenge), I’d love to see it. Seriously, nothing makes my day more than seeing someone else enjoy something I’ve made approximately 27 times to get just right.
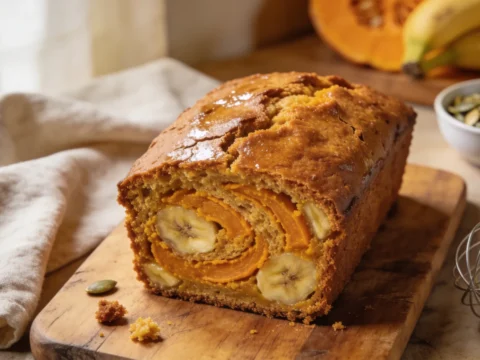
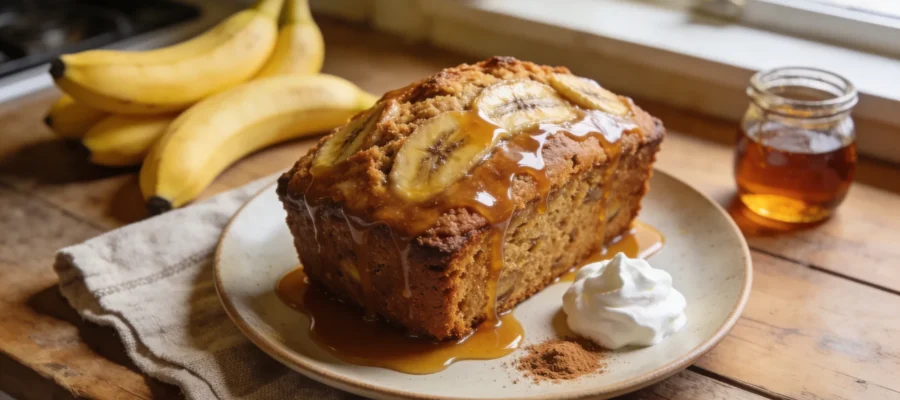
Maple Banana Bread with Sweet Maple Glaze
This maple banana bread is moist and flavorful with a distinct woodsy sweetness from real maple syrup and a glorious glaze on top.