

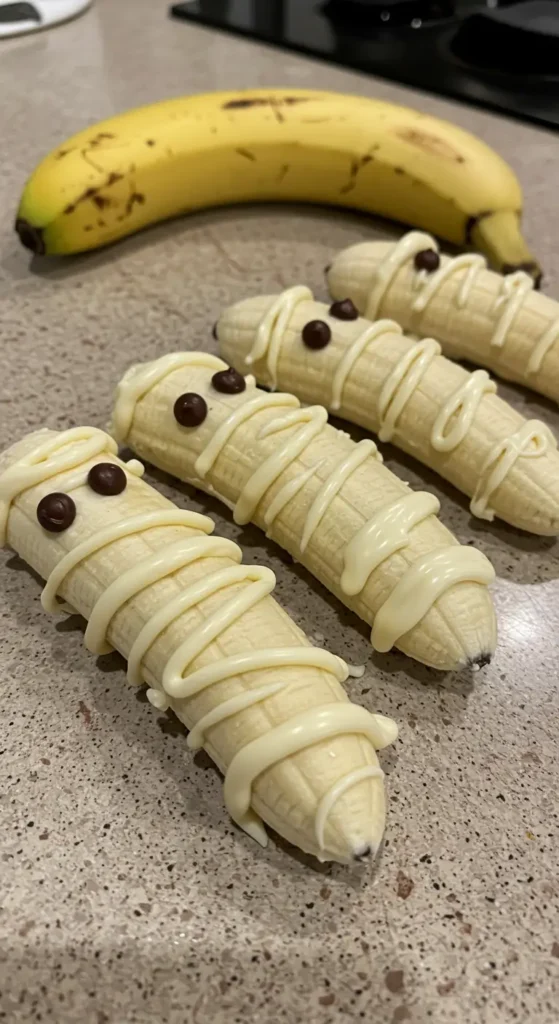
Look, I’m gonna be honest with you—I never thought I’d be the mom making cute Halloween snacks. But here we are, and my kids are absolutely obsessed with these Mummy Bananas.
Started making these last October when my 6-year-old Emma came home from school talking about some elaborate Halloween treats her friend’s mom made. You know how it is. Suddenly I’m feeling like the world’s most boring parent because I usually just throw some candy in a bowl and call it a day.
But these Mummy Bananas? Game changer. They’re stupidly easy, actually healthy (shocking, I know), and the kids think they’re hilarious. Especially when the banana starts browning a little and the “mummy” looks more… well, dead. Which is exactly what we’re going for, right?
Table of Contents :
How I Discovered This Mummy Bananas Madness
So there I was, scrolling Pinterest at 11 PM like a responsible adult, and I stumbled across this concept. Bananas wrapped like mummies. My first thought was “that’s ridiculous.” My second thought was “Emma would lose her mind over this.”
Tried it the next day and completely botched it. The white chocolate was too thick, the chocolate chips fell off, and honestly? It looked more like a banana that got attacked by a paper towel than a mummy.
But you know what? Emma still thought it was the coolest thing ever.
Why Mummy Bananas Actually Work (Even When You Mess Up)
Here’s the thing about kids—they don’t care if your Pinterest-worthy creation looks like it was made during an earthquake. They care that you tried to make something fun. And these Mummy Bananas hit all the right notes:
- They’re actually nutritious (bananas = potassium, right?)
- Takes like 10 minutes max
- Uses stuff you probably already have
- Kids can help without destroying your kitchen
- When they inevitably turn brown, they look more authentic
The browning thing was my accidental discovery. Made them in the morning, packed them for Emma’s school party, and by the time she got there, they had that perfect “aged mummy” look. The other kids were convinced I was some kind of Halloween genius.
If only they knew I burned mac and cheese the night before.
What You Actually Need for Mummy Bananas
Okay, ingredient list time. And before you ask—no, you don’t need fancy organic everything. This isn’t a cooking show.
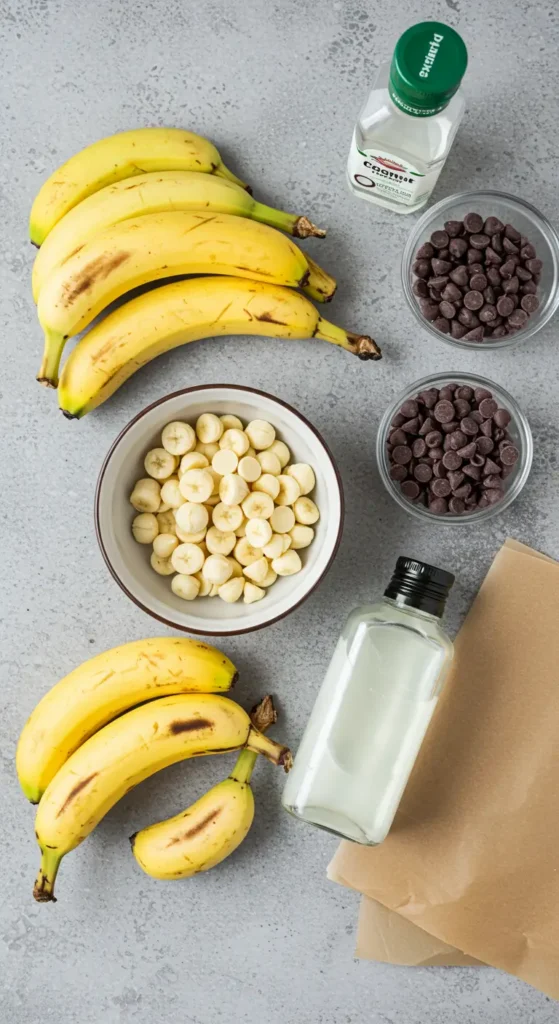
For the Mummies:
- 4-6 bananas (ripe but not mushy—nobody wants mummy goo)
- 1 cup white chocolate chips or melting wafers
- 2 tablespoons coconut oil (optional, makes it easier to drizzle)
- Mini chocolate chips for eyes (about 1/4 cup)
Alternative Option:
- White fruit leather strips (if you want to go the wrapping route instead of drizzling)
That’s it. Seriously. I told you it was simple.
Shopping tip: Don’t be like me and buy the bananas the day you want to make these. Buy them 2-3 days ahead so they’re perfect. And get extra bananas because someone (me) will definitely eat one while you’re working.
How to Make Mummy Bananas (Without Losing Your Mind)
Step 1: Prep Your Workspace Clear a spot on your counter and lay out some parchment paper. Trust me on the parchment paper. Learned this the hard way when white chocolate dripped all over my granite countertop and took forever to clean.
Step 2: Peel and Prep Bananas Peel your bananas carefully, leaving them whole. If one breaks—and one always breaks—just call it a “wounded mummy” and keep going. The kids will think it’s even cooler.
Pro tip: Pat the bananas dry with paper towels. Wet bananas and melted chocolate don’t play nice together.
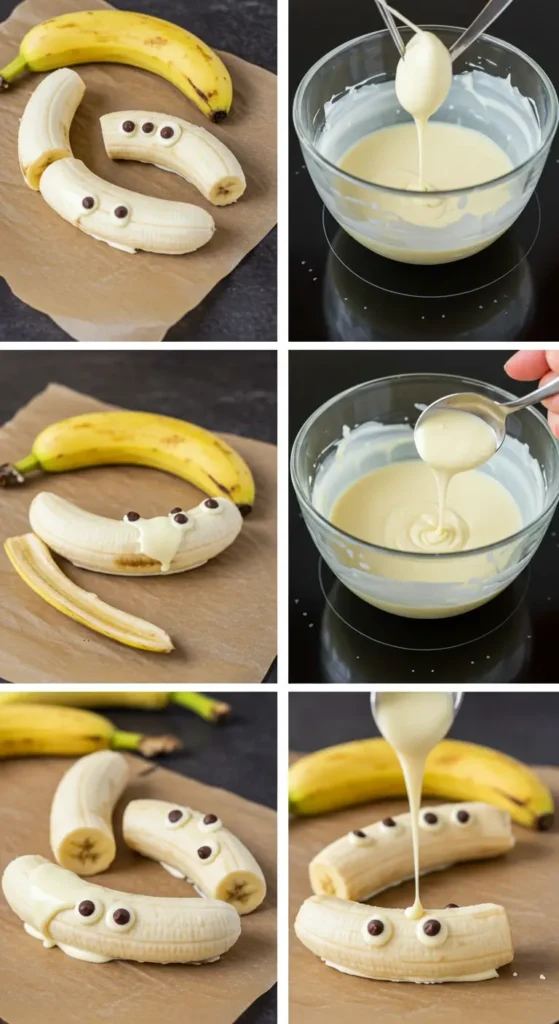
Step 3: Melt the White Chocolate Here’s where I messed up initially. Put the white chocolate chips in a microwave-safe bowl with a tablespoon of coconut oil. Microwave in 30-second intervals, stirring between each one.
Do NOT try to rush this by using full power for 2 minutes. You’ll end up with burnt chocolate that looks like… well, not what you want on your mummy bananas. Been there. The smell lingered for days.
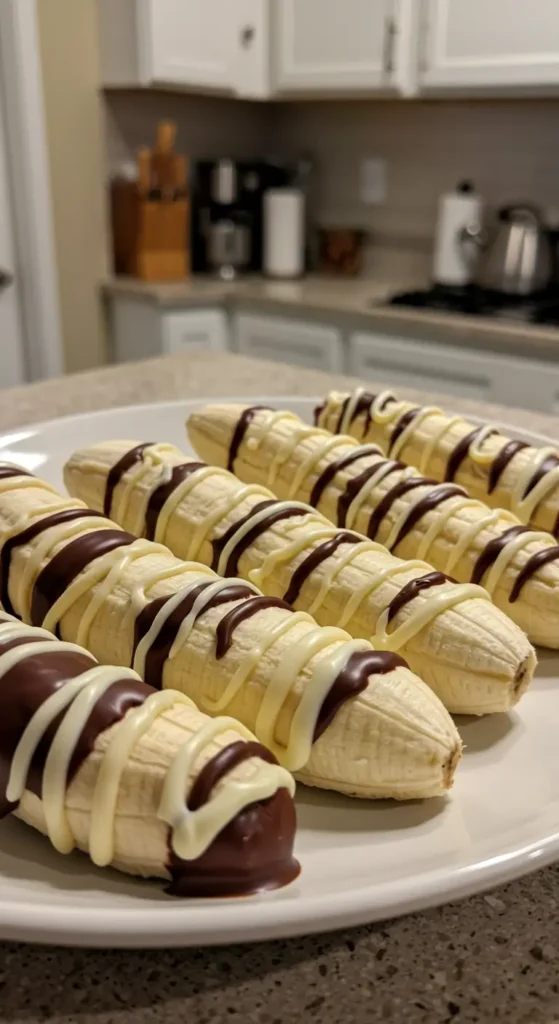
Step 4: The Mummy Wrapping Magic This is the fun part! Using a spoon or fork, drizzle the melted white chocolate over the bananas in a back-and-forth motion. You want it to look like bandages, not like you dumped a bucket of paint on them.
Leave some gaps—mummies have exposed spots. Plus, if you completely cover the banana, the chocolate gets too thick and weird.
Alternative method: If you’re using fruit leather strips, just wrap them around the banana like actual bandages. This takes longer but gives you more control. My perfectionist sister swears by this method, but I’m team “good enough” all the way.
Step 5: Add the Eyes While the chocolate is still wet, gently press two mini chocolate chips into each banana for eyes. Don’t push too hard or they’ll disappear into the banana.
Here’s where the kids can help! My 4-year-old loves this part, even though half the chocolate chips end up in his mouth instead of on the bananas.
Step 6: The Waiting Game Put your Mummy Bananas in the fridge for about 15-20 minutes to set the chocolate. This is the hardest part because everyone wants to eat them immediately.
Real Talk: What Could Go Wrong (And How to Fix It)
Chocolate too thick? Add a bit more coconut oil and re-melt.
Chocolate too thin? Let it cool for a few minutes before drizzling.
Eyes falling off? The chocolate wasn’t wet enough. Just re-drizzle a tiny bit where you want the eyes and press them in again.
Banana breaks? Embrace it! Broken mummies are spooky mummies.
Kid eats all the mini chocolate chips? Hide them better next time. Also, buy extra. Also, maybe sneak a few yourself because they’re delicious.
When to Serve These Mummy Bananas
The timing on these is actually pretty flexible. I usually make them in the morning for after-school snacks, but they work great for:
- Halloween parties (obviously)
- Random Tuesday when you want to be the cool parent
- Sleepover snacks
- “I forgot we need to bring something to the class party” emergencies
They’re best eaten within a few hours of making them. After that, they’re still totally fine, just not as pretty. But honestly? The slightly brown, weathered look makes them more authentic.
Storage tip: Keep them in the fridge if you’re not eating them right away. Room temperature makes the chocolate soft and the bananas… well, banana-ier.
Why My Kids Are Obsessed
Emma started requesting these year-round after Halloween. “But they’re not mummies anymore, they’re just… chocolate bananas,” I told her.
“So?” she replied. Fair point, kid.
Now I make them for birthday parties, play dates, and whenever I need to distract them while I figure out dinner. They work every single time.
The best part? Other parents think you’re this amazing, creative mom. Little do they know you’re just really good at melting chocolate and sticking stuff to bananas.
Variations That Actually Work
Once you master basic Mummy Bananas, you can get creative:
Zombie Bananas: Use green-tinted white chocolate (food coloring works) and add pretzel stick “bones”
Ghost Bananas: Skip the strips, just drizzle randomly and add chocolate chip eyes
Pirate Bananas: One chocolate chip eye and a tiny pretzel eyepatch
My neighbor tried making “vampire bananas” with red food coloring for blood. Let’s just say her kitchen looked like a crime scene, but the kids loved them.
The Real Reason I Love This Recipe
Look, I’m not going to pretend I’m Pinterest mom. Most days I’m struggling to get dinner on the table before 8 PM. But these Mummy Bananas? They make me look like I have my life together.
Plus, they get my kids excited about eating fruit, which is basically a miracle in my house. Emma’s the kid who picks the blueberries out of muffins, but she’ll devour a Mummy Banana without complaint.
And when other parents ask for the “recipe” at school pickup, I feel like sharing some ancient family secret. “Oh, you just… drizzle chocolate on bananas,” I say, trying not to laugh.
Bottom Line
These Mummy Bananas aren’t going to win any culinary awards. They’re not going to be featured in some fancy food magazine. But they will make your kids happy, give you serious parent points, and take about 10 minutes of actual effort.
In a world where Pinterest moms are making elaborate Halloween villages out of vegetables, sometimes you just need a win that involves melted chocolate and fruit.
Make these. Your kids will think you’re amazing. And honestly? After the day most of us have had, we could all use someone thinking we’re amazing, even if it’s just because we figured out how to make a banana look spooky.
Now excuse me while I go make another batch because apparently we “need” them for Emma’s sleepover tonight. The things we do for love… and to avoid hearing “I’m bored” for the hundredth time today.
Happy Halloween, and may your chocolate always melt smoothly! 🎃
Let me know how yours turn out, seriously! I love seeing other people’s versions of these little mummy masterpieces.
Mummy Bananas: A Spooky & Healthy Halloween Treat for Kids
Easy and healthy Halloween treat that transforms bananas into spooky mummies using white chocolate drizzle and mini chocolate chip eyes. Perfect for kids' parties and school treats.
Ingredients
- 4-6 ripe bananas
- 1 cup white chocolate chips or melting wafers
- 2 tablespoons coconut oil (optional)
- 1/4 cup mini chocolate chips for eyes
Instructions
- Step 1Clear counter space and lay out parchment paper for easy cleanup.
- Step 2Peel bananas carefully, leaving them whole. Pat dry with paper towels.
- Step 3Microwave white chocolate chips with coconut oil in 30-second intervals, stirring between each interval until smooth.
- Step 4Using a spoon or fork, drizzle melted white chocolate over bananas in back-and-forth motion to resemble mummy bandages, leaving gaps for authentic look.
- Step 5While chocolate is still wet, gently press two mini chocolate chips into each banana for eyes.
- Step 6Place mummy bananas in refrigerator for 15-20 minutes to set the chocolate before serving.