I’ve been obsessing over this soft cookie recipe for years, tweaking and testing until I finally cracked the code. You know how most cookies start getting that sad, hard texture the day after baking? Not these babies. They stay pillowy soft for DAYS—if they last that long in your house. After countless batches and some serious cookie science experimentation, I’ve finally nailed the perfect balance of ingredients that creates that bakery-style softness that actually lasts. My friends now request “those magical soft cookies” for every gathering, and I’m finally sharing all my secrets.
Table of Contents :
Why I Became Obsessed With Creating The Perfect Soft Cookie
Let me tell you about my cookie journey. I grew up in a house where cookies were a love language, but they were always crispy. Don’t get me wrong—I appreciate a good crisp cookie, but my heart has always belonged to those thick, chewy, soft-centered ones from fancy bakeries. You know the ones—slightly underbaked in the middle, perfectly soft all the way through.
My first attempts were disasters. Complete disasters. I followed popular recipes that promised softness but ended up with cookies that were either too cakey, too flat, or—the absolute worst—soft when warm but hockey pucks by morning. One memorable failure happened during a snowstorm when I was supposed to be baking for a delayed birthday celebration. I was wearing my lucky baking socks (ridiculous, I know), had everything measured out perfectly, and still ended up with cookies that could’ve been used as weapons. My poor husband tried to be supportive, saying they’d make great ice cream scoopers. Not helpful.
After about fifteen batches over several months (my neighbors were very well-fed during this period), I finally discovered the combination of ingredients and techniques that creates that elusive, long-lasting softness. The secret isn’t just one ingredient—it’s several small tweaks that work together. And honestly? Some of these go against everything you’ve probably heard about cookie baking.
Ingredients for Perfect Soft Cookies
Here’s the thing about soft cookies that stay soft—it’s all about moisture retention. Traditional recipes often miss this completely. The ingredients below might look standard at first glance, but the proportions and a couple of special additions are what make all the difference. I’ve tested substitutions for almost everything, so I’ll tell you what’s flexible and what absolutely isn’t.
And look, I’m not precious about brands for most things, but there are a few places where it genuinely matters. I learned this the hard way after a batch made with bargain butter turned out completely different from my usual recipe.
All-Purpose Flour (2¼ cups)
Regular all-purpose flour works perfectly here. I’ve tried bread flour (too chewy) and cake flour (too cakey), but good old AP flour gives the right structure while still staying tender. Don’t bother sifting unless your flour is seriously lumpy. And please, please measure correctly—fluff the flour, spoon it into the measuring cup, and level it off. Packing it down is the easiest way to ruin these.
Unsalted Butter (1 cup/2 sticks, softened)
The butter needs to be properly softened—not melted, not cold, but squishable with your finger. This takes about 45 minutes on the counter. I’ve tried the microwave shortcut and ended up with weird partly-melted butter that made the cookies spread like crazy. If you only have salted butter, that’s fine, just reduce the added salt to ¼ teaspoon.
Granulated Sugar (¾ cup)
Regular white sugar creates those slightly crisp edges while allowing the centers to stay soft. I’ve experimented with reducing this and the cookies just weren’t the same. Sugar isn’t just sweetness—it’s structure and moisture. This isn’t the place to cut corners, folks.
Brown Sugar (1 cup, packed)
THIS is the softness superhero. The molasses in brown sugar attracts moisture from the air, keeping cookies soft longer. Dark brown sugar works best, but light brown is fine too. Always pack it in the measuring cup—this isn’t like flour where you want it loose. And if your brown sugar has hardened into a brick (we’ve all been there), microwave it with a damp paper towel for 20 seconds.
Eggs (2 large, room temperature)
Room temperature eggs incorporate better into the dough. If you forgot to take them out early (I always do), place them in warm water for 5 minutes. The eggs provide structure and richness. I’ve tried using just one egg plus an extra yolk, but honestly, two whole eggs work perfectly.
Vanilla Extract (2 teaspoons)
Use the real stuff here, not imitation. It makes a difference. I actually add more vanilla than most recipes call for because it enhances the buttery, caramel notes from the brown sugar. This is where I do get brand-specific—McCormick or Nielsen-Massey are worth the extra dollars.
Corn Syrup (2 tablespoons)
This is my controversial secret ingredient. Look, I resisted this for ages, thinking it was some kind of processed food devil. But a tiny bit of corn syrup (light, not dark) helps prevent sugar crystallization, which is what makes cookies harden. You can substitute honey, but it will change the flavor slightly. And no, this small amount won’t make your cookies taste like commercial candy.
Baking Soda (1 teaspoon)
This provides the perfect gentle rise without making the cookies cakey. Check that yours is fresh—old baking soda can lead to dense cookies. The quick test: drop a pinch in vinegar. If it fizzes vigorously, you’re good to go.
Salt (½ teaspoon)
Regular table salt works perfectly fine. I’ve tried fancy sea salt in the dough and honestly couldn’t tell the difference. Save the fancy salt for sprinkling on top if you want that sweet-salty vibe.
Mix-ins (1½ cups total)
Chocolate chips are classic (semi-sweet or milk, your call), but these work with anything—chopped nuts, M&Ms, toffee bits, white chocolate chunks, whatever makes you happy. I sometimes do a mix of mini chocolate chips and chopped walnuts. The mix-ins actually help prevent the cookies from spreading too much, creating those perfect thick, soft centers.
Instructions for the Soft Cookie Recipe
Okay, so here’s where most people go wrong with soft cookies. The mixing method matters. The baking time matters. Even how you cool them matters. I’m going to walk you through exactly what to do, and more importantly, WHY you’re doing it. This takes about 20 minutes of active time, plus chilling (which, yes, is non-negotiable, I’ve tried skipping it). Then 10-12 minutes baking per batch.
And actually, the dough can be made ahead and refrigerated for up to 3 days, or frozen for up to 3 months. I almost always have a roll of this cookie dough in my freezer for cookie emergencies. Yes, cookie emergencies are real.
STEP 1: Prepare your ingredients and equipment.
Start by setting your butter and eggs out to reach room temperature—about 45 minutes before baking. Measure everything else while you wait. Line your baking sheets with parchment paper, not wax paper (I made this mistake once and had smoke alarms blaring). Preheat your oven to 350°F, but know that we won’t be using it immediately. Your dough needs to chill first, but ovens take time to heat properly, and most don’t tell you when they’ve actually reached temperature.
STEP 2: Cream the butter and sugars.
In a large bowl, beat the softened butter, granulated sugar, and brown sugar together until the mixture is light and fluffy—about 3-4 minutes. Not 30 seconds. Not 1 minute. 3-4 actual minutes. This incorporates air into the dough which helps with texture. The mixture should lighten in color and look almost fluffy. I learned the hard way that rushing this step creates dense cookies. If your arm gets tired with a hand mixer, take a quick break, but get back to it. This step matters.
STEP 3: Add the moisture-boosting ingredients.
Add the eggs one at a time, beating well after each. Then add the vanilla and corn syrup, and beat until well combined. The mixture might look slightly separated or curdled—that’s totally normal, don’t panic. I freaked out the first time I saw this and almost threw out the dough. The mixture will smooth out when you add the dry ingredients. Scrape down the sides of the bowl with a rubber spatula so everything mixes evenly.
STEP 4: Mix in the dry ingredients.
In a separate bowl, whisk together the flour, baking soda, and salt. Add this to the wet ingredients and mix on low speed just until combined—about 30-45 seconds. Over-mixing develops gluten, which makes cookies tough, so stop as soon as the flour disappears. If you’re using a stand mixer, I actually recommend switching to a wooden spoon for this part to avoid over-mixing. The dough should be soft but not sticky at this point.
STEP 5: Fold in your mix-ins.
Gently fold in your chocolate chips or whatever mix-ins you’ve chosen. Use a wooden spoon or spatula, not the mixer. Distribute them evenly throughout the dough, but try not to overwork it. I sometimes reserve about 1/4 cup of the chips to press into the tops of the cookies right before baking—makes them look bakery-style pretty. Not necessary, but a nice touch if you’re trying to impress someone.
STEP 6: Chill the dough (DO NOT SKIP).
Here’s where I need you to trust me. Cover the dough with plastic wrap and refrigerate for at least 2 hours, preferably 4, or overnight if you can stand waiting. This does several important things: it allows the flour to fully hydrate, solidifies the butter so the cookies don’t spread too much, and lets the flavors meld. I’ve tested side by side with unchilled dough, and the difference is dramatic. I know it’s torture to wait, but if you want truly soft cookies that stay soft, don’t skip this.
STEP 7: Shape your cookies generously.
Once chilled, scoop the dough into balls about 2 tablespoons in size. Yes, that’s larger than many recipes suggest. Small cookies tend to bake through completely and get crisp faster. Larger cookies can maintain that amazing textural contrast—slightly set edges with soft centers. Roll the balls between your palms to smooth them, then place on your prepared baking sheets about 2 inches apart. They will spread, but not dramatically if the dough was properly chilled.
STEP 8: Bake just until the edges set.
Bake at 350°F for 10-12 minutes, JUST until the edges are set and lightly golden but the centers still look slightly underbaked and puffy. This is where most people go wrong—they wait until the cookies look completely done. The centers will continue to bake from residual heat after you take them out. If you wait until they look fully baked in the oven, they’ll end up overbaked and won’t stay soft. My husband always argues with me about this, saying they look raw, but I’m always right. Always.
STEP 9: The cooling trick for ultimate softness.
Let the cookies rest on the hot baking sheet for exactly 5 minutes before transferring to a wire rack. This allows them to set up enough to move without breaking but doesn’t let the bottoms get too crisp from the hot pan. Here’s another softness trick: only let them cool on the wire rack for about 10 minutes, then transfer to an airtight container while they’re still slightly warm. The trapped steam helps keep them ultra-soft. If you’re not eating them right away, place a piece of bread in the container with them—the cookies will absorb moisture from the bread, staying soft for days.
Tips & Variations for Soft Cookie Recipe
For chocolate chip cookie lovers, standard semi-sweet chips work beautifully, but try chopping up a bar of good chocolate instead—the irregular pieces create pockets of melty chocolate throughout. If you want to go wild, substitute half the vanilla extract with almond extract and add some toasted chopped almonds with white chocolate chunks. The flavor combination is mind-blowing.
To keep these cookies at peak softness, store them with a slice of bread in an airtight container at room temperature. The bread will get stale, but the cookies will stay magically soft for up to a week. To refresh any cookies that do firm up, microwave them for 10 seconds—they’ll taste freshly baked again.
And listen, if your cookies don’t look like perfectly uniform bakery specimens, that’s completely normal. Homemade cookies should look homemade! Those little imperfections are how people know they’re getting the real deal, not something mass-produced.
Final Thoughts on Soft Cookie Recipe
I know this might seem like a lot of fuss for “just cookies,” but once you taste the difference, you’ll get why I became so obsessed. The first time you bite into one of these perfectly soft cookies three days after baking and find it’s still somehow magically tender—that’s the moment you’ll become a convert too. And honestly, people will think you’re some kind of baking wizard.
If you try this recipe, please let me know how it turns out for you. I’m genuinely curious if my soft cookie obsession translates to other kitchens or if my oven just has some kind of special soft-cookie mojo. Every time someone tells me they’ve tried these, I get unreasonably excited to hear about their results—especially if they’ve made any fun variations. Happy baking!
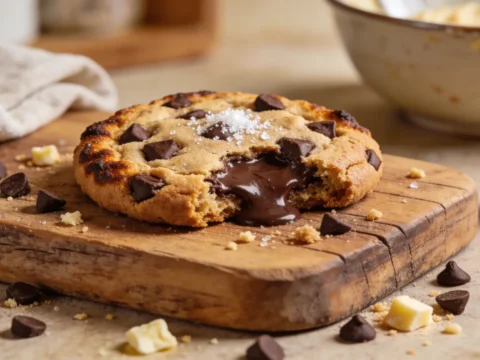
The Softest Cookie Recipe Ever — Stays Soft for Days!
A soft cookie recipe that guarantees bakery-style softness that lasts for days, incorporating various techniques to retain moisture.