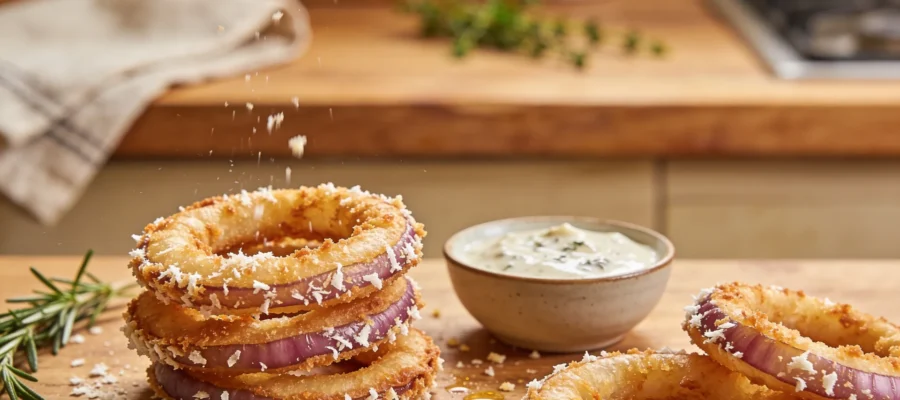
Crispy Onion Ring Chips were born from my desperation one night when I was craving something crunchy but trying to stay low-carb. I stared at an onion on my counter and wondered if I could transform it into something that would satisfy that snack craving without the heavy breading of traditional onion rings. What happened next was nothing short of a happy kitchen accident that’s now become my go-to savory snack. These thin slices of onion get transformed into airy, crispy chips with a savory parmesan crust that shatters when you bite into them.
Table of Contents :
How These Low-Carb Onion Chips Saved My Snack Life
Let’s be honest, the hardest part about eating low-carb isn’t the main meals – it’s the snacks. I used to live for potato chips and crispy appetizers, but most of those options were suddenly off the table. I tried pork rinds (meh), cheese crisps (good but one-dimensional), and those sad vegetable chips from the health food store that somehow cost $7 for what feels like three chips.
The first time I attempted these onion chips, I sliced the onions way too thick and ended up with floppy, half-raw onion rings that were… edible? I guess? But definitely not the crispy experience I was after. The second try, I cranked the oven too high thinking I’d speed up the process, and ended up with charcoal discs that set off my smoke detector. My dog still hasn’t forgiven me. But the third try – that magical third attempt – I finally got the temperature, timing, and thickness just right. These aren’t just “good for being healthy” – they’re legitimately delicious. My husband, who typically looks at my low-carb experiments with suspicion, actually started stealing them off the baking sheet before I could even get them to the table.
Ingredients for Crispy Onion Ring Chips
The beauty of these Crispy Onion Ring Chips is that they require just a handful of ingredients you probably already have. The key is using the right type of onion and making sure your seasonings are fresh – those little details make all the difference between “meh” and “more please!”
And look, I know some recipes claim to be “5-ingredient easy” and then list twenty “pantry staples” they don’t count. I’m not playing that game. This really is a simple recipe with minimal shopping required, which makes it perfect for those nights when you’re craving something crispy but don’t want to run to the store.
Large Sweet Onions (2 medium)
Sweet onions like Vidalia or Walla Walla work best here because they caramelize beautifully in the oven and have less of that sharp, pungent bite when cooked. Yellow onions will work in a pinch, but the sweetness really makes these special. Choose firm onions with tight, dry outer skins – no soft spots or sprouting.
Grated Parmesan Cheese (1/2 cup)
Please, for the love of all things tasty, use the real stuff you grate yourself, not the shelf-stable powder in the green can. Pre-grated works if you’re in a hurry, but freshly grated melts and crisps up in a way that creates those incredible lacy edges. I’ve tried fancy aged Parmigiano-Reggiano and honestly, regular parmesan works just as well for a fraction of the cost.
Olive Oil (2 tablespoons)
You don’t need your fancy finishing oil here – any decent olive oil will do. Its job is to help the onions crisp up and give the seasonings something to stick to. In a pinch, avocado oil works too, but avoid vegetable or canola oil which can leave an unpleasant aftertaste with this cooking method.
Garlic Powder (1/2 teaspoon)
Not garlic salt, which would make these way too salty, but straight garlic powder. It distributes evenly and won’t burn like fresh garlic would at this temperature. Check that yours isn’t a solid brick – if it’s old and clumpy, do yourself a favor and get a new bottle. Trust me, it makes a difference.
Paprika (1/4 teaspoon)
Regular paprika adds a subtle warmth and beautiful color. You can substitute smoked paprika if you want a more complex flavor, but start with just a pinch as it’s much stronger. I’ve accidentally over-smoked these before and they tasted like a campfire – not in the good way.
Salt and Black Pepper (to taste)
Remember that Parmesan is already salty, so go easy on the additional salt. I usually use about 1/4 teaspoon of salt and a generous pinch of freshly ground black pepper. Pre-ground pepper works, but if you have a pepper mill, this is the time to use it – those aromatic oils make a difference.
Instructions for Crispy Onion Ring Chips
The process for making these Crispy Onion Ring Chips isn’t complicated, but there are a few critical points where things can go sideways. The most important thing? Patience. These need low, slow heat to properly dehydrate and crisp without burning. If you rush it, you’ll end up with either floppy chips or burnt ones – neither of which is what we’re after.
This takes about 25-30 minutes of actual hands-on work, plus baking time. You can prep the onions ahead and keep them in cold water in the fridge for up to a day, but pat them completely dry before proceeding. And a heads up: your kitchen will smell amazing during baking – it’s like the best parts of Thanksgiving and a steakhouse had a fragrant baby.
STEP 1: Preheat and prep your baking sheets.
Preheat your oven to 325°F (not 350°F – that extra 25 degrees will burn these delicate chips). Line two large baking sheets with parchment paper, not foil. I learned the hard way that foil can cause the bottoms to burn before the tops crisp up. If you only have one baking sheet, you’ll need to work in batches. These need space to crisp properly – crowding is the enemy of crispiness.
STEP 2: Slice the onions paper-thin.
This is THE most critical step. The onions must be sliced extremely thin – we’re talking almost translucent, about 1/16 inch thick if possible. A mandoline is ideal here (with the guard, please – I still have the scar from when I thought I could slice “just one more piece” without it). If using a knife, make sure it’s very sharp. After slicing, separate the rings completely. Any connected rings will steam instead of crisp, and you’ll end up with soft spots in your chips.
STEP 3: Remove excess moisture.
Spread the onion rings on a clean kitchen towel or paper towels and press gently with another towel to remove as much moisture as possible. I cannot stress this enough – moisture is the enemy of crispiness. I once skipped this step thinking “how wet could onions really be?” and ended up with limp, sad chips that never crisped up even with extra baking time. Take the 2 minutes to do this properly.
STEP 4: Season the onions.
In a large bowl, toss the onion rings with olive oil until every piece is lightly coated. In a small bowl, mix the Parmesan, garlic powder, paprika, salt, and pepper. Add this mixture to the onions and toss gently until evenly coated. Your fingers work best for this – tongs can break the delicate rings. The mixture will seem like it’s not sticking well at first, but keep tossing gently and it will distribute.
STEP 5: Arrange in a single layer.
Arrange the coated onion rings on the prepared baking sheets in a single layer with minimal overlap. This is not the time to crowd the pan – these need airflow around them to crisp up. If they’re piled on top of each other, they’ll steam instead of crisp. I typically use two large baking sheets for two medium onions, and sometimes still need to work in batches.
STEP 6: Bake until golden and crisp.
Bake for 15 minutes, then rotate the pans and switch their positions in the oven for even cooking. Continue baking for another 10-15 minutes, checking frequently after the 10-minute mark. These go from “almost done” to “burnt” shockingly fast – I’ve ruined more than one batch by walking away during those final minutes. They’re done when they’re golden brown and look dry and crisp. The thinner pieces will brown faster than thicker ones, so you might want to remove some chips earlier than others.
STEP 7: Cool completely for maximum crispness.
This step is non-negotiable. The chips won’t reach their full crispy potential until they’ve cooled completely. Transfer them to a wire rack, not a plate – the air circulation underneath helps prevent sogginess. They’ll continue to crisp as they cool, transforming from merely firm to genuinely crunchy. Give them at least 10 minutes, though 15 is better. I know it’s tempting to eat them right away (the smell is intoxicating), but patience pays off with the perfect texture.
Tips & Variations for Crispy Onion Ring Chips
These chips are best eaten the day they’re made – after about 12 hours, they start to lose some crispness due to humidity in the air. You can store them in an airtight container with a paper towel for up to 2 days, but they’ll never be quite as good as fresh. To crisp them back up, pop them in a 300°F oven for 3-5 minutes.
For flavor variations, try adding 1/4 teaspoon of dried herbs like thyme or rosemary, or swap in Asiago or Pecorino cheese for the Parmesan. I’ve even made a spicy version with a pinch of cayenne that was divine with a cold beer. And if yours aren’t picture-perfect, who cares? Mine certainly never look like food magazine spreads, but they disappear just as fast.
Final Thoughts on Crispy Onion Ring Chips
These Crispy Onion Ring Chips honestly saved my snacking life when I was trying to cut carbs. They satisfy that crunchy, savory craving that’s so hard to meet without traditional chips or crackers. Yes, your kitchen will smell like onions for a bit, and yes, you might burn the first batch while you get the timing right for your particular oven. But once you nail it, you’ll find yourself making these regularly.
If you try these, please let me know how they turn out. I’m particularly curious if different varieties of onions work for you – I’m still experimenting myself and would love to compare notes. And if you come up with any brilliant seasoning combinations, drop me a comment. Half the fun of recipes like this is seeing where other people take them!
Crispy Onion Ring Chips
These Crispy Onion Ring Chips are a low-carb snack with a crunchy texture and a savory parmesan coating, perfect for satisfying crunchy cravings without the carbs.