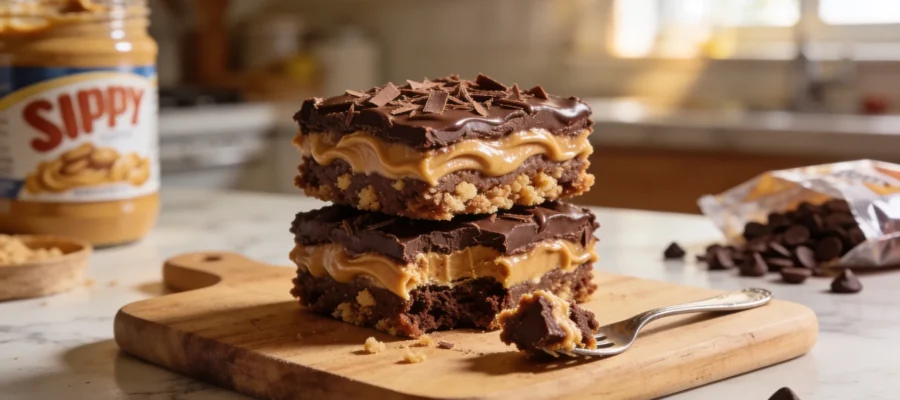
These no bake chocolate peanut butter bars have been my go-to dessert when I need something that tastes impressive but requires zero actual baking skills. I’m talking five ingredients, maybe twenty minutes of actual work, and bars that disappear faster than I can cut them. The best part? No oven means no risk of me burning another batch because I got distracted by laundry or whatever crisis my kids decided to have. I’ll walk you through everything below, including why I kept getting the ratios completely wrong for months.
Table of Contents :
Why I Finally Perfected These Bars
Okay, so here’s the thing. I used to be one of those people who thought no-bake desserts were somehow cheating. Like, if you’re not sweating over a hot oven, are you even really making dessert? Then I had three kids under five and my perspective changed real fast.
The first time I tried making these no bake chocolate peanut butter bars, I followed some recipe that called for way too much powdered sugar and not enough peanut butter. The result was this overly sweet, chalky mess that nobody wanted to eat. Total disaster. The second attempt, I swung too far the other way and made them so peanut buttery they wouldn’t hold together. They were basically expensive peanut butter soup with graham cracker chunks floating around.
What finally clicked for me was realizing that the graham crackers aren’t just filler, they’re actually doing structural work here. And the chocolate layer isn’t just decoration, it’s what keeps everything from falling apart when you try to cut clean squares. Most recipes online completely skip explaining this balance, which is why so many people end up with bars that either crumble or turn into mush. My version gives you that perfect chewy-but-firm texture that actually slices cleanly and tastes like a grown-up Reese’s cup.
Ingredients for no bake chocolate peanut butter bars
The beauty of this recipe is that you probably have most of this stuff already. I keep all these ingredients stocked because they’re useful for so many other things too. Nothing here is fancy or hard to find, but the quality of your peanut butter really does matter more than you’d think.
Graham crackers (1 sleeve, about 9 crackers)
These create the base structure and give you that slight crunch that keeps the bars interesting. I usually buy the honey variety because I like the extra sweetness, but regular works fine too. You’re going to crush these up, and I’ve learned the hard way that putting them in a food processor for exactly thirty seconds gives you the perfect texture. Too long and you get powder, too short and you get annoying big chunks.
Creamy peanut butter (1 cup)
This is your main event ingredient, so don’t cheap out here. I always use Jif or Skippy because the natural stuff separates too much and throws off the consistency. You want something that’s smooth and holds together well. Crunchy peanut butter technically works, but then you lose that clean, fudgy texture that makes these bars special. Save the crunchy stuff for sandwiches.
Powdered sugar (1½ cups)
This sweetens everything and helps bind the base layer together. Regular granulated sugar won’t work here because it won’t dissolve properly and you’ll end up with grainy bars. I’ve tried cutting back on this amount to make them less sweet, but anything under 1¼ cups and the bars won’t hold their shape when you cut them.
Butter (6 tablespoons, melted)
The butter helps everything stick together and adds that rich flavor that makes these taste bakery-quality instead of like something you threw together in desperation. I melt it in the microwave in thirty-second increments because I always forget and let it explode everywhere if I try to do it all at once.
Semi-sweet chocolate chips (1 cup)
For the top layer that makes these look professional and adds that perfect chocolate contrast. I’ve tried milk chocolate, but it’s too sweet and overpowers the peanut butter. Dark chocolate works if you like things less sweet, but semi-sweet hits that perfect balance. You’ll melt these with a tiny bit of butter to make them spreadable.
How to Make no bake chocolate peanut butter bars
The whole process is pretty straightforward, but there are a few spots where timing matters more than you’d expect. The chocolate layer needs to go on while the base is still slightly soft, but not so soft that it sinks in. I usually get everything ready before I start because once you begin, it moves pretty quickly.
STEP 1: Prep your pan and crush the graham crackers.
Line an 8×8 baking dish with parchment paper, leaving some overhang so you can lift the bars out later. Trust me on this step, trying to cut bars while they’re still in the pan is a nightmare. Put your graham crackers in a food processor and pulse until they’re finely ground but not powdery. If you don’t have a food processor, put them in a sealed bag and crush them with a rolling pin, but check frequently because it’s easy to overdo it.
STEP 2: Make the peanut butter base.
Mix the crushed graham crackers, peanut butter, powdered sugar, and melted butter in a large bowl. This is where I always think I need my stand mixer, but honestly, a wooden spoon and some elbow grease works better. You want everything evenly distributed but not overmixed. The mixture should hold together when you squeeze it but not be wet or oily. If it seems too dry, add another tablespoon of melted butter.
STEP 3: Press the base layer.
Dump the peanut butter mixture into your prepared pan and press it down evenly. I use the bottom of a measuring cup to really pack it down, especially in the corners. This step determines whether your bars will slice cleanly later, so don’t rush it. The surface should look smooth and feel firm when you press it with your finger.
STEP 4: Melt and spread the chocolate.
Melt the chocolate chips with about a teaspoon of butter in the microwave, stirring every thirty seconds until smooth. Don’t skip the butter here, it makes the chocolate way easier to spread and gives it a nice shiny finish. Pour the melted chocolate over the peanut butter base and spread it evenly with an offset spatula or the back of a spoon. Work quickly because the chocolate starts to set pretty fast.
STEP 5: Chill and cut.
Refrigerate for at least two hours, but honestly three is better if you want clean cuts. When you’re ready to serve, lift the whole thing out using the parchment paper overhang and cut into squares with a sharp knife. Wipe the knife clean between cuts for the prettiest results, though let’s be real, they disappear so fast that perfect squares are kind of optional.
What to Serve With no bake chocolate peanut butter bars
These are rich enough to stand on their own, but a glass of cold milk is basically mandatory in my house. They’re also fantastic with vanilla ice cream if you’re going full dessert mode, or alongside fresh strawberries if you want something to cut through all that chocolate and peanut butter richness. Coffee pairs surprisingly well too, especially if you’re serving these after dinner. My kids like them with more milk, my husband likes them with his evening coffee, and I usually just eat them straight from the fridge while standing in the kitchen pretending I’m checking if they’re set yet.
Tips for the Best no bake chocolate peanut butter bars
Store these in the refrigerator covered with plastic wrap, and they’ll keep for about a week if they last that long. They actually taste better after sitting overnight because all the flavors meld together. You can make them up to three days ahead for parties, which is honestly when I make my best stuff anyway. If you want to switch things up, try using crunchy peanut butter in the base or adding a handful of mini chocolate chips to the peanut butter layer. Just don’t expect them to look like professional bakery photos, these are supposed to be homemade and slightly imperfect.
Questions People Ask About no bake chocolate peanut butter bars
I get asked about these bars pretty regularly, especially around holidays when people want something impressive but manageable.
Can I use natural peanut butter instead of regular?
I’ve tried this and it’s tricky because natural peanut butter has more oil separation. If you really want to use it, make sure it’s well-stirred and you might need to add an extra couple tablespoons of powdered sugar to get the right consistency. The texture won’t be quite as smooth, but the flavor is definitely more intense.
How long do these no bake chocolate peanut butter bars need to set?
Minimum two hours in the fridge, but three is better for clean slicing. If you’re in a hurry, you can put them in the freezer for about forty-five minutes, but let them sit at room temperature for five minutes before cutting or the chocolate will crack.
Can I freeze these bars for later?
Absolutely, they freeze really well wrapped individually in plastic wrap. They keep for up to three months frozen, and you can eat them straight from the freezer or let them thaw for about ten minutes. Actually, some people prefer them slightly frozen because it makes them extra fudgy.
Why did my bars turn out too soft to cut?
Usually this means either not enough graham crackers in the base, or the bars didn’t chill long enough. The base should feel firm when you press it before adding the chocolate layer. If yours are too soft, try chilling them longer or next time add another couple of crushed crackers to the mixture.
Final Thoughts on no bake chocolate peanut butter bars
Look, I’m not saying these are going to win any fancy dessert competitions, but they disappear faster than anything else I make and people actually ask for the recipe. That’s pretty much my definition of success in the kitchen these days. They’re the kind of dessert that makes you look like you know what you’re doing without actually requiring any real skill.
If you try these, let me know how yours turn out. I’m always curious if this works in other kitchens or if mine is just weird. And seriously, don’t stress about making them look perfect, the taste is what people remember anyway.
No Bake Chocolate Peanut Butter Bars
These no bake chocolate peanut butter bars are a delightful dessert that combines chocolate and peanut butter in an easy-to-make recipe requiring no baking.