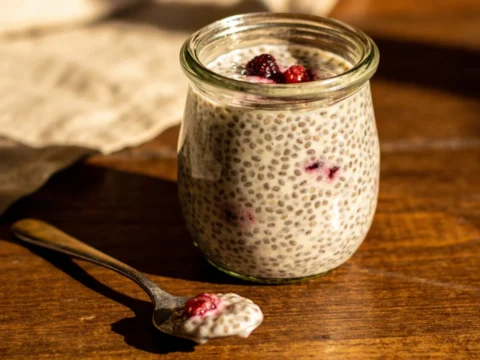
Sugar free chia pudding saved my morning routine after I finally admitted my breakfast smoothies were basically milkshakes with vitamins. I’d been hunting for something filling that wouldn’t spike my blood sugar before noon, and after several spectacularly failed attempts at overnight oats (soggy mess, anyone?), I stumbled onto chia seeds. The first few batches were… interesting. Too watery, too thick, or weirdly crunchy. But once I nailed the proportions and figured out the sweetening situation, I haven’t looked back.
Table of Contents :
My Journey to Actually Enjoying Breakfast Again
For years, I thought “healthy breakfast” meant choking down something that tasted like cardboard or secretly loading it with sugar to make it palatable. My breaking point came when my doctor gave me that look during my annual checkup. You know the one – where they scan your bloodwork and then glance up with that “we need to talk” expression.
Cutting back on added sugar seemed impossible at first. I tried those “sugar-free” products from the store, but they were either packed with artificial sweeteners that gave me headaches or tasted like sweetened chalk. The first time I made chia pudding, I used way too few chia seeds and ended up with what I can only describe as slightly thickened milk with fish eggs floating in it. Not appetizing. The second attempt went too far in the other direction – so thick I could’ve used it as spackle. I almost gave up, but then I remembered I had some ripe bananas on the counter that were about to cross into banana bread territory.
That was my lightbulb moment. What if natural sweetness was the answer? Six iterations later, this recipe emerged – creamy, satisfying, and naturally sweet without a grain of refined sugar in sight. And honestly? I don’t miss the sugar crash at all.
Ingredients for Sugar Free Chia Pudding
The beauty of this recipe lies in its simplicity. You don’t need fancy equipment or hard-to-find ingredients – just a few wholesome components that work together to create something that feels indulgent without the sugar spike. The trick is understanding how each ingredient contributes to the final texture and sweetness.
I’ve tested this recipe with at least ten different milk alternatives, multiple sweetener options, and enough flavor variations to stock a small cafe menu. What I’ve landed on is a flexible formula that you can adapt based on what’s in your pantry, while still guaranteeing that perfect pudding consistency.
Chia Seeds (¼ cup)
These tiny powerhouses are non-negotiable (I mean, it’s chia pudding after all). They contain omega-3 fatty acids and fiber that keeps you full for hours. I’ve tried both black and white chia seeds – they work exactly the same, but the white ones disappear visually if aesthetics matter to you. Always check the expiration date when buying; old seeds don’t gel properly, which I learned the hard way with a runny batch that never set.
Almond Milk (1 cup, unsweetened)
I prefer almond milk for its neutral flavor and lower calorie content, but any milk works here. Coconut milk makes an incredibly rich, tropical-tasting pudding. Oat milk gives a creamier result but adds more carbs. Regular dairy milk works perfectly too – I just find it makes the pudding a bit heavier. Whatever you use, make sure it’s unsweetened since we’re controlling the sweetness ourselves.
Ripe Banana (½ medium)
This is my secret weapon for natural sweetness. The riper, the sweeter – those spotty ones that are too soft for eating are perfect here. The banana also adds creaminess and body to the pudding. If you’re not a banana fan (or are keto/very low carb), you can swap it for ¼ avocado plus your preferred sugar-free sweetener, though you’ll lose some of the natural sweetness.
Pure Vanilla Extract (½ teaspoon)
Don’t skip this! Vanilla enhances the perception of sweetness without adding any sugar. I’ve tried the alcohol-free versions and honestly can’t tell the difference in this recipe, so use whichever you have. In a pinch, a vanilla bean pod scraped into the milk works beautifully but is definitely more expensive – I save that for when I’m trying to impress someone.
Cinnamon (¼ teaspoon)
Another sweetness booster that tricks your taste buds into thinking something is sweeter than it actually is. I’ve left it out before when I ran out, and the pudding definitely needed more sweetener to compensate. Ceylon cinnamon has a more delicate flavor if you’re not a huge cinnamon fan. If you’re making a chocolate version, you can replace this with a pinch of cardamom instead.
Sea Salt (tiny pinch)
I forget this ingredient exactly once, and the pudding tasted flat and one-dimensional. Just a tiny amount – seriously, I’m talking a few grains – enhances all the other flavors and balances the sweetness. I use flaky sea salt because that’s what’s in my everyday salt cellar, but any salt works fine here.
Optional Mix-ins and Toppings
This is where you can get creative. Fresh berries add natural sweetness and beautiful color. Unsweetened cocoa powder (1-2 teaspoons) transforms this into a chocolate pudding. Chopped nuts add crunch and staying power. A spoonful of almond butter swirled in just before serving makes this taste downright decadent. I usually set out a few options and let everyone customize their own.
Instructions for Sugar Free Chia Pudding
Making chia pudding isn’t complicated, but there are a few key techniques that separate the amazing from the merely edible. The first time I made this for my sister, she said, “Wait, yours actually tastes like pudding. Mine always tastes like…well, healthy food.” The secret is in how and when you mix things, plus a little patience.
The entire active prep takes about 5 minutes, but you’ll need at least 2 hours of refrigeration time (overnight is ideal). I usually make this after dinner so it’s ready for the next morning. If you’re in a rush, you can speed things up by using slightly warm (not hot) milk and extending the initial stir time, but I find the texture isn’t quite as perfect.
STEP 1: Blend your banana base.
In a blender, combine the almond milk, ripe banana, vanilla extract, cinnamon, and salt. Blend until completely smooth – about 30-45 seconds. This step is crucial for distributing the banana evenly and preventing chunks in your finished pudding. If you skip the blender and just mash the banana, you’ll get little pockets of intense banana flavor rather than a consistent sweetness throughout. I learned this the hard way when my blender was broken, and the texture was noticeably less creamy.
STEP 2: Combine with chia seeds.
Pour your blended mixture into a medium bowl and add the chia seeds. Whisk immediately and thoroughly – this is where people often go wrong. Chia seeds start absorbing liquid immediately and can clump together if you don’t mix well right away. Whisk for a solid 30 seconds until all seeds are distributed evenly. The mixture will look very watery at this point – that’s completely normal. The first time I made this, I panicked and added more chia seeds, which resulted in that spackle-like texture I mentioned earlier.
STEP 3: Wait, then whisk again.
Let the mixture sit for 10 minutes at room temperature, then whisk again vigorously. This second whisking is non-negotiable – it breaks up any clumps that have started to form as the chia seeds begin absorbing liquid. You’ll notice the mixture has started to thicken slightly but is still quite liquid. If you see any seed clumps, break them up with your whisk or a fork. I sometimes use the back of a spoon to press against the side of the bowl to break up stubborn clumps.
STEP 4: Transfer and refrigerate.
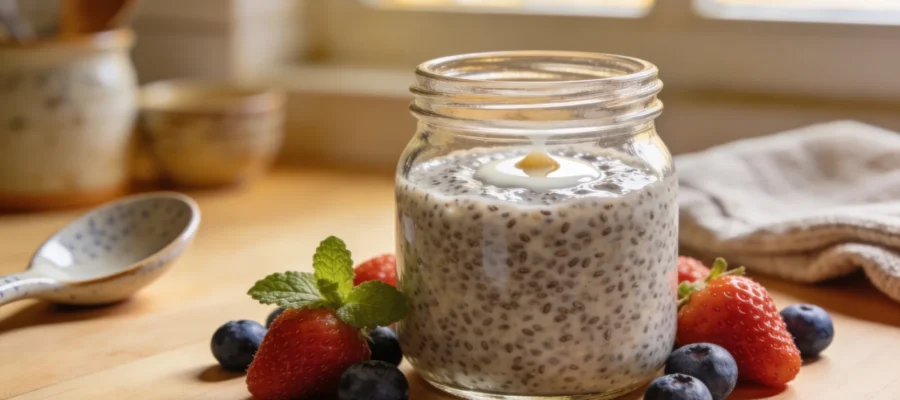
Cover the bowl or transfer the mixture to individual jars or containers. This recipe makes about 2 servings, so I usually split it between two small mason jars (those little 8oz ones are perfect). Refrigerate for at least 2 hours, but preferably overnight. The pudding will continue to thicken as it chills, eventually reaching that perfect spoonable consistency. If you’re in a hurry, the minimum time is about 2 hours, but the texture improves dramatically with longer chilling time.
STEP 5: Check consistency and adjust if needed.
After chilling, check your pudding. It should be thick, creamy, and spoonable – not runny or dry. If it’s too thick (which can happen if your chia seeds are super absorbent or if you accidentally added too many), simply stir in a splash more almond milk until you reach your desired consistency. If it’s too thin (rare, but can happen with old chia seeds), you can either add a teaspoon more chia seeds and wait another hour, or just enjoy it as is – it’ll still taste delicious even if the texture is more like a thick smoothie.
STEP 6: Add toppings and serve.
This is where the magic happens. I like to add fresh berries, a sprinkle of chopped nuts, maybe a dust of extra cinnamon, or a small drizzle of almond butter. If you’re serving this to someone skeptical of “healthy food,” a few dark chocolate shavings on top can win them over without adding much sugar. The toppings add textural contrast and make the whole experience more satisfying. And honestly? They make it look pretty enough for Instagram, which sometimes matters when you’re trying to convince yourself or others that healthy food can be delicious.
Tips & Variations for Sugar Free Chia Pudding
This pudding keeps beautifully in the fridge for up to 4 days, though the texture is best within the first 2-3 days. It never lasts that long in my house anyway. For a portable breakfast, make it in jars with lids and grab one as you head out the door. If you’re meal prepping, you can double or triple the recipe with exactly the same results.
For variations, try adding 1-2 teaspoons of unsweetened cocoa powder to the blending stage for chocolate pudding. A chocolate-peanut butter version (with a tablespoon of natural peanut butter blended in) tastes indulgent enough for dessert. For tropical vibes, use coconut milk and add some chopped mango on top. And if you really need it sweeter but want to stay sugar-free, a few drops of monk fruit extract or stevia works without affecting the texture.
If yours doesn’t set properly, the most common culprit is old chia seeds that have lost their gelling power, or not whisking thoroughly enough in the beginning. Unlike those picture-perfect food blogger photos, real homemade chia pudding sometimes has a seed or two that escapes the matrix and floats to the top – that’s completely normal and doesn’t affect the taste at all.
Final Thoughts on Sugar Free Chia Pudding
I won’t pretend this recipe will change your life or that you’ll never crave a cinnamon roll again. But I will say that this sugar-free chia pudding has become a genuine staple in my kitchen – not in that aspirational way where I make it once and then go back to my old habits, but in that real-life way where I actually make it every week because it works for me.
If you try this recipe, I’d love to hear how it worked in your kitchen. Did you make any tweaks? Find a topping combination that works amazingly well? Or did something go hilariously wrong? Drop a comment below – your experiences help make this recipe better for everyone, and honestly, they make my day. We’re all just figuring out this healthy eating thing together, one chia seed at a time.
Sugar-Free Chia Pudding (Naturally Sweetened & Guilt-Free!)
This sugar-free chia pudding is creamy, satisfying, and naturally sweetened without any refined sugars, making it a perfect breakfast or snack option.