

Keto Friendly Hamburger Casserole: The Ultimate Comfort Food That Won’t Kick You Out of Ketosis
Picture this: you walk into your kitchen after a long day, craving something hearty and comforting, but you’re committed to your keto lifestyle. You don’t want another sad salad or plain grilled chicken breast. You want something that screams “comfort food” without screaming “carb overload.” Well, my friend, let me introduce you to your new weeknight hero – the keto hamburger casserole.
I’ve been perfecting this recipe for three years now, ever since my neighbor Karen challenged me to make a casserole that wouldn’t derail her keto progress. Spoiler alert: she’s been making this dish weekly ever since, and her husband thinks she’s some kind of kitchen wizard. The best part? This casserole delivers all the satisfaction of traditional comfort food while keeping your macros in check.
Table of Contents :

What Makes This Keto Hamburger Casserole So Special?
Here’s the thing about most casseroles – they’re carb bombs waiting to happen. Rice, pasta, potatoes, breadcrumbs – it’s like they were designed to sabotage your keto goals. But this recipe? It’s different. We’re talking about a protein-packed, veggie-loaded masterpiece that clocks in at just 4 net carbs per serving.
The secret lies in our clever substitutions and layering technique. Instead of relying on starchy fillers, we build flavor through quality ingredients and smart cooking methods. Trust me, after one bite, you won’t miss those carbs one bit.
Key Benefits of This Recipe:
- High protein content (28g per serving)
- Low net carbs (only 4g per serving)
- Family-friendly (even the kids love it)
- Make-ahead friendly (perfect for meal prep)
- Budget-conscious (uses affordable ingredients)
The Complete Ingredient Breakdown
Let’s talk ingredients, because the quality of what goes into your casserole directly impacts what comes out. I’ve tested this recipe with various brands and cuts, so here’s what works best:
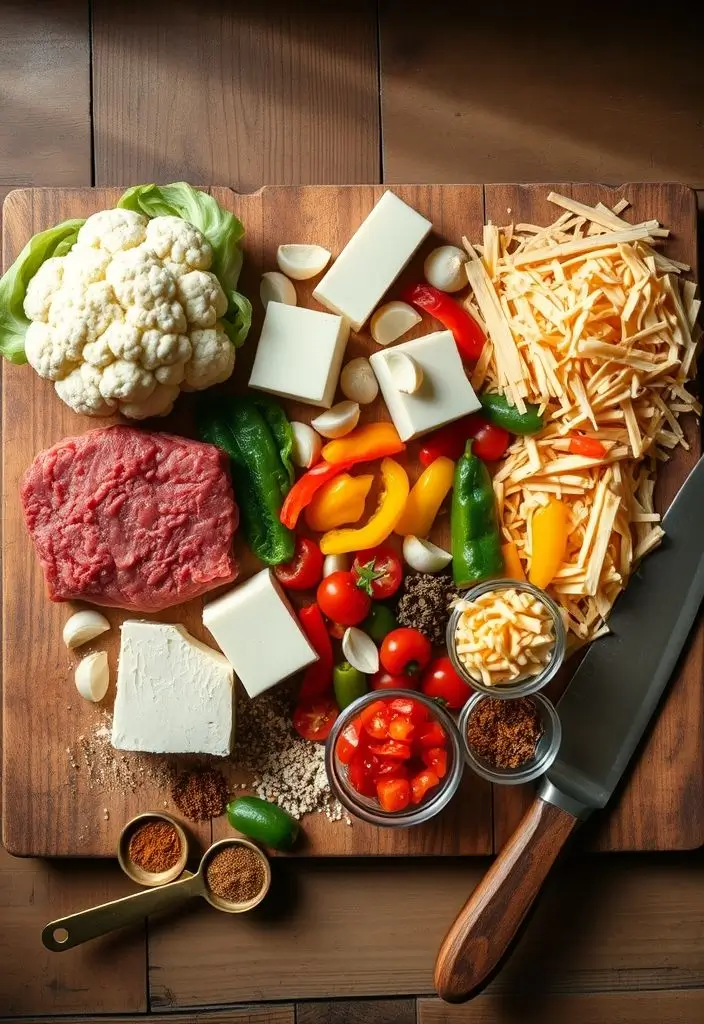
The Protein Foundation:
- 2 pounds ground beef (80/20 blend works perfectly)
- 8 oz cream cheese (full-fat, please – we’re doing keto right)
- 1 cup shredded cheddar cheese (sharp cheddar adds more flavor)
- 1/2 cup mozzarella cheese (for that perfect melt factor)
The Vegetable Stars:
- 1 large head of cauliflower (about 2 pounds, riced)
- 1 medium onion, diced
- 3 cloves garlic, minced
- 1 bell pepper (any color you prefer)
- 2 cups fresh spinach (or 1 cup frozen, thawed and drained)
The Flavor Builders:
- 1 can diced tomatoes (14.5 oz, sugar-free variety)
- 2 tablespoons tomato paste (check the label for added sugars)
- 2 teaspoons Italian seasoning
- 1 teaspoon paprika
- 1/2 teaspoon red pepper flakes (optional, but recommended)
- Salt and black pepper to taste
- 2 tablespoons olive oil
Step-by-Step Cooking Instructions
Alright, let’s get cooking! This isn’t rocket science, but there are a few tricks that make all the difference.
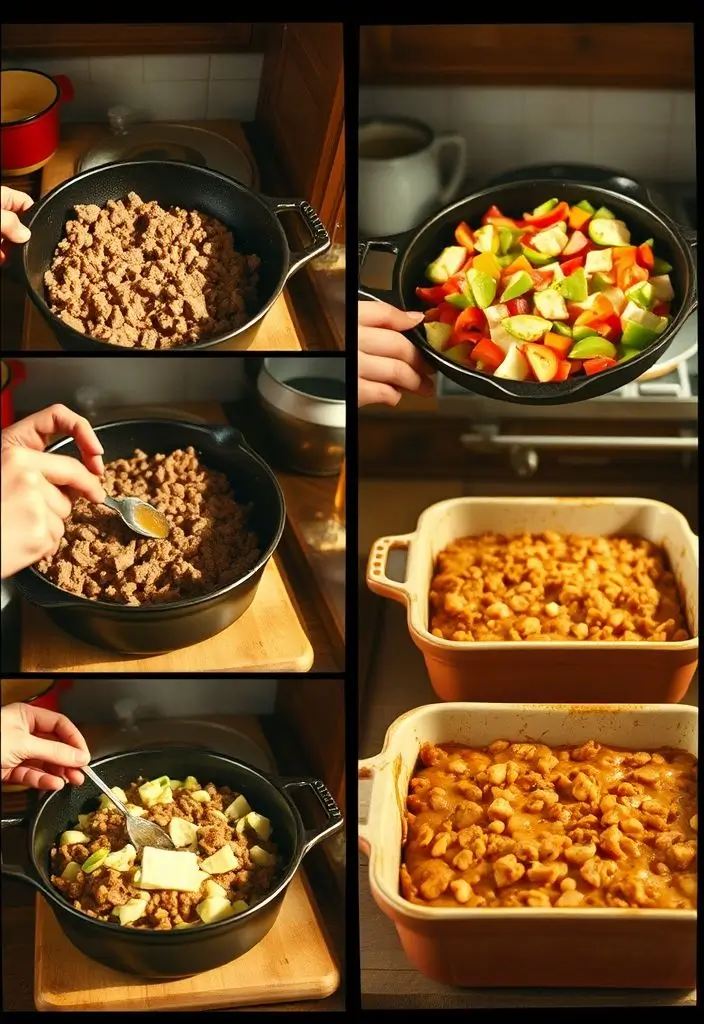
Step 1: Prep Your Cauliflower Rice
First things first – cauliflower rice preparation is crucial. You can buy pre-riced cauliflower (FYI, it’s a real time-saver), or rice your own. If you’re going the DIY route, cut your cauliflower into chunks and pulse in a food processor until it resembles rice grains.
Heat 1 tablespoon of olive oil in a large skillet over medium-high heat. Add the cauliflower rice and cook for 5-7 minutes, stirring occasionally. You want to remove excess moisture – nobody likes a soggy casserole. Season with salt and pepper, then set aside.
Step 2: Brown That Beef Like a Pro
In the same skillet (waste not, want not), add the ground beef. Here’s where many people go wrong – they move the meat around too much. Let it sit and develop a nice brown crust before stirring. This takes about 4-5 minutes per side.
Once browned, use a slotted spoon to transfer the beef to a plate, leaving about 2 tablespoons of fat in the pan. If there’s more fat than that, drain some – if there’s less, add a bit of olive oil.
Step 3: Build Your Flavor Base
Time to create what I call the “flavor foundation.” Add diced onions to the same pan and cook until translucent (about 3-4 minutes). Add minced garlic and bell pepper, cooking for another 2 minutes until fragrant.
Return the browned beef to the pan and stir in:
- Diced tomatoes (drained)
- Tomato paste
- Italian seasoning
- Paprika
- Red pepper flakes (if using)
- Salt and pepper
Let this mixture simmer for 10 minutes. The tomato paste should darken slightly, and the whole mixture should smell absolutely incredible.
Step 4: The Creamy Magic Happens
Lower the heat and add chunks of cream cheese to the beef mixture. Stir gently as it melts – this creates that rich, creamy base that makes this casserole so addictive. Once the cream cheese is fully incorporated, fold in the fresh spinach and let it wilt.
Taste and adjust seasonings. This is your chance to make it perfect – need more salt? Add it. Want more heat? A pinch more red pepper flakes will do the trick.
Step 5: Assembly Time
Preheat your oven to 375°F. In a greased 9×13 inch baking dish, spread the cauliflower rice evenly across the bottom. Top with the beef mixture, spreading it out evenly.
Sprinkle the shredded cheddar and mozzarella cheeses over the top. Here’s a pro tip: mix the cheeses together first for more even distribution and better melting.
Step 6: The Final Bake
Bake for 25-30 minutes until the cheese is golden and bubbly. If you want extra browning on top (and honestly, who doesn’t?), pop it under the broiler for 2-3 minutes at the end.
Let it rest for 10 minutes before serving. I know it’s tempting to dig in immediately, but this resting time allows everything to set up properly.
Customization Options That Actually Work
One of the things I love most about this recipe is how adaptable it is. Over the years, I’ve tried countless variations, and here are the ones that actually make the cut:
Protein Swaps:
- Ground turkey (use 93/7 lean and add extra olive oil)
- Ground pork (adds incredible flavor)
- Mix of beef and Italian sausage (remove casings first)
Vegetable Additions:
- Mushrooms (sauté them first to remove moisture)
- Zucchini (dice small and salt for 15 minutes, then pat dry)
- Broccoli florets (blanch them first)
Cheese Variations:
- Monterey Jack instead of mozzarella
- Pepper Jack for heat lovers
- Gouda for a more sophisticated flavor profile
Meal Prep and Storage Secrets
This casserole is a meal prepper’s dream. Here’s how to make it work for your busy lifestyle:
Make-Ahead Strategy:
Assemble the entire casserole up to the baking step. Cover tightly with plastic wrap and refrigerate for up to 2 days, or freeze for up to 3 months. If baking from frozen, add an extra 15-20 minutes to the cooking time.
Individual Portions:
Divide the mixture into individual ramekins or meal prep containers before baking. Bake for 15-20 minutes instead of the full time. Perfect for grab-and-go lunches.
Leftover Magic:
Refrigerated leftovers keep for 5 days and actually taste better the next day (the flavors meld beautifully). Reheat individual portions in the microwave for 60-90 seconds, or reheat the whole dish in a 350°F oven for 15 minutes.
Nutritional Breakdown and Macro Counting
Let’s talk numbers, because I know you’re curious. Per serving (this recipe makes 8 generous servings):
- Calories: 385
- Total Carbs: 8g
- Fiber: 4g
- Net Carbs: 4g
- Protein: 28g
- Fat: 27g
These macros make this dish perfect for most keto meal plans. The high protein content will keep you satisfied, while the moderate fat content leaves room for other fats throughout your day.
Troubleshooting Common Issues
After years of making this recipe and helping others perfect it, here are the most common problems and their solutions:
Problem: Watery Casserole
Solution: Always pre-cook your cauliflower rice to remove excess moisture. Also, drain your diced tomatoes thoroughly and don’t skip the simmering step for the beef mixture.
Problem: Bland Flavor
Solution: Season each component as you go. Salt the cauliflower rice, season the beef well, and taste the final mixture before assembling. Don’t be afraid of seasonings – this dish can handle them.
Problem: Cheese Won’t Melt Properly
Solution: Make sure your cheese is at room temperature before adding to the hot mixture. Also, use freshly grated cheese rather than pre-shredded when possible – it melts much better.
Why This Recipe Beats Store-Bought Alternatives
Look, I get it. There are plenty of frozen keto meals out there promising convenience. But here’s the reality check: most are loaded with preservatives, cost way more per serving, and honestly? They just don’t taste as good as homemade.
This casserole costs about $12 to make and feeds 8 people generously. That’s $1.50 per serving for a high-quality, satisfying meal. Try finding that in the frozen food aisle – I’ll wait.
Plus, when you make it yourself, you control every ingredient. No mysterious additives, no questionable “natural flavors,” just real food that supports your health goals.
The Bottom Line
This keto hamburger casserole has become a staple in my household for good reason. It’s satisfying without being heavy, flavorful without being complicated, and keto-friendly without tasting like a “diet food.”
Whether you’re new to keto or a seasoned pro looking for dinner inspiration, this recipe delivers. It’s the kind of dish that makes you forget you’re following any kind of eating plan – it’s just good food that happens to fit your macros perfectly.
Give it a try this week, and I guarantee it’ll earn a permanent spot in your recipe rotation. And hey, if you end up loving it as much as my neighbor Karen does, drop me a line – I love hearing success stories!
Now stop reading and start cooking. Your taste buds (and your keto goals) will thank you