

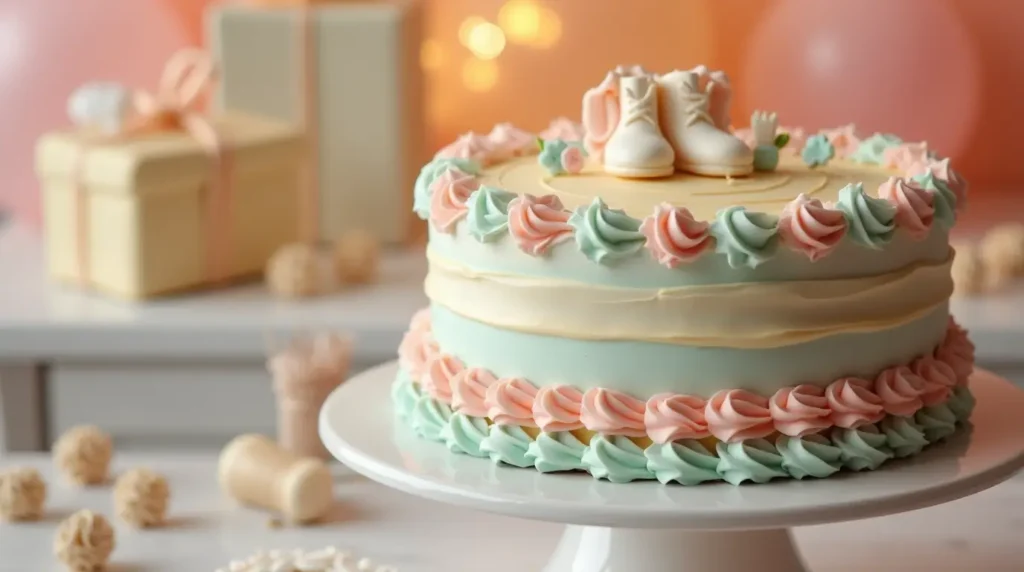
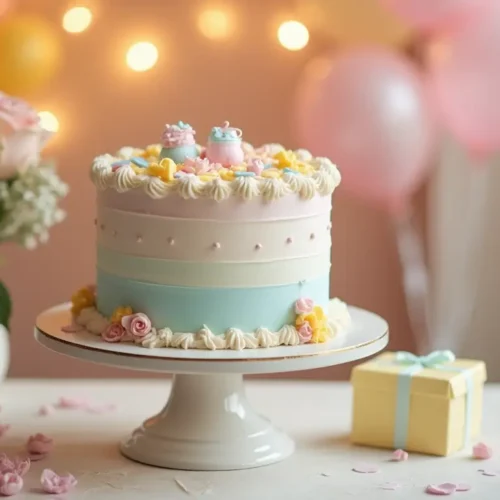
There’s nothing quite like the joy of celebrating a new arrival, and what better way to sweeten the moment than with a stunning Baby Shower Cake? Whether you’re planning a whimsical celebration or an elegant gathering, this cake is sure to steal the spotlight. Imagine the excitement as your guests gather around, marveling at your creation—beautifully frosted, bursting with flavor, and topped with delightful baby-themed decorations.
But creating the perfect Baby Shower Cake doesn’t have to be stressful. With just a few simple tips and tricks, you can easily bake a cake that’s as gorgeous as it is delicious. From choosing the right cake flavor to decorating with style, this recipe is designed to guide you every step of the way. Ready to create a show-stopping treat that will wow your guests? Let’s dive in!
Table of Contents
Key Benefits of Making a Baby Shower Cake
A homemade Baby Shower Cake isn’t just a dessert—it’s a centerpiece that brings joy, creativity, and flavor to your special celebration. When you make your own cake, you’re not only treating your guests to something delicious, but you’re also creating lasting memories. Let’s explore why this cake is a must-have for any baby shower!
1. Personalized Touch
One of the biggest benefits of making your own Baby Shower Cake is the opportunity to personalize it to fit your theme. Whether you’re going for a soft pastel palette, a whimsical animal design, or a gender-neutral look, you can tailor every detail, from the cake flavor to the decoration, to reflect your style and vision. It’s a unique way to make the day even more special!
2. Flavor Customization
With a homemade Baby Shower Cake, you get to choose the flavors that will wow your guests. From classic vanilla and chocolate to more adventurous flavors like lemon or red velvet, the sky’s the limit. Plus, you can tweak the cake’s filling and frosting to match the preferences of your crowd, ensuring it’s a hit for everyone at the party!
3. Fresh, High-Quality Ingredients
When you bake your Baby Shower Cake yourself, you have complete control over the ingredients. Opting for high-quality, fresh ingredients like real butter, pure vanilla extract, and organic eggs not only enhances the flavor but also ensures a superior texture that store-bought cakes just can’t match. Plus, you’ll know exactly what’s going into your cake—no mystery ingredients here!
4. Cost-Effective
While buying a pre-made Baby Shower Cake can be costly, making it yourself can save you a significant amount of money. With just a few simple ingredients and a little time, you can create a stunning cake that rivals those from a bakery—without the hefty price tag. Plus, if you’re on a tight budget, you can always get creative with your decorating, using budget-friendly supplies like sprinkles, edible flowers, or DIY toppers.
5. A Fun, Creative Experience
Baking a Baby Shower Cake isn’t just about the end result; it’s about the fun and satisfaction of creating something beautiful with your own hands. Whether you’re baking solo, with friends, or with family, it’s an opportunity to bond over a shared experience. Plus, decorating the cake gives you a chance to unleash your creativity and try out fun techniques like piping frosting or adding cute baby-themed decorations.
In the next section, we’ll dive into the ingredients you’ll need to get started on your perfect Baby Shower Cake! Stay tuned for a list of essentials, along with some optional add-ins to take your cake to the next level!
Ingredients for the Perfect Baby Shower Cake
Before we dive into the steps of creating your beautiful Baby Shower Cake, let’s make sure you have everything you need! This cake recipe is simple yet delicious, with a perfect balance of sweetness and flavor that will leave your guests raving. Here’s what you’ll need to make your cake come to life:
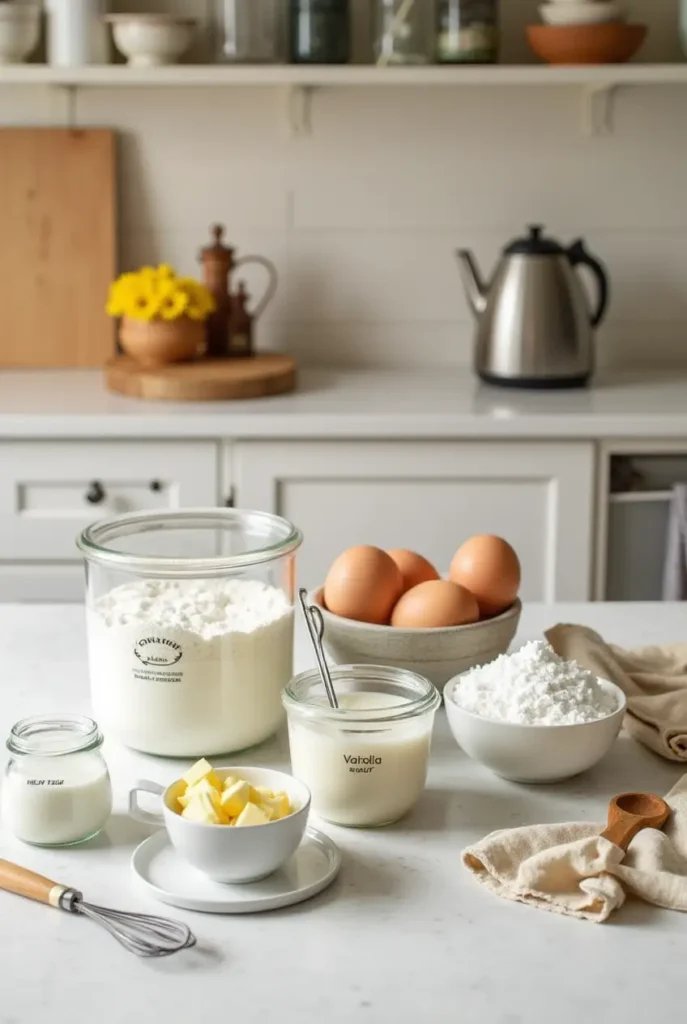
Basic Ingredients for the Cake:
- 2 ½ cups all-purpose flour – This forms the base of your cake and gives it a light, fluffy texture.
- 2 ½ tsp baking powder – Helps your cake rise and gives it that perfect soft crumb.
- 1 tsp salt – Enhances the flavor and balances the sweetness of the cake.
- 1 cup unsalted butter (softened) – This adds richness and moisture to the cake, making it tender and delicious.
- 1 ¾ cups granulated sugar – Sweetens the cake without overpowering the flavor.
- 4 large eggs – These bind the ingredients together and add moisture.
- 1 tsp vanilla extract – For that irresistible, classic flavor.
- 1 cup whole milk – Ensures a soft and moist texture, making the cake melt-in-your-mouth.
- Optional: ½ cup sour cream – For extra moisture and a slight tang that elevates the flavor.
Ingredients for the Frosting:
- 2 cups unsalted butter (softened) – A creamy base for your frosting.
- 5-6 cups powdered sugar – This gives the frosting its sweet, smooth texture.
- 2 tsp vanilla extract – Adds that signature vanilla flavor.
- 2-3 tbsp heavy cream or milk – For the perfect consistency, allowing your frosting to be easily spread and piped.
- A pinch of salt – To balance the sweetness and add depth of flavor.
Optional Add-Ins & Variations:
- Zest of 1 lemon or orange – For a fresh citrus twist that pairs beautifully with vanilla cake.
- 1 cup mini chocolate chips – For a fun surprise in every bite, especially if you love a little chocolatey sweetness.
- Food coloring – If you’re decorating with a theme, feel free to add food coloring to your frosting for vibrant, eye-catching hues.
- Edible decorations – Think sprinkles, edible flowers, or fun toppers that match your baby shower theme (like baby booties or baby bottles)!
With your ingredients in hand, you’re ready to get started on making the most stunning Baby Shower Cake. In the next section, we’ll guide you through how to make the cake step by step, so you can confidently create your masterpiece! Stay tuned!
How to Make the Best Baby Shower Cake
Now that we’ve gathered all the ingredients, it’s time to get baking! Follow these simple steps to create a beautiful, delicious Baby Shower Cake that’s sure to wow your guests. Don’t worry—this process is straightforward, and I’ll walk you through every step to ensure your cake turns out perfectly.
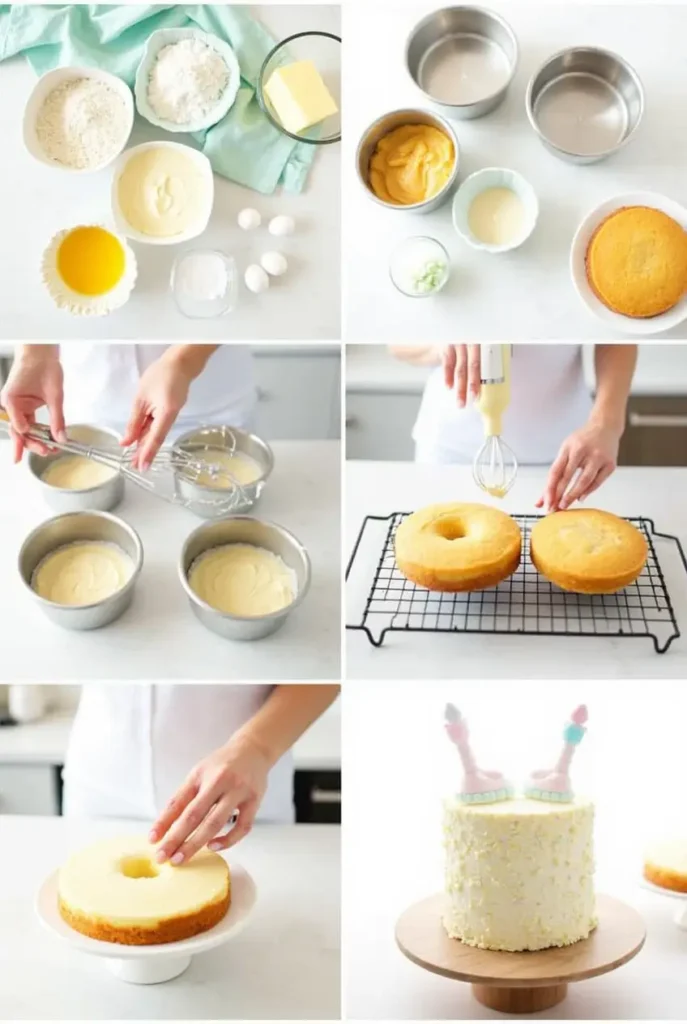
Step 1: Preheat and Prepare
Start by preheating your oven to 350°F (175°C). Grease and flour your cake pans (either two 9-inch round pans or one 9×13-inch pan). You can also line the bottom with parchment paper for easy removal after baking.
Step 2: Mix Dry Ingredients
In a medium bowl, whisk together the flour, baking powder, and salt. This step ensures that your dry ingredients are well-combined and ready to incorporate evenly into the batter. Set it aside for now.
Step 3: Cream Butter and Sugar
In a large mixing bowl, beat the softened butter and sugar together with an electric mixer on medium speed until light and fluffy (about 3-4 minutes). This process adds air to the mixture, helping your cake achieve that light, soft texture.
Step 4: Add Eggs and Vanilla
Add the eggs one at a time, beating well after each addition. Be sure to scrape down the sides of the bowl to incorporate all ingredients. Then, stir in the vanilla extract for that sweet, comforting flavor.
Step 5: Alternate Adding Dry Ingredients and Milk
Now it’s time to combine your dry ingredients and wet mixture. Gradually add the dry ingredients to the wet ingredients in two batches, alternating with the milk. Start and end with the dry ingredients to prevent overmixing, which can result in a dense cake. Mix each addition until just combined, being careful not to overwork the batter.
Step 6: Optional Add-Ins
If you’d like to add a twist to your cake, now is the time! Stir in any optional ingredients like sour cream for extra moisture, lemon zest for a fresh kick, or mini chocolate chips for a fun surprise. These optional add-ins will elevate the flavor and texture of your cake, making it even more memorable.
Step 7: Bake the Cake
Divide the batter evenly between your prepared cake pans and smooth the tops with a spatula. Bake for 25-30 minutes, or until a toothpick inserted into the center of the cakes comes out clean. If you’re using one larger pan, it may take a bit longer—around 35-40 minutes.
Step 8: Cool the Cake
Once the cakes are done, remove them from the oven and allow them to cool in the pans for 10 minutes. Then, carefully remove the cakes from the pans and transfer them to a wire rack to cool completely. Cooling is key to getting smooth, flawless frosting later on!
Pro Tips and Variations for Your Baby Shower Cake
Now that you’ve baked your perfect Baby Shower Cake, it’s time to make it even more stunning with some professional decorating tips and fun variations. Whether you’re a novice baker or a seasoned pro, these tips will help you create a cake that’s not only delicious but also visually spectacular. Let’s dive into how to take your cake to the next level!
1. Mastering the Frosting Technique
A smooth, even layer of frosting can make your cake look like it came straight from a bakery. Here are a few tips to get that flawless finish:
- Use a crumb coat: Before you apply the final layer of frosting, spread a thin layer over the entire cake to lock in the crumbs. Chill the cake for about 30 minutes to set the crumb coat, then apply the final layer of frosting for a clean, professional look.
- Offset spatula magic: For smooth, even frosting, use an offset spatula. This tool gives you more control as you spread frosting over the cake and helps you achieve that perfectly smooth finish.
- Keep your frosting soft: If the frosting becomes too stiff, add a tablespoon of milk or heavy cream at a time to soften it to the right spreading consistency.
2. Play with Cake Flavors and Fillings
While vanilla and chocolate are classic choices, why not experiment with flavors and fillings to make your Baby Shower Cake stand out?
- Try flavored cakes: Consider switching up the flavor of the cake itself—think lemon, strawberry, or coconut for a refreshing twist. A citrus-flavored cake pairs wonderfully with a tangy cream cheese frosting.
- Add fruit fillings: A layer of fresh berries or fruit preserves between cake layers can add sweetness and color to your cake. Raspberry or strawberry filling works beautifully with vanilla or lemon cake.
- Fluffy frosting variations: Switch up your frosting by making it a bit more unique. You can try a fluffy whipped cream frosting, a tangy cream cheese frosting, or a rich buttercream frosting.
3. Stunning Baby Shower Decorations
Decorating your Baby Shower Cake is where you can really let your creativity shine! Here are some ideas to match your baby shower theme:
- Baby-themed toppers: You can use cute baby toppers like baby booties, onesies, or even edible baby blocks. These little touches can make the cake feel personal and special.
- Fresh flowers: For an elegant touch, decorate your cake with fresh edible flowers like pansies, violets, or lavender. They add a pop of color and a sophisticated vibe.
- Sprinkles and edible glitter: For a more playful cake, add sprinkles, edible glitter, or even candy accents to make your Baby Shower Cake sparkle and shine.
4. Keep It Simple and Elegant
If you prefer a more minimalist look, here are some ways to keep your Baby Shower Cake elegant:
- Naked cake style: Leave the sides of the cake exposed for a rustic, chic look. This style works well with delicate buttercream and fresh fruits or flowers.
- Subtle ombré effect: You can create a soft gradient effect by blending colors of frosting from light to dark. This works especially well with pastel shades for a baby shower theme.
- Minimalist decorations: A simple ribbon around the cake or a few delicate decorations on top can still make a statement. Keep it clean and uncluttered for an elegant feel.

Serving Suggestions for Your Baby Shower Cake
After all that hard work and creativity, your Baby Shower Cake is finally ready to shine at the party! But how do you serve it to make sure it’s both delicious and visually appealing? Here are some simple serving suggestions to ensure your cake looks just as amazing on the table as it tastes.
1. Perfect Cake Slices
To serve your Baby Shower Cake with precision, start by using a sharp knife. Clean the knife between cuts for neat slices that won’t pull on the frosting. If you’re serving a multi-layer cake, use a serrated knife to slice through the layers evenly and without damaging the delicate cake structure.
For an elegant touch, try cutting your slices on the diagonal. This makes each piece look larger and more inviting, perfect for guests to indulge in.
2. Add a Side of Something Special
While your Baby Shower Cake is sure to be the star of the show, serving it alongside something extra can elevate the dessert experience:
- Whipped cream: A dollop of fresh whipped cream is a light, fluffy addition that complements the richness of the cake.
- Fresh fruit: Serve slices of cake with a side of fresh berries or citrus slices for a refreshing contrast. Strawberries, raspberries, and blueberries work particularly well with vanilla or lemon cakes.
- Ice cream: For a decadent treat, offer a scoop of vanilla or fruit-flavored ice cream on the side. It’s a classic pairing that never goes out of style.
3. Presentation Matters
The way you present your Baby Shower Cake can really wow your guests! Here are some ideas to make the presentation extra special:
- Cake stand: Elevate your cake with a beautiful cake stand. Whether it’s rustic wood or elegant glass, a cake stand will give your cake the attention it deserves.
- Decorative platter: If you don’t have a cake stand, a large, decorative platter can also create a stunning display. You can even add some greenery or petals around the base of the cake for an added touch of elegance.
- Mini servings: For a fun twist, consider serving individual slices of cake in clear glass cups or small plates. This makes it easier for guests to grab a piece while mingling and adds a charming touch.
4. Time Your Cake Cutting
Timing your cake cutting is essential to keeping the cake fresh and beautiful throughout the event. If you’re planning to serve it right after it’s cut, try to do so while the cake is still at room temperature. This ensures the frosting is soft and the cake itself is moist.
If you plan to serve it later, store the cake in an airtight container or cover it with plastic wrap to preserve its freshness. Just be sure to let it sit for a few minutes at room temperature before serving, so the frosting isn’t too firm.
These serving suggestions will help ensure your Baby Shower Cake looks as good as it tastes. Whether you go for classic elegance or creative flair, your cake will be the perfect complement to a joyous celebration. Next up, we’ll answer some of the most common FAQs to make sure you have everything covered for a smooth cake-making experience! Stay tuned for more tips and insights.
FAQs About Making the Best Baby Shower Cake
Have questions about making the perfect Baby Shower Cake? Don’t worry! Here are some common FAQs to help clear up any confusion and ensure your cake-making experience is as smooth as possible. Let’s dive in!
1. Can I Make This Cake Ahead of Time?
Absolutely! You can bake the cake layers a day or two in advance. Once they’ve cooled completely, wrap each layer tightly in plastic wrap and store them in an airtight container at room temperature. When you’re ready to frost, simply let the layers come to room temperature for about 30 minutes before decorating. This not only saves you time but also helps the cake stay fresh!
2. Can I Use a Different Type of Frosting?
Of course! While buttercream is the classic choice, you can switch things up depending on your preference. Here are a few frosting alternatives:
- Cream cheese frosting: Perfect for a tangy twist, especially with a carrot or red velvet cake.
- Whipped cream frosting: Light and airy, ideal for a lighter feel if you’re serving the cake in warmer weather.
- Ganache: For a decadent touch, a smooth chocolate ganache can make a beautiful, glossy finish. Experiment with what works best for your baby shower theme and flavor profile!
3. How Can I Make My Cake More Moist?
To ensure a moist Baby Shower Cake, try these simple tips:
- Don’t overmix the batter: Overmixing can lead to a dense cake. Mix until just combined.
- Use sour cream or yogurt: Adding a bit of sour cream or yogurt can help keep your cake moist and tender.
- Bake at the right temperature: Make sure your oven is preheated properly, and always check the cake with a toothpick before removing it from the oven to avoid over-baking.
4. Can I Make a Gluten-Free or Dairy-Free Baby Shower Cake?
Yes! You can easily adjust the recipe to be gluten-free by using a gluten-free flour blend (make sure it’s a one-to-one substitute for all-purpose flour). For a dairy-free option, simply swap the butter with dairy-free margarine and use a non-dairy milk like almond or oat milk. Just keep in mind that these substitutions may slightly change the texture or flavor, so it’s a good idea to do a test run if you’re unsure!
Baby Shower Cake
Ingredients
- 2 1/2 cups all-purpose flour
- 2 1/2 tsp baking powder
- 1/2 tsp salt
- 1 cup unsalted butter room temperature
- 1 1/2 cups granulated sugar
- 4 large eggs
- 1 tsp vanilla extract
- 1 cup whole milk
- 1/2 cup heavy cream
- 3-4 cups buttercream frosting for decorating
- Baby-themed decorations edible toppers, fresh flowers, or sprinkles
Instructions
- Preheat the oven: Set your oven to 350°F (175°C). Grease and flour two 9-inch round cake pans, or line with parchment paper.
- Prepare the dry ingredients: In a medium bowl, sift together the flour, baking powder, and salt. Set aside.
- Cream the butter and sugar: In a large mixing bowl, beat the butter and sugar together until light and fluffy, about 3-4 minutes.
- Add the eggs: Add the eggs one at a time, beating well after each addition. Stir in the vanilla extract.
- Combine wet and dry ingredients: Gradually add the dry ingredients to the wet ingredients in thirds, alternating with milk. Mix until just combined. Be careful not to overmix.
- Bake the cake layers: Pour the batter evenly into the prepared cake pans. Bake for 25-30 minutes, or until a toothpick inserted into the center comes out clean.
- Cool the cakes: Allow the cakes to cool in the pans for 10 minutes before transferring to a wire rack to cool completely.
- Frost the cake: Once the cakes have cooled, spread a thin layer of buttercream frosting over one layer of the cake. Place the second layer on top, and apply a crumb coat. Chill for 30 minutes, then apply a final layer of frosting.
- Decorate: Add baby-themed decorations, fresh flowers, or sprinkles to finish. Serve and enjoy!
Conclusion: The Perfect Baby Shower Cake Awaits
You’ve made it through all the essential steps to creating the best Baby Shower Cake! From selecting the right ingredients to mastering frosting techniques and serving suggestions, you’re now equipped with everything you need to bake a cake that will be the centerpiece of your celebration.
Why This Recipe Works:
Not only is this Baby Shower Cake delicious, but it’s also versatile enough to suit any theme or personal taste. You can experiment with different flavors, frostings, and fillings to make it your own. The tips and variations we covered will help ensure that your cake stands out while still being easy and fun to make.
Whether you’re celebrating with close friends and family or hosting a big party, this cake will leave everyone with sweet memories. Enjoy the baking process, and don’t forget to savor the moments as you share this special treat with your loved ones.
Ready to start baking? Grab your ingredients, put on your apron, and let’s get this Baby Shower Cake in the oven! Happy baking, and I can’t wait for you to share your beautiful creation with everyone.