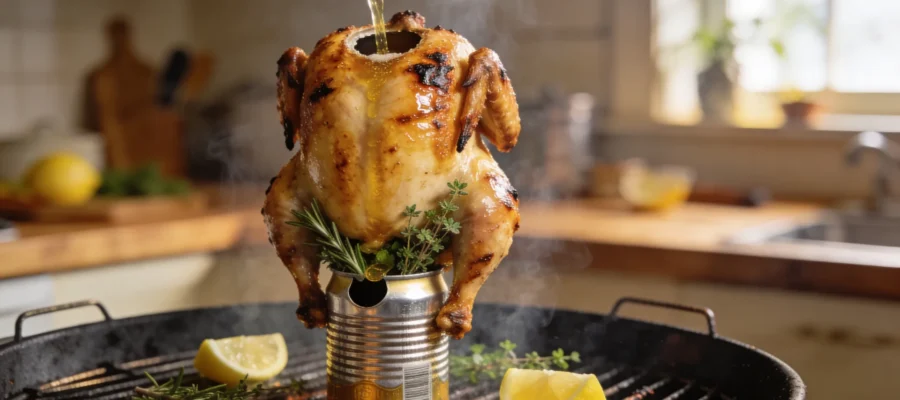
Beer can chicken on the grill has been my go-to summer recipe for over a decade now. There’s something magical about propping a chicken on a beer can and letting it roast to perfection on the grill. It’s not just the novelty factor (though watching guests’ reactions the first time they see it is priceless) – this method genuinely produces some of the juiciest, most flavorful chicken you’ll ever taste. The beer steams the chicken from the inside while the grill’s heat crisps up the skin on the outside. It’s basically the best of both worlds.
Table of Contents :
How I Discovered Beer Can Chicken
I first attempted beer can chicken about 15 years ago when I saw some guy doing it at a neighborhood cookout. It looked ridiculous – this whole chicken sitting upright on the grill like it was having one last party. But the chicken that came off that grill was mind-blowingly good. Naturally, I had to try it myself.
My first attempt was… well, a disaster. Complete disaster. I didn’t balance the chicken properly, and about 20 minutes in, the whole thing toppled over, spilling beer all over my grill and causing a pretty impressive flare-up. My eyebrows eventually grew back, thankfully. The second time, I used a flimsy aluminum can that collapsed under the weight of the chicken. The third time, though – that’s when I finally got it right. I discovered that a proper beer can chicken stand makes all the difference in the world. Now I can make this recipe with my eyes closed (though I don’t recommend that for safety reasons).
Ingredients for beer can chicken recipe grill
The beauty of beer can chicken is its simplicity. You really only need a handful of ingredients, but each one plays an important role. The star of the show is obviously the chicken, but don’t underestimate how much flavor comes from your choice of beer and spice rub. I’ve experimented with dozens of combinations over the years, and I’ve settled on what I think is the perfect balance.
You can definitely play around with the seasonings to match your taste preferences. The only non-negotiables are the chicken (duh) and the beer can (double duh). Everything else can be adjusted based on what you have in your pantry or what flavors you’re craving.
Whole chicken (4-5 pounds)
Look for a chicken that’s not too massive – around 4-5 pounds is perfect. Any bigger and it gets unwieldy on the can. I prefer air-chilled chickens when I can find them because they seem to crisp up better on the grill. And for the love of all things tasty, don’t remove the skin – that’s where all the crispy goodness happens.
Can of beer (12 ounces)
Any 12-ounce can will work, but I find that lagers and ales give the best results. Nothing too hoppy or bitter – those flavors can intensify during cooking. I typically grab whatever’s in my fridge, but Budweiser or PBR work great if you want a neutral option. Non-beer drinkers can substitute with a can of soda or even just water with some herbs added.
Olive oil (2 tablespoons)
The oil helps the skin crisp up beautifully and gives the spices something to cling to. You can substitute with any neutral oil like canola or vegetable oil. I’ve even used melted butter on occasion for extra richness, though it does cause more flare-ups, so be careful.
Kosher salt (2 tablespoons)
Don’t skimp on the salt – it’s essential for bringing out the chicken’s flavor. I use Diamond Crystal kosher salt, which is less salty by volume than other brands. If you’re using table salt, cut the amount in half. The salt also helps dry out the skin, which leads to that amazing crispy exterior we’re after.
Paprika (1 tablespoon)
I use regular sweet paprika for color and a subtle earthy flavor. Smoked paprika works beautifully too if you want to amp up the smoky notes. Hungarian paprika will give you a more vibrant color, while Spanish paprika adds a deeper flavor. Any type works well, honestly.
Garlic powder (1 tablespoon)
Garlic powder distributes more evenly than fresh garlic would. It also doesn’t burn like fresh garlic might during the long cooking process. If you don’t have garlic powder, onion powder makes a decent substitute, or you can leave it out entirely if you must.
Black pepper (2 teaspoons)
Freshly ground is best for maximum flavor, but pre-ground works too. The pepper adds a gentle heat that balances the other seasonings. White pepper is an interesting substitute if you want a different type of spiciness without the black flecks.
Brown sugar (1 tablespoon, optional)
The sugar helps with browning and balances the salt and spices. Light or dark brown both work fine – dark just has more molasses flavor. You can skip this if you’re avoiding sugar, but I find it helps create that gorgeous mahogany color on the skin. It does increase the chance of burning though, so keep an eye on it.
Instructions for beer can chicken recipe grill
Okay, so here’s the thing about beer can chicken – it looks complicated but it’s actually super straightforward. The biggest challenge is keeping the chicken balanced, which is why I highly recommend investing in a beer can chicken holder. They’re like $10 and will save you so much frustration. The whole process takes about 90 minutes from start to finish, with about 20 minutes of prep and 70 minutes of grilling time.
You can prep the spice rub ahead of time and even season the chicken earlier in the day if you want. Actually, letting the chicken sit with the seasonings for a few hours in the fridge will give you even better flavor. Just bring it to room temperature for about 30 minutes before grilling.
STEP 1: Prepare your chicken.
Remove the giblets from the chicken cavity if present (check both the main cavity and the neck). Rinse the chicken inside and out, then pat it completely dry with paper towels. This drying step is crucial – if the chicken is wet, you’ll get steam instead of crispy skin. I learned this the hard way after serving several chickens with rubbery skin. Let the chicken sit at room temperature for 30 minutes before cooking.
STEP 2: Fire up the grill.
Set up your grill for indirect heat. For a gas grill, turn one side to medium-high and leave the other side off. For charcoal, pile the coals on one side. You’re aiming for a temperature of around 350°F. Remember that maintaining a consistent temperature is key – too hot and the skin will burn before the inside cooks; too cool and you’ll be waiting forever for dinner. I always keep an instant-read thermometer handy to check both the grill and chicken temperature.
STEP 3: Mix your spice rub.
In a small bowl, combine the salt, paprika, garlic powder, black pepper, and brown sugar (if using). Mix thoroughly with your fingers, breaking up any clumps. This is where you can get creative if you want – add some cayenne for heat, dried herbs like thyme or rosemary, or even a bit of cumin for a different flavor profile. Just remember that spices can burn over long cooking times, so don’t go overboard with anything that blackens easily.
STEP 4: Prepare the beer can.
Open the beer and drink (or pour out) about one-third of it. This prevents overflow when the beer heats up and starts to steam. You can add a few cloves of crushed garlic or herbs directly to the remaining beer for extra flavor if you’re feeling fancy. Some folks poke additional holes in the top of the can, but I find the opening is sufficient for the steam to escape. If you’re using a beer can chicken holder, insert the can into the designated spot.
STEP 5: Season the chicken.
Rub the chicken all over with olive oil, including under the skin where you can reach without tearing it. The oil helps the seasonings stick and promotes crispy, golden skin. Then generously apply the spice rub all over the outside of the chicken, inside the cavity, and under the skin if possible. Don’t be shy – really work it in there. I like to lift the skin over the breast and rub some seasoning directly on the meat for maximum flavor penetration.
STEP 6: Mount the chicken.
This is where things get awkward – in a hilarious way. Lower the chicken onto the beer can so the can fits into the cavity. If using a stand, this is easier; without one, you’ll need to balance the chicken using its legs like a tripod. The chicken should be sitting upright with the can inside it. The first time I did this without a stand, the chicken kept falling over until I finally positioned the legs just right. It takes some practice, but you’ll get it. Once positioned, tuck the wing tips behind the chicken’s back so they don’t burn.
STEP 7: Grill the chicken.
Carefully transfer the chicken (on its can) to the cool side of the grill. Close the lid and let it cook for about 70-90 minutes, depending on the size of your chicken. The internal temperature should reach 165°F in the thickest part of the thigh when done. About halfway through, rotate the chicken for even cooking. If the skin is getting too dark too quickly, you can loosely tent it with foil. The amazing smell that will start wafting from your grill after about 30 minutes is completely normal and will likely attract neighbors.
STEP 8: Rest and serve.
This is the tricky part – removing a hot chicken from a hot beer can without burning yourself. Use heat-resistant gloves or tongs and a spatula to carefully lift the whole setup off the grill. Let it rest for 10 minutes before removing the chicken from the can. Be extremely careful during this step – the can contains hot liquid that can cause burns. Once removed, let the chicken rest for another 5-10 minutes before carving. This resting period is non-negotiable – it allows the juices to redistribute throughout the meat.
Tips & Variations for beer can chicken recipe grill
If you don’t have a grill, you can absolutely make this in an oven set to 375°F. You’ll miss some of that smoky flavor, but the chicken will still be incredibly juicy. For extra smokiness on a gas grill, add soaked wood chips in a foil packet or smoker box. Leftovers (if you have any) keep well for 3-4 days in the fridge and make amazing sandwiches or salad toppers. Just know that the skin won’t stay crispy after refrigeration – that’s physics, not a flaw in the recipe. For a non-alcoholic version, use ginger ale, root beer, or even just water with some lemon slices and herbs.
And if your chicken doesn’t look exactly like those perfectly styled food magazine photos, that’s completely normal. As long as the meat reaches 165°F, it’s safe to eat, regardless of how picture-perfect it looks. Some of my tastiest birds have been the most lopsided ones!
Final Thoughts on beer can chicken recipe grill
I’ve been making beer can chicken for years, and it never fails to impress. There’s something primitively satisfying about cooking a chicken standing upright on your grill. Is it the absolute best chicken recipe in the world? Maybe not. But it’s definitely in my top five for taste-to-effort ratio. It’s virtually foolproof once you get the hang of it, and even when things go a little sideways (sometimes literally), the chicken still tastes amazing.
If you try this recipe, drop a comment below and let me know how it turned out. I’m especially curious about what beer you used and if you made any tweaks to the spice blend. And don’t forget to share your own beer can chicken stories – I can’t be the only one with embarrassing first-time fails!
Beer Can Chicken Recipe on the Grill
Beer can chicken on the grill produces juicy and flavorful chicken by steaming from the inside while crisping the skin on the outside.