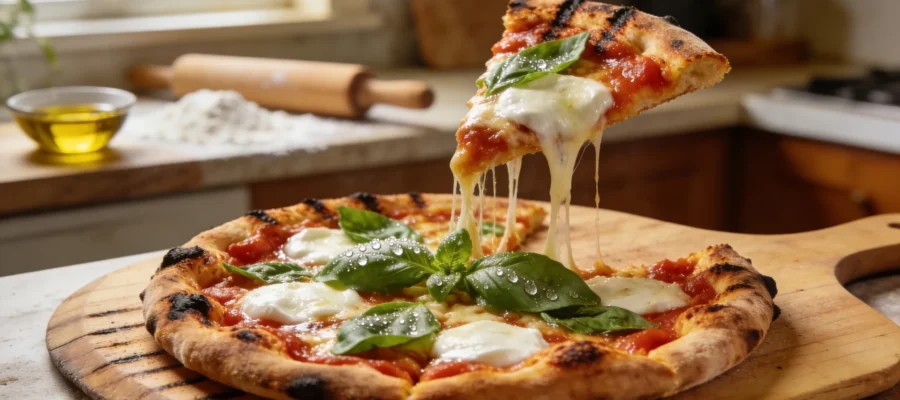
This grilled pizza recipe homemade changed everything for me. I was skeptical at first because, let’s be honest, pizza belongs in an oven, right? But after my third attempt at making decent homemade pizza in a regular oven failed miserably (soggy bottom, anyone?), I decided to try the grill. Now I’m completely converted. The crust gets actually crispy, with these amazing charred spots that taste like they came from a fancy wood-fired place. Plus, it keeps the heat outside during summer, which my family definitely appreciates.
Table of Contents :
Why I Started Making Pizza on the Grill
Okay, so here’s the thing about regular oven pizza. My home oven maxes out at 500 degrees, and that’s just not hot enough for really good pizza. I kept ending up with this weird chewy crust that was somehow both burnt on top and soggy underneath. Total disaster.
Then my neighbor mentioned grilling pizza, and I thought she was crazy. But she brought over a piece, and wow. The bottom was crispy, the cheese was bubbly, and there were these gorgeous leopard spots on the crust. I had to learn how to do this. Of course, my first attempt was a complete mess. I tried to flip the dough and half of it fell through the grates into the fire. I was wearing my favorite apron too, which somehow made it more embarrassing.
But I figured it out, and now this is our go-to Friday night dinner. The kids actually request it, which never happened with my oven attempts. Trust me, once you get the hang of it, you’ll never go back to struggling with a home oven again.
Ingredients for grilled pizza recipe homemade
The ingredient list here is pretty flexible, which I love. You probably have most of this stuff already. The key is keeping things simple so you can focus on getting that crust perfect. I learned the hard way that trying to pile on ten different toppings just makes everything slide around when you’re flipping.
Don’t stress too much about making your own dough if you’re just starting out. Store-bought works great, and you can always get fancy later once you’ve mastered the grilling technique.
Pizza dough (1 pound)
I use store-bought from the grocery bakery section, but homemade works too. The key is letting it come to room temperature for at least 30 minutes before you start. Cold dough is impossible to stretch and will snap back constantly. I keep mine on the counter while I prep everything else. Trader Joe’s has great dough, or most pizza places will sell you a ball of theirs.
Olive oil (3 tablespoons)
This is crucial for preventing sticking and getting that golden color. I brush it on both sides of the dough and use extra for the grates. Don’t use your fancy finishing olive oil here, just regular stuff that can handle the heat. The oil also helps create those crispy edges that make grilled pizza so addictive.
Pizza sauce (1/2 cup)
Less is more here. Too much sauce makes everything soggy and hard to flip. I use whatever jar sauce I have, sometimes just marinara. The high heat concentrates the flavors anyway. Spread it thin, like you’re painting the dough, not frosting a cake. I learned this after several sauce-dripping disasters.
Mozzarella cheese (6 ounces, shredded)
Fresh mozzarella looks fancy but releases too much water on the grill. Stick with low-moisture mozzarella, the kind you shred yourself or buy pre-shredded. I usually shred my own because it melts better, but honestly, the pre-shredded works fine too. Don’t go overboard with the amount or it’ll slide right off.
Pepperoni (3 ounces, sliced)
Classic for a reason, and it crisps up beautifully on the grill. You can skip this or swap in whatever you like, but keep toppings light. Heavy stuff like thick vegetables will make flipping nearly impossible. The pepperoni gets these amazing crispy edges from the direct heat that you just can’t get in a regular oven.
How to Make grilled pizza recipe homemade
The process here is different from oven pizza, so don’t just wing it. You’re basically cooking the crust on one side first, then flipping it and adding toppings to the cooked side. I know it sounds backwards, but trust the process. The whole thing takes about 10 minutes once you get started, but have everything ready because there’s no time to prep once you begin.
Get your grill nice and hot, around 450 degrees if you have a thermometer. If not, you should be able to hold your hand about 5 inches above the grates for only 3 to 4 seconds before it gets too hot.
STEP 1: Prepare your dough and workspace.
Stretch the dough into a rough circle or oval on a floured surface. Don’t worry about perfect shapes, rustic looks better anyway. Brush both sides generously with olive oil. Set up your toppings nearby because once you start grilling, everything moves fast. I keep the sauce, cheese, and pepperoni on a big plate right next to the grill.
STEP 2: Oil the grates and place the dough.
Clean your grill grates and brush them with oil using a paper towel held with tongs. Carefully lay the oiled dough directly on the grates. It might bubble and puff in places, which is exactly what you want. Close the lid and cook for 3 to 4 minutes. You’ll hear some sizzling, and that’s the sound of success.
STEP 3: Check and flip the crust.
Lift one edge with a spatula to check the bottom. You want golden brown with some darker grill marks. If it’s still pale, give it another minute. When ready, flip the entire crust using a large spatula or tongs. The cooked side should now be facing up, and this is where your toppings go.
STEP 4: Add toppings quickly.
Working fast, spread the sauce thinly on the cooked side, then sprinkle cheese evenly and add pepperoni. Don’t overload it. Close the lid immediately and cook for another 3 to 4 minutes until the cheese melts and the bottom gets crispy. The smell of melting cheese mixed with that slight char is incredible.
STEP 5: Remove and let cool briefly.
Use a large spatula to transfer the pizza to a cutting board. Let it cool for 2 to 3 minutes before slicing, or the cheese will slide right off. I learned this the hard way during my first successful attempt. The crust should be crispy on the bottom with beautiful grill marks, and the cheese should be bubbly with some golden spots.
What to Serve With grilled pizza recipe homemade
This pizza is pretty filling on its own, but we usually make it a whole outdoor meal. A simple green salad with Italian dressing cuts through the richness perfectly. Grilled vegetables like zucchini or bell peppers work great since the grill’s already hot. Cold beer is obviously the classic pairing, but lemonade works for the kids. Sometimes I throw some garlic bread on the grill too, just because everything tastes better with a little char on it.
Tips for the Best grilled pizza recipe homemade
Don’t stress if your first one isn’t perfect. Mine definitely wasn’t. The dough might stick a little or tear when flipping, and that’s totally normal while you’re learning. Keep the toppings light and have everything prepped before you start cooking. Leftover pizza keeps in the fridge for 2 days, but honestly, it never lasts that long in our house. Reheat it in a skillet to keep the bottom crispy, not the microwave.
If you’re feeling adventurous, try different cheeses or toppings, but master the basic technique first. The key is that flip in the middle, everything else is just details.
Questions People Ask About grilled pizza recipe homemade
These are the questions I get most often when I tell people about grilling pizza.
Can I use a gas grill instead of charcoal?
Absolutely, and it’s actually easier to control the temperature. I use gas most of the time because it heats up faster and maintains steady heat. Just preheat all burners to medium-high and you’re good to go. The flavor is slightly different from charcoal but still way better than oven pizza.
What if my dough keeps shrinking back?
This means it’s too cold or hasn’t rested enough. Let it sit at room temperature for at least 30 minutes, maybe even an hour. Cold dough from the fridge is impossible to work with and will keep snapping back no matter what you do. Patience here saves a lot of frustration later.
How do I prevent the dough from falling through the grates?
Make sure your dough isn’t too thin, and oil both the dough and the grates well. If you’re really worried, you can use a pizza stone on the grill, but I think direct grilling gives better results once you get the hang of it. The first few times might be messy, but you’ll figure it out.
Can I make this ahead of time?
You can prep all your toppings and have the dough ready, but the actual grilling needs to happen right before serving. The magic of grilled pizza recipe homemade is that crispy-hot-off-the-grill texture that you just can’t recreate later. Think of it as a fun cooking activity rather than something to meal prep.
Final Thoughts on grilled pizza recipe homemade
Look, this isn’t going to look like delivery pizza, and that’s actually better. The rustic, slightly charred look is part of the charm. My family requests this constantly now, and I love that it keeps the heat outside during summer. The first time might feel chaotic, but by the third pizza you’ll feel like a pro.
Give this grilled pizza recipe homemade a try and let me know how it goes. I’m always curious to hear what toppings people come up with and whether their first flip attempt goes better than mine did.
Grilled Pizza Recipe — Crispy Crust in 10 Minutes
This grilled pizza recipe homemade changed everything for me. With a crispy crust and charred spots, it's now our go-to Friday night dinner.