Grilled chicken breast recipes should be simple, but somehow they’ve become a culinary minefield. After years of serving up dry, stringy chicken that nobody actually wanted to eat, I finally cracked the code on juicy, tender grilled chicken breasts. The secret? It’s not about complicated techniques or fancy equipment – it’s about understanding a few basic principles that nobody bothers to explain. I’ll walk you through my foolproof method that has converted even the most dedicated “chicken thigh people” I know.
Table of Contents :
Why Most Grilled Chicken Breasts Turn Out Dry (And How Mine Don’t)
Let’s be honest – chicken breasts have a terrible reputation. They’re the protein people choose when they’re trying to be “healthy” but don’t actually expect to enjoy their meal. And I get it. I spent years producing sad, overcooked chicken breasts that required serious effort to chew through.
The turning point came during a summer cookout at my sister’s place. I watched my brother-in-law pull the most perfect, juicy chicken breasts off the grill while mine always turned out like chicken jerky. When I finally swallowed my pride and asked for his secret, it wasn’t some complicated technique – it was about temperature control and a ridiculously simple brine. That night changed everything.
Since then, I’ve refined the process through dozens of cookouts (and yes, plenty of failures – like the time I got distracted by a phone call and returned to chicken breasts that resembled hockey pucks). The method I’m sharing today guarantees consistent results every single time. No more dry chicken. No more apologizing to dinner guests. Just perfectly juicy grilled chicken breasts that people actually want seconds of.
Ingredients for this grilled chicken breast recipe
Here’s what makes this recipe work – it’s not about fancy ingredients or complicated marinades. It’s about treating each component with purpose. The brine is non-negotiable (trust me on this), but there’s flexibility with the seasonings based on what you have on hand.
Quality matters with chicken, but you don’t need to break the bank. I’ve found that how you prepare the chicken matters far more than whether you bought the premium organic brand or the store brand on sale. That said, fresher is definitely better here.
Boneless, skinless chicken breasts (2 pounds)
Look for breasts that are relatively even in thickness – those giant, lopsided ones from the grocery store will cook unevenly. If you can only find the huge ones, don’t worry – I’ll show you how to fix them. Avoid anything with woody breast syndrome (when the meat has hard, woody streaks) – it’s becoming increasingly common and ruins texture.
Kosher salt (3 tablespoons for brine)
I use Diamond Crystal kosher salt for brining – it dissolves easily and seasons gently. If you’re using Morton’s or table salt, cut the amount in half or you’ll end up with super salty chicken. This isn’t just seasoning – it’s restructuring the meat to hold moisture during cooking.
Granulated sugar (2 tablespoons for brine)
The sugar helps with browning and balances the salt. I’ve tried honey and brown sugar too, but plain white sugar works perfectly and dissolves completely. If you’re avoiding sugar, you can skip it, but you’ll lose some of the beautiful caramelization.
Water (4 cups)
Nothing fancy here – tap water is fine. The amount is important though – you need enough to fully submerge the chicken. If your container is larger, just maintain the salt-to-water ratio (basically 1 tablespoon kosher salt per cup of water).
Olive oil (2 tablespoons)
Use a decent everyday olive oil, nothing too precious. The oil helps prevent sticking and helps your seasonings adhere to the meat. In a pinch, avocado oil or even canola oil will work, though you’ll miss some flavor.
Black pepper (1 tablespoon)
Freshly ground makes a difference here – pre-ground black pepper loses its punch quickly. I go pretty heavy on pepper because it creates a nice crust on the outside. If you’re not a pepper fan, feel free to use less.
Garlic powder (2 teaspoons)
Not garlic salt! That’ll make your chicken too salty after the brine. Garlic powder adheres better than fresh garlic, which tends to burn on the grill. I’ve found California-style garlic powder has the best flavor, but any kind works fine.
Paprika (1 tablespoon)
I use regular paprika for color and mild flavor. Smoked paprika is amazing if you want to add smoky depth (especially if you’re using a gas grill). Hungarian paprika has more flavor but less color. Choose your adventure here – it’s hard to go wrong.
Instructions for this grilled chicken breast recipe
Here’s where the magic happens. The technique isn’t complicated, but the details matter. The whole process takes about an hour total, but only 20 minutes of that is active time. The rest is brining and resting – steps you absolutely cannot skip if you want juicy results.
And hey, don’t stress about getting it perfect the first time. Grilling is part science, part feel. Your grill might run hotter or cooler than mine, so use the visual cues I’ve included as your guide more than strict timing. The most important tool? An instant-read thermometer. Seriously, if you don’t have one, order it right now – it’s the difference between perfection and disappointment.
STEP 1: Prepare the brine solution.
In a large bowl, stir 3 tablespoons kosher salt and 2 tablespoons sugar into 4 cups of cool water until completely dissolved. It should taste like seawater – unpleasantly salty. This concentration is perfect for a 30-minute brine. If the salt isn’t dissolving, warm a cup of the water first, dissolve the salt and sugar in that, then add the rest of the cool water – we don’t want to start cooking the chicken in warm brine.
STEP 2: Prep and brine the chicken.
If your chicken breasts are very uneven in thickness (like those giant ones from the grocery store), now’s the time to even them out. Place them on a cutting board and cover with plastic wrap, then use a meat mallet (or a heavy skillet if you’re like me and can never find your kitchen tools) to gently pound the thicker parts until the breast has a relatively even thickness – about 3/4 inch is perfect. Submerge the chicken completely in the brine, cover, and refrigerate for exactly 30 minutes. Set a timer! Any less and you miss the benefits, any more and the meat can get too salty and start to cure.
STEP 3: Preheat your grill properly.
While the chicken is brining, preheat your grill. This is critical – an improperly heated grill is the number one cause of sticking. For a gas grill, preheat on high with the lid closed for at least 10-15 minutes. For charcoal, light the coals and wait until they’re covered with white ash. You want two heat zones: one medium-high area (about 400°F) for direct cooking, and one cooler area for finishing the chicken without burning it. On a gas grill, leave one burner on medium-high and turn another to low. With charcoal, push most coals to one side.
STEP 4: Remove chicken from brine and dry thoroughly.
After exactly 30 minutes, remove the chicken from the brine and rinse briefly under cold water (this removes excess salt from the surface). This is CRUCIAL – pat the chicken completely dry with paper towels. Like, really dry. I’m talking multiple paper towels, pressing firmly. Any moisture on the surface will create steam instead of sear. I learned this the hard way when I rushed this step once and ended up with pale, rubbery chicken instead of those beautiful grill marks.
STEP 5: Season and oil the chicken.
In a small bowl, mix together the garlic powder, paprika, and black pepper. Drizzle the dried chicken breasts with olive oil, then rub it all over to coat evenly. The oil acts as both a barrier against sticking and helps the seasoning adhere. Sprinkle the seasoning mixture evenly over both sides of the chicken, pressing gently to adhere. Don’t go crazy with any additional salt – the brine has already perfectly seasoned the meat inside.
STEP 6: Grill with purpose and patience.
Clean and oil your grill grates well – I fold a paper towel, dip it in vegetable oil, and use tongs to rub it over the grates. Place the chicken on the hot side of the grill at a 45-degree angle to the grates. Now here’s the secret to perfect grill marks: DON’T TOUCH IT for 3-4 minutes. You’ll be tempted. Resist. When it’s ready to flip, it will release easily. If it sticks, wait 30 more seconds. After those first 3-4 minutes, rotate the breasts 90 degrees (still on the same side) to create crosshatch marks and grill for another 3 minutes. The chicken should look nicely marked and caramelized.
STEP 7: Flip and finish cooking.
Flip the chicken over to the second side, still over the hot part of the grill. Cook for another 3 minutes, then move the chicken to the cooler side of the grill to finish cooking through without burning the outside. Close the lid and let it cook until an instant-read thermometer registers 157-158°F when inserted into the thickest part (about 2-5 more minutes depending on thickness). This is slightly below the 165°F USDA recommendation because the temperature will continue to rise during resting. The chicken should feel firm but still have a slight give when pressed with tongs.
STEP 8: Rest before cutting – absolutely non-negotiable.
This step is where most people go wrong. Transfer the chicken to a plate and tent loosely with foil. Let it rest for a FULL 5-10 minutes. The chicken will finish cooking from residual heat, and the juices will redistribute throughout the meat instead of spilling out onto your cutting board. The first time I forced myself to wait the full resting period, the difference was night and day – chicken that had previously been “fine” was suddenly incredibly juicy. If you cut too soon, all that work with the brine goes down the drain.
Tips & Variations for this grilled chicken breast recipe
Need to prep ahead? You can brine the chicken up to 4 hours in advance if you reduce the salt to 2 tablespoons. Just keep it refrigerated. The seasoned, grilled chicken keeps well for 3-4 days in the fridge, making it perfect for meal prep – though it’s never quite as juicy as fresh off the grill. Reheat it gently in a 300°F oven covered with foil, or slice it cold for salads and sandwiches.
For a quick marinade variation, add lemon zest, fresh herbs (rosemary, thyme, or oregano), or a teaspoon of smoked paprika to your seasoning mix. If you don’t have a grill, a cast iron grill pan works surprisingly well – just make sure to open some windows as it’ll get smoky indoors.
Oh, and if your chicken looks less photogenic than the magazine-perfect images you see online, don’t sweat it. Mine certainly isn’t always Instagram-worthy, but it tastes incredible. Function over form, always.
Final Thoughts on this grilled chicken breast recipe
Look, mastering grilled chicken breasts isn’t going to win you a spot on Top Chef, but it’s honestly one of the most useful cooking skills I’ve developed. There’s something deeply satisfying about transforming the most maligned, boring protein into something people genuinely enjoy. The first time my husband – a dedicated dark meat enthusiast – went back for seconds of chicken breast, I knew I’d cracked the code.
If you try this method, I’d love to hear how it works in your kitchen. Did the brine make as big a difference for you as it did for me? Did you come up with any seasoning combinations I should try? Drop a comment and let me know – cooking is always better as a conversation.
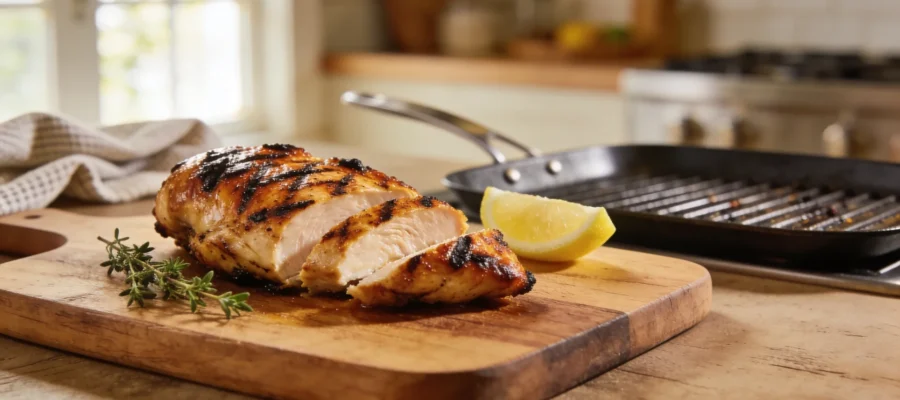
Grilled Chicken Breast
This grilled chicken breast recipe guarantees moist and tender results using a simple brine and grilling techniques.