This no bake energy balls recipe has literally saved my sanity during those afternoon crashes when I’m craving something sweet but don’t want to hate myself later. I’ve been making these for about three years now, and they’re honestly one of those recipes that just works every single time. No oven required, no complicated steps, just five simple ingredients that somehow transform into these perfectly chewy, naturally sweet little bites that actually keep me satisfied.
Table of Contents :
Why I Started Making These Energy Balls
Okay, so here’s the thing. I used to be that person who’d hit 3 PM and immediately start digging through the pantry for anything chocolate. Usually ended up with some processed granola bar that left me feeling gross and still hungry twenty minutes later. Then my sister mentioned she’d been making these no bake energy balls, and I was skeptical because honestly, how good could something be with just five ingredients?
The first batch I made was a complete disaster. I didn’t process the dates long enough, so I ended up with these chunky, falling-apart messes that tasted like sweetened cardboard. My husband took one bite and gave me that look, you know the one. But I was determined to figure it out because the concept was so appealing. No baking, no cleanup, and I could make a week’s worth in about ten minutes.
After some trial and error, I finally nailed the technique. The secret is really in how you process everything and getting the right moisture balance. Now I make a batch every Sunday, and they’re gone by Friday. Even my picky ten-year-old asks for them, which is basically a miracle.
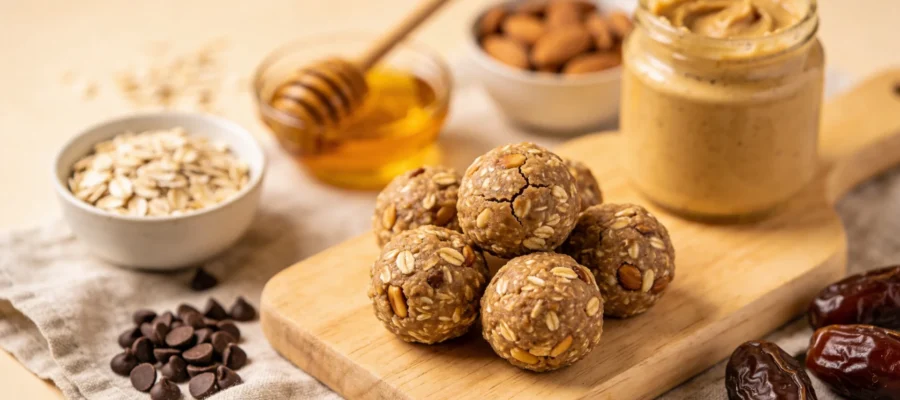
Ingredients no bake energy balls recipe
What I love about this recipe is how simple the ingredient list is. You probably have most of this stuff already, and if you don’t, it’s all pantry staples that you’ll use for other things too. I’ve tried getting fancy with add-ins before, but honestly, these five ingredients create the perfect balance of sweetness, texture, and that satisfying chewiness you want in an energy ball.
Medjool Dates (1 cup, pitted)
These are your natural sweetener and the glue that holds everything together. I always use Medjool because they’re softer and stickier than other varieties. If your dates feel dry or hard, soak them in warm water for about ten minutes first. I learned this the hard way after making those cardboard disasters I mentioned. You can substitute regular dates, but you might need to process them longer to get them smooth.
Raw Almonds (1/2 cup)
These add protein and that satisfying crunch factor. I prefer raw over roasted because they blend more evenly, but roasted works if that’s what you have. You could swap these for cashews or walnuts, but almonds give the best texture in my opinion. Whatever you do, don’t use salted nuts. Trust me on this one, the saltiness throws off the whole balance.
Old-Fashioned Rolled Oats (1/2 cup)
The oats add bulk and make these actually filling instead of just candy in disguise. I use Quaker Old-Fashioned because they’re what I always have, but any brand works. Don’t use quick oats though, they get too mushy. Steel-cut oats are too hard and won’t break down properly. Stick with the regular rolled oats and you’ll be fine.
Natural Peanut Butter (2 tablespoons)
This adds creaminess and helps everything stick together while boosting the protein content. I use the natural stuff without added sugar because the dates provide plenty of sweetness. If you’re not a peanut butter person, almond butter works great too. Just make sure whatever you use is room temperature so it blends easily.
Unsweetened Cocoa Powder (1 tablespoon)
Just enough to give these a subtle chocolate flavor without making them overly rich. I use Hershey’s unsweetened because it’s what I always have for baking. You could skip this for plain energy balls, but the cocoa really makes them taste more like a treat and less like health food. Which, let’s be honest, helps with the whole family acceptance factor.
How to Make no bake energy balls recipe
The whole process takes maybe fifteen minutes from start to finish, and most of that is just waiting for the food processor to do its thing. The key is being patient with the processing steps. I used to rush it and end up with chunky, crumbly balls that fell apart. Now I let each step go a little longer than feels necessary, and the results are so much better.
STEP 1: Process the dates first.
Add your pitted dates to the food processor and pulse until they form a sticky paste. This takes about 60 to 90 seconds of processing. You’ll hear the sound change from chopping to more of a whirring noise when they’re ready. The mixture should look like thick caramel and stick to the sides of the bowl. If you still see chunks of dates, keep processing. This step is crucial for getting smooth, cohesive energy balls.
STEP 2: Add the almonds and oats.
Toss in the almonds and oats, then process for another 30 to 45 seconds until everything is roughly chopped and combined. You want some texture here, so don’t over-process. The almonds should be broken down but not completely powdered. You’ll still see little pieces, which is perfect. They add nice bite to the final product.
STEP 3: Mix in the peanut butter and cocoa.
Add the peanut butter and cocoa powder, then process until everything comes together into a cohesive mixture that holds together when you squeeze it. This usually takes about 30 seconds. The mixture should look uniformly brown and feel slightly sticky. If it seems too dry and won’t hold together, add another tablespoon of peanut butter. If it’s too wet and sticky to handle, add a bit more oats.
STEP 4: Roll into balls.
Scoop out about a tablespoon of mixture and roll it between your palms into a ball. The mixture might be slightly sticky, which is normal. If it’s really sticking to your hands, lightly dampen your palms with water. You should get about 12 energy balls from this recipe. Don’t worry about making them perfectly round, mine never are and they taste just as good.
STEP 5: Chill and store.
Place the energy balls on a plate or in a container and refrigerate for at least 30 minutes before eating. This helps them firm up and makes them less likely to fall apart. They’ll keep in the fridge for about a week in an airtight container, though they never last that long in my house.
What to Serve With no bake energy balls recipe
These energy balls are perfect on their own as an afternoon snack, but I also love them with a cup of coffee in the morning when I need something quick. They pair really well with Greek yogurt for a more substantial breakfast, or you can crumble one over oatmeal for extra sweetness and texture. My kids like them with a glass of cold milk, and they make great additions to lunch boxes since they don’t need to be kept cold.
Tips for the Best no bake energy balls recipe
Store these in the refrigerator in an airtight container for up to a week. They actually taste better after sitting overnight because the flavors meld together. If you want to make them ahead, they freeze beautifully for up to three months. Just thaw them in the fridge when you’re ready to eat them. You can roll them in shredded coconut or chopped nuts before chilling if you want a fancier look, but honestly, they’re great plain too. Don’t expect them to look like professional food photos, mine are always a little rustic looking and that’s perfectly normal.
Questions People Ask About no bake energy balls recipe
I get asked about variations and troubleshooting pretty regularly, so here are the most common questions.
Can I use a different type of nut butter?
Absolutely, almond butter, cashew butter, or sunflower seed butter all work great in this no bake energy balls recipe. Just make sure whatever you use is natural and doesn’t have added sugar. The consistency might change slightly, but the balls will still hold together just fine.
Why are my energy balls falling apart?
Usually this means the dates weren’t processed long enough or they were too dry to begin with. Try soaking your dates in warm water for ten minutes before processing, and make sure to blend them into a smooth paste before adding the other ingredients. If the mixture still won’t hold together, add another tablespoon of nut butter.
Can I make these without a food processor?
It’s really difficult to get the right texture without a food processor. I’ve tried using a blender before and it just doesn’t work as well. You could maybe chop everything by hand and mash it together, but the results won’t be nearly as smooth or cohesive as the traditional method.
How long do these energy balls last?
They’ll keep in the refrigerator for about a week in an airtight container. The texture actually improves after the first day as everything melds together. You can also freeze them for up to three months if you want to make a bigger batch.
Final Thoughts on no bake energy balls recipe
Look, these aren’t going to win any beauty contests, but they’re exactly what I need when I want something sweet that won’t make me crash later. The best part is how adaptable they are once you get the basic technique down. I’ve made versions with different nuts, added chia seeds, swapped the cocoa for cinnamon. They always work.
If you try this no bake energy balls recipe, let me know how it goes. I’m always curious to hear what variations people come up with, and honestly, it’s nice to know I’m not the only one who gets excited about five-ingredient snacks.
No Bake Energy Balls
This no bake energy balls recipe has literally saved my sanity during those afternoon crashes when I'm craving something sweet but don't want to hate myself later. Made with just five simple ingredients, they are chewy, naturally sweet bites that keep you satisfied.