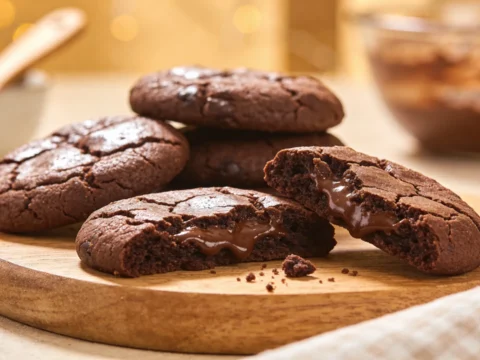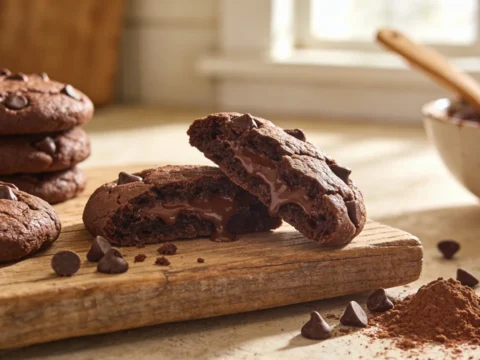
This Nutella stuffed cookies recipe has been my secret weapon for potlucks and office parties for years. There’s something absolutely magical about biting into what looks like an ordinary chocolate chip cookie and discovering that molten river of hazelnut chocolate hiding inside. The contrast between the soft, chewy cookie exterior and that gooey Nutella center creates a texture experience that literally makes people close their eyes and do that “mmm” thing. I’ve tweaked this recipe probably fifteen times to get it just right—the cookies need to be thick enough to hold the Nutella without leaking, but soft enough to maintain that perfect bakery-style texture.
Table of Contents :
The Quest for the Perfect Nutella Stuffed Cookie
I first attempted Nutella stuffed cookies after seeing them on Instagram about five years ago. What the video didn’t show was how incredibly messy the process would be. My first batch looked like chocolate meteors—flat, burned discs with Nutella oozing everywhere except where it should be. The kitchen looked like a hazelnut tornado had hit it, and I had Nutella under my fingernails for days.
Most recipes online are just plain wrong about the Nutella prep. They tell you to just spoon it in, which is a disaster waiting to happen. I learned (the hard way) that freezing little Nutella discs ahead of time is absolutely non-negotiable. I was making these for my sister’s birthday and waited until the last minute—big mistake. Room temperature Nutella just melts instantly and creates sad, flat cookies that look nothing like those perfect Instagram versions. After that disaster, I developed the frozen Nutella disc method that’s now the cornerstone of this recipe. Sure, it adds prep time, but the difference is night and day. Trust me on this one.
Ingredients nutella stuffed cookies recipe
The ingredients for these stuffed cookies might look similar to regular chocolate chip cookies with one obvious addition, but there are some key differences. I’ve adjusted the flour ratio and added an extra egg yolk to create a dough that’s sturdy enough to wrap around the Nutella while still baking up soft and chewy. The brown sugar proportion is also higher than usual because it adds moisture and creates that perfect chewy texture we’re after.
A quick note on measuring: for these cookies in particular, I really recommend weighing your flour if you have a kitchen scale. Too much flour and you’ll get dry, cakey cookies that crack when you try to stuff them; too little and the dough will be too sticky to work with and the cookies will spread too much during baking.
Nutella (1 cup)
The star of the show! Don’t bother with off-brand hazelnut spreads here—I’ve tried them all and genuine Nutella has the best flavor and consistency for these cookies. The way it sets up when frozen and then melts back to that perfect gooey consistency when baked just can’t be matched. You’ll be freezing tablespoon-sized portions, and you’ll have some leftover for, well, eating straight from the jar (no judgment here).
All-Purpose Flour (2 1/4 cups)
Regular all-purpose flour works perfectly here. I’ve tried bread flour thinking it would give more structure, but the cookies ended up too tough. I’ve also tried cake flour hoping for more tenderness, but the cookies collapsed. Stick with all-purpose for the right balance. If you’re measuring by volume instead of weight, make sure to fluff, spoon, and level your flour rather than scooping directly with the measuring cup.
Unsalted Butter (1 cup, softened)
Temperature really matters here—too cold and you’ll get uneven mixing; too warm and your dough will be greasy and spread too much. The butter should be soft enough that your finger leaves an impression when you press it, but not so soft that it’s shiny or melting. I usually take mine out about 45 minutes before I start baking. You can use salted butter if that’s all you have—just reduce the added salt to 1/4 teaspoon.
Brown Sugar (1 cup, packed)
I use dark brown sugar for a deeper molasses flavor and extra moisture, which helps keep these cookies soft for days. Light brown sugar works too, but your cookies will be slightly less chewy. Whatever you do, make sure to really pack it into the measuring cup—loose brown sugar will throw off the ratio and affect how the cookies spread.
Granulated Sugar (1/2 cup)
The combination of both sugars is key—granulated sugar helps the cookies spread and creates those slightly crisp edges, while the brown sugar keeps the centers soft and adds flavor. I’ve tried reducing the sugar to make them “healthier” once, and they were terrible—dry and cakey instead of soft and chewy. Learn from my mistake.
Eggs (1 whole egg + 1 egg yolk)
The extra yolk is my secret weapon for super soft, chewy cookies. It adds fat and protein that helps create that perfect texture. Make sure your eggs are room temperature so they incorporate evenly—cold eggs can cause the butter to re-solidify and make your dough lumpy. I place mine in warm water for about 5 minutes if I forget to take them out ahead of time.
Vanilla Extract (2 teaspoons)
Always use pure vanilla extract if you can—the flavor difference is noticeable, especially in something simple like cookies. I splurge on the good stuff from Madagascar for these because the vanilla complements the hazelnut flavor so well. In a pinch, you can use imitation vanilla, but reduce to 1 1/2 teaspoons as the flavor can be more intense and slightly artificial.
Baking Soda (1 teaspoon)
This provides the lift and helps create that soft, puffy texture. Make sure yours is fresh—old baking soda loses its potency and your cookies won’t rise properly. If you haven’t replaced your baking soda in the last 6 months, it’s probably time for a fresh box. They’re cheap, and it makes a huge difference.
Salt (1/2 teaspoon)
I use fine sea salt because it distributes more evenly than kosher salt. The salt is crucial here—it balances the sweetness and actually enhances the chocolate and hazelnut flavors. Don’t skip it, even if you’re watching your sodium. These cookies need that balance.
Semi-Sweet Chocolate Chips (1 cup)
I prefer semi-sweet chips because they balance the sweetness of the Nutella, but you can use milk chocolate if you prefer a sweeter cookie. I’ve tried fancy chocolate chunks and honestly, regular old Nestle Toll House chips work perfectly. I do recommend sticking with chips rather than chopped chocolate bars for this recipe—the uniformity helps when wrapping the dough around the Nutella.
Instructions nutella stuffed cookies recipe
This recipe takes some planning—you need to freeze the Nutella ahead of time, and I recommend chilling the dough too. It’s not complicated, but it’s not a last-minute cookie craving solution either. The hands-on time is about 30 minutes, but with freezing and chilling, you’re looking at a few hours from start to finish. The good news is you can break it up into stages if you need to.
Don’t be intimidated by the stuffing process—it gets easier after the first few cookies. I’ve provided really detailed instructions below because I want you to succeed where I initially failed. The first time I made these, I was rushing and skipped chilling the dough, and ended up with what I can only describe as “Nutella pancakes.” Not pretty. Stick with the process and you’ll be rewarded with gorgeous, bakery-worthy cookies.
STEP 1: Freeze the Nutella.
Line a small baking sheet or plate with parchment paper. Scoop out tablespoon-sized portions of Nutella and place them on the parchment about 1 inch apart. The key here is to make them slightly smaller than a full tablespoon—about 2 teaspoons is perfect. Place the sheet in the freezer for at least 2 hours, or overnight. The Nutella should be completely firm before you try to handle it. I learned this the messy way after trying to rush with only 30 minutes of freezing time—disaster.
STEP 2: Prepare the cookie dough.
In a large bowl, beat the softened butter, brown sugar, and granulated sugar with an electric mixer for 2-3 minutes until light and fluffy. This isn’t just mixing—you’re actually incorporating air into the butter and sugar, which affects the texture of your finished cookies. Don’t rush this step! You’ll know it’s ready when the color lightens and the mixture looks almost whipped. Scrape down the sides of the bowl at least once during mixing.
STEP 3: Add the eggs and vanilla.
Add the egg, extra egg yolk, and vanilla extract to your butter-sugar mixture. Beat on medium speed until completely combined and smooth, about 1 minute. The mixture should look glossy and slightly thickened. If your eggs were too cold, you might see little lumps of butter—that’s why room temperature ingredients are so important. If this happens, keep mixing and they should eventually incorporate.
STEP 4: Incorporate the dry ingredients.
In a separate bowl, whisk together the flour, baking soda, and salt. Gradually add this dry mixture to your wet ingredients, mixing on low speed just until combined. Over-mixing at this stage will develop the gluten in the flour and make your cookies tough instead of tender. When you’re about halfway through adding the flour mixture, stop the mixer and use a rubber spatula to scrape down the sides and bottom of the bowl. Resume mixing until just a few streaks of flour remain.
STEP 5: Add chocolate chips.
Fold in the chocolate chips with a rubber spatula until evenly distributed. The dough will be soft but should not be sticky—it should feel similar to play-dough. If it seems too sticky to handle, the butter was probably too warm. Pop the dough in the refrigerator for about 30 minutes before moving on to the next step. Trust me, trying to wrap sticky dough around frozen Nutella is an exercise in frustration. I’ve been there.
STEP 6: Chill the dough.
Cover the bowl with plastic wrap and refrigerate for at least 1 hour. This step is non-negotiable! Chilled dough is easier to handle and helps prevent the cookies from spreading too much during baking. If you’re in a hurry (like I often am), you can speed this up by spreading the dough on a parchment-lined baking sheet and refrigerating for 20-30 minutes until firmer. The dough should feel cool to the touch and hold its shape when you roll it.
STEP 7: Stuff and shape the cookies.
Preheat your oven to 350°F (175°C) and line baking sheets with parchment paper. Scoop out about 2 tablespoons of dough and flatten it in your palm. Working quickly, take a frozen Nutella disc, place it in the center of the dough, and fold the edges up and over to completely seal the Nutella inside. Roll between your palms to form a ball, making sure there are no cracks or openings where the Nutella could leak out. I work in batches of 4-6 cookies, keeping the rest of the Nutella discs in the freezer until needed.
STEP 8: Arrange and bake.
Place the stuffed cookie dough balls on your prepared baking sheets, spacing them about 3 inches apart—these will spread as they bake. Don’t crowd the pan or you’ll end up with one giant cookie (though honestly, that doesn’t sound terrible). Bake for 11-13 minutes until the edges are set and just beginning to turn golden, but the centers still look slightly underdone. The cookies will continue to cook from residual heat after you take them out of the oven.
STEP 9: Perfect the appearance and cool.
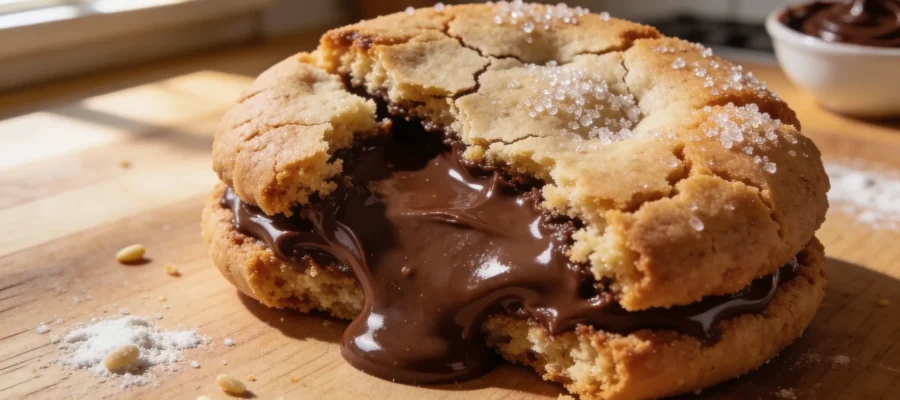
As soon as the cookies come out of the oven, you can use a round cookie cutter or the rim of a glass to gently scoot around any misshapen cookies to make them perfectly round. This is a professional baker’s trick I learned that makes homemade cookies look bakery-perfect. Let the cookies cool on the baking sheet for 5 minutes—they’re too fragile to move right away and the Nutella inside is molten hot! After 5 minutes, transfer them to a wire rack to cool completely. Well, at least let them cool enough that you don’t burn your tongue on the Nutella.
Tips & Variations nutella stuffed cookies recipe
For storage, these cookies keep well in an airtight container at room temperature for up to 5 days, though they’re best within the first 3 days. You can also freeze the baked cookies for up to 3 months—just microwave for about 15 seconds to get that gooey center back. Even better, freeze the shaped unbaked dough balls and bake them whenever a craving hits—just add 1-2 minutes to the baking time when cooking from frozen.
Want to switch things up? Try using white chocolate chips instead of semi-sweet for a sweeter cookie. You can also add 1/2 cup of chopped hazelnuts to the dough to enhance that Nutella flavor. For a festive touch, I sometimes press a few extra chocolate chips on top of each cookie right after baking—it makes them look even more irresistible. And if yours don’t look exactly like professional photos, that’s completely normal. They’ll still taste amazing, and that’s what really matters.
Final Thoughts nutella stuffed cookies recipe
This Nutella stuffed cookies recipe might seem like a bit of work with all the freezing and chilling, but I promise the payoff is worth it. There’s nothing quite like watching someone’s face light up when they discover that molten Nutella center. I’ve served these at everything from casual game nights to fancy dinner parties, and they’re always the first thing to disappear from the dessert table.
If you try these cookies, please let me know how they turn out! I’m always curious if my detailed instructions actually help people avoid the Nutella explosion disaster I experienced on my first attempt. And I’d love to hear what variations you come up with—this community always has the best ideas for taking recipes to the next level.
Nutella Stuffed Cookies
This Nutella stuffed cookies recipe has been my secret weapon for potlucks and office parties for years. The contrast between the soft, chewy cookie exterior and that gooey Nutella center creates a texture experience that delights everyone.