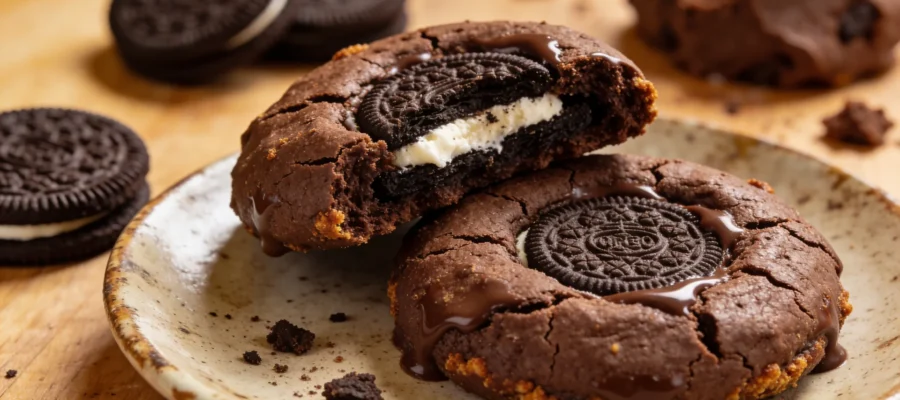
This Oreo stuffed cookies recipe has become my ultimate party trick. Every time I bring these cookies somewhere, people literally lose their minds over the surprise center. I mean, who wouldn’t? You bite into what looks like a regular (albeit thick) chocolate chip cookie, and BAM—there’s a whole Oreo inside! The contrast between the chewy cookie exterior and the crisp, creamy Oreo center creates this magical texture experience that’s honestly worth every calorie.
Table of Contents :
How I Discovered Oreo Stuffed Cookies
I first saw these cookies on Pinterest years ago and thought they looked completely ridiculous—in the best possible way. Obviously, I had to try making them immediately. My first attempt was…well, let’s just say not Instagram-worthy. I didn’t make the cookie dough thick enough, so the Oreos burst through the top during baking like little cookie volcanoes. Still tasted amazing though!
After some experimenting (and several batches that mysteriously disappeared within days), I finally nailed the perfect ratio of cookie dough to Oreo. The trick is making sure you completely seal the Oreo inside the dough—something I learned the hard way when my neighbor’s kid bit into one with an exposed edge and asked, “Why did you put a store-bought cookie inside your cookie?” Talk about being called out by a seven-year-old!
What makes my version different from others online is that I don’t just use any chocolate chip cookie recipe. I specifically developed this dough to be extra thick and chewy to properly encase the Oreo. I also chill the dough, which prevents excessive spreading—a step many recipes skip but is absolutely essential unless you want cookie pancakes.
Ingredients for Oreo Stuffed Cookies Recipe
The ingredients list might look like your standard chocolate chip cookie recipe with an extra package of Oreos, but there are some important details to pay attention to. The ratio of brown to white sugar matters here—we want more moisture and chewiness than a traditional cookie to complement the crunchy Oreo center.
And while I’m normally all about substitutions and making do with what you have, this is one recipe where specific ingredients really do make a difference in the final result. That said, I’ll note where you can flex a bit without ruining everything.
Unsalted Butter (1 cup/2 sticks, softened)
You want actual butter here, not margarine or shortening. The flavor is unmatched, and the way it creams with the sugars creates that perfect chewy texture. If you only have salted butter, that’s fine—just reduce the added salt by about 1/4 teaspoon. And make sure it’s truly softened to room temperature; I’ve tried to rush this by microwaving and ended up with greasy, flat cookies.
Light Brown Sugar (1 cup, packed)
Brown sugar brings moisture and a subtle molasses flavor that makes these cookies chewy rather than crisp. Don’t substitute white sugar here—the cookies won’t have the same depth or texture. Dark brown sugar works too if that’s what you have; it’ll just give a slightly stronger molasses flavor and darker color.
Granulated Sugar (1/2 cup)
This works with the brown sugar to create the perfect texture balance. The granulated sugar helps the edges get that slight crispness while the centers stay soft. If you’re out, you could substitute more brown sugar, but your cookies will be even softer and might not spread properly.
Eggs (2 large, room temperature)
Room temperature eggs incorporate much better into the batter. I’ve forgotten this step many times and ended up with weird streaks in my dough. If you’re in a hurry, place cold eggs in warm (not hot) water for about 5 minutes. And please don’t try to substitute with flax eggs here—I tried once and the dough couldn’t hold the Oreo properly.
Vanilla Extract (2 teaspoons)
Real vanilla extract makes a difference in flavor, but I’m not going to pretend I haven’t used the imitation stuff in a pinch. If you have vanilla bean paste, even better—use the same amount and enjoy those tiny bean flecks. I once tried almond extract (just 1/2 teaspoon) along with vanilla, and it was surprisingly good!
All-Purpose Flour (3 cups)
The flour amount is critical—it’s what helps create a thick dough that can fully enclose the Oreo. If you measure using cups, make sure to spoon and level rather than scooping directly with the measuring cup. Too much flour will make the cookies dry; too little and they’ll spread too much. For gluten-free, I’ve had success with 1-to-1 baking flour blends, but the texture isn’t quite the same.
Baking Soda (1 teaspoon)
This is our leavening agent that helps the cookies rise just enough without getting cakey. Make sure yours is fresh—old baking soda loses its power and your cookies won’t puff up properly. I learned this the hard way after finding a box in the back of my pantry that had been there for…well, let’s not discuss how long.
Salt (1 teaspoon)
Don’t skip this! Salt balances the sweetness and enhances all the flavors. I prefer kosher salt for its clean taste, but table salt works fine too—just use a bit less (about 3/4 teaspoon). If you’re feeling fancy, a light sprinkle of flaky sea salt on top before baking adds amazing contrast.
Semi-Sweet Chocolate Chips (1 1/2 cups)
Semi-sweet provides the perfect balance with the sweet Oreo center. You can substitute milk chocolate chips if you prefer a sweeter cookie, or dark chocolate if you like more contrast. I’ve also done a mix of chips and chunks for texture variety. And yes, I’ve definitely added extra when no one was looking.
Oreo Cookies (24 cookies)
Regular Oreos are perfect, but Double Stuf works too if you want extra creme (though they can be a bit trickier to fully encase). The seasonal flavored Oreos create fun variations—I’ve tried mint, peanut butter, and birthday cake with great success. Just don’t use the thin Oreos; they get lost in the cookie and the whole point is that dramatic center!
Instructions for Oreo Stuffed Cookies Recipe
This recipe isn’t complicated, but it does require some patience. You’ll need about 20 minutes of prep time, an hour of chilling (non-negotiable, I’ve tried skipping it), and then baking time. The most finicky part is wrapping the dough around the Oreos without leaving gaps or thin spots. But even if they’re not perfect, they’ll still taste amazing—I’ve never had anyone complain about a slightly imperfect cookie!
One thing to know about these cookies is that they’re BIG. Like, significantly bigger than your standard cookie. This means they need a little more baking time than you might expect, but don’t be tempted to overdo it. They should still look slightly underdone in the center when you take them out—they’ll continue cooking on the baking sheet.
STEP 1: Cream the butter and sugars.
In a large bowl, beat the softened butter, brown sugar, and granulated sugar together for a full 2-3 minutes until the mixture is light and fluffy. This isn’t just mixing—you want to incorporate air and really cream these ingredients together. I use a stand mixer on medium speed, but a hand mixer works too. If your butter isn’t properly softened, you’ll end up with little lumps that never incorporate properly. Been there, regretted that.
STEP 2: Add eggs and vanilla.
Add the eggs one at a time, beating well after each addition until completely incorporated. Then mix in the vanilla extract. The mixture should look smooth and slightly increased in volume. If it looks curdled or separated, your eggs were probably too cold—keep mixing and it should come together, but next time remember room temperature ingredients!
STEP 3: Mix the dry ingredients.
In a separate bowl, whisk together the flour, baking soda, and salt. This ensures even distribution of the leavening agent and salt. I used to skip this step and add everything directly to the wet ingredients, but learned the hard way that you can end up with bitter pockets of baking soda or random salty spots. Definitely not what you want when biting into what should be cookie perfection.
STEP 4: Combine wet and dry ingredients.
Gradually add the dry ingredient mixture to the butter mixture, mixing on low speed just until combined. Don’t overmix or you’ll develop too much gluten, resulting in tough cookies. The dough should come together and pull away from the sides of the bowl but still be soft. If it seems too sticky to handle, your butter might have been too warm—not a disaster, but you’ll definitely need that chilling time.
STEP 5: Fold in the chocolate chips.
Gently fold in the chocolate chips with a spatula until evenly distributed throughout the dough. This is where I usually sneak a taste (despite containing raw eggs—I know, I know) because the dough is so good. Actually, I’m convinced half the appeal of making cookies is eating the dough. But I digress…
STEP 6: Chill the dough.
Cover the dough with plastic wrap and refrigerate for at least 1 hour. This step is absolutely non-negotiable. I’ve tried skipping it when I was in a hurry, and the dough was too soft to work with and spread way too much during baking. The chilling time allows the flour to hydrate and the butter to firm up, which helps the cookies maintain their shape and properly encase the Oreo.
STEP 7: Preheat and prepare.
Preheat your oven to 350°F (175°C) and line baking sheets with parchment paper. Don’t use wax paper (it can smoke in the oven) and don’t skip the lining—these cookies can stick due to melted chocolate and their large size. If you’re out of parchment, silicone baking mats work great too.
STEP 8: Wrap Oreos in cookie dough.
This is the fun part! Scoop about 2 tablespoons of dough and flatten it in your palm. Place an Oreo cookie in the center, then top with another flattened 2 tablespoons of dough. Seal the edges by pinching and rolling to completely encase the Oreo. You should end up with a dough ball about the size of a golf ball with no Oreo visible. The first few might look a bit rough, but you’ll get the hang of it. If the dough gets too warm and sticky as you work, pop it back in the fridge for 15 minutes.
STEP 9: Space and bake the cookies.
Place the dough balls on the prepared baking sheets, leaving about 3 inches between them—these spread significantly! I usually fit only 6 cookies per standard baking sheet. Bake for 12-14 minutes until the edges are set and lightly golden, but the centers still look slightly underdone. The cookies will continue to cook from residual heat after removal from the oven. If you wait until they look completely done, they’ll end up overbaked and won’t have that amazing chewy texture.
STEP 10: Cool properly.
Let the cookies cool on the baking sheet for 5-7 minutes before transferring to a wire rack to cool completely. This resting time is crucial—try to move them too soon and they’ll fall apart since they’re so big and still soft in the center. The texture continues to develop as they cool, with the outside setting while maintaining that perfect chewy center around the Oreo. It’s torture waiting, but worth it!
Tips & Variations for Oreo Stuffed Cookies Recipe
These cookies will stay fresh in an airtight container at room temperature for about 3-4 days, though they’ve never lasted that long in my house! For longer storage, you can freeze the baked cookies for up to 3 months—just thaw at room temperature when the craving hits. Even better, freeze the unbaked dough balls with Oreos inside, and you can bake them straight from frozen (just add 2-3 minutes to the baking time).
For a fun twist, try different Oreo flavors or even other sandwich cookies. Mint Oreos with dark chocolate chips in the dough are incredible. Peanut butter Oreos with peanut butter chips mixed into the dough will send any peanut butter lover into ecstasy. I’ve even tried using Chips Ahoy cookies inside instead of Oreos for a meta cookies-inside-cookies experience!
If your cookies spread too much despite chilling the dough, your oven might run hot. Try reducing the temperature by 25 degrees. And don’t be discouraged if your first batch doesn’t look Instagram-perfect—these are rustic, homemade treats, not factory-produced perfection. The surprise factor when someone bites into them more than makes up for any aesthetic imperfections!
Final Thoughts on Oreo Stuffed Cookies Recipe
Look, these Oreo stuffed cookies are not subtle, sophisticated, or healthy. They’re indulgent, a bit ridiculous, and exactly what you need when you want to impress people with minimal effort. Every time I make them, I still get a little thrill seeing people’s faces when they discover the Oreo inside. It’s the simple joys, right?
If you try this recipe, please let me know how it goes! I’m especially curious if you experiment with different Oreo flavors or make any tweaks to the base cookie recipe. My kids are always begging me to try new variations, and I’m running out of ideas that don’t involve me buying every single limited edition Oreo flavor at the grocery store (though I’m not opposed to that research if necessary).
Oreo Stuffed Cookies
These thick, chewy cookies have a surprise creamy Oreo center that will impress your guests and satisfy your cravings.