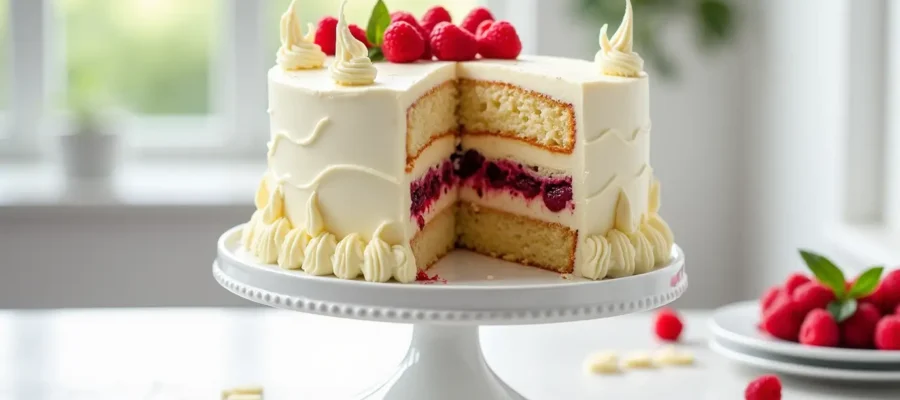
Hey there, fellow bakers! Today I’m sharing something that makes my heart (and stomach) incredibly happy – my absolute favorite White Chocolate Raspberry Cake recipe. This isn’t just any cake – it’s a slice of heaven that combines the subtle sweetness of white chocolate with the tartness of fresh raspberries. The result? Pure magic on a plate!
I’ve been perfecting this recipe for years, and let me tell you – it’s been a delicious journey! 🙂 This cake has become my go-to for special occasions, from birthdays to anniversaries, and even “just because it’s Wednesday and I need cake” days (we all have those, right?).
Ever wondered how to create that perfect balance between sweet and tart? Or how to achieve that moist, melt-in-your-mouth texture that makes people ask for seconds? Well, you’re in the right place because I’m about to spill all my secrets!
Table of Contents :

Why You’ll Love This White Chocolate Raspberry Cake
Let’s be real – there are tons of cake recipes floating around the internet. So why should you try this one? Well…
- It’s the perfect balance of sweet white chocolate and tangy raspberries
- The cake layers are incredibly moist (no dry cake here, promise!)
- It looks impressive but is actually totally doable for home bakers
- The white chocolate raspberry combo works for literally any occasion
- You can customize it based on what you have on hand
Look, I’m not saying this cake will change your life, but… okay, maybe it will a little bit. At the very least, it’ll make you the star of your next gathering when everyone’s fighting over the last slice!
Ingredients You’ll Need
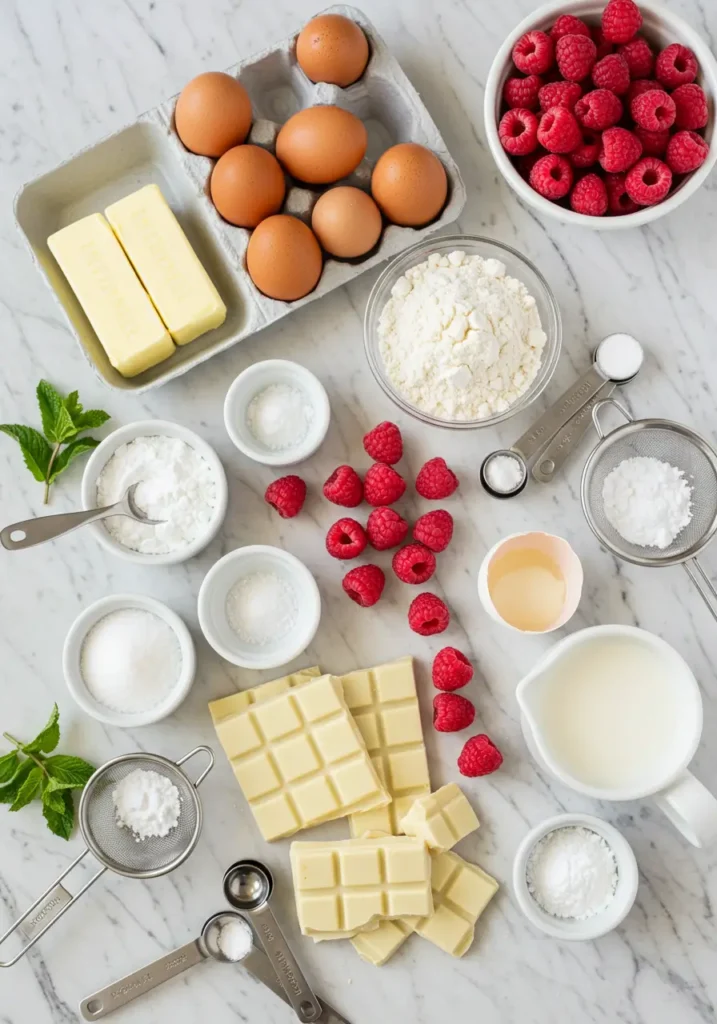
For the Cake Layers
- 2¾ cups (345g) all-purpose flour
- 1 tablespoon baking powder
- ½ teaspoon salt
- 1 cup (227g) unsalted butter, room temperature
- 1¾ cups (350g) granulated sugar
- 4 large eggs, room temperature
- 2 teaspoons vanilla extract
- ½ teaspoon almond extract (optional but recommended!)
- 1 cup (240ml) whole milk, room temperature
- 6 oz (170g) white chocolate, melted and slightly cooled
- 1½ cups (180g) fresh or frozen raspberries (if frozen, don’t thaw)
For the White Chocolate Buttercream
- 1½ cups (340g) unsalted butter, room temperature
- 4½ cups (540g) powdered sugar, sifted
- 8 oz (225g) white chocolate, melted and cooled
- 2 tablespoons heavy cream
- 1 teaspoon vanilla extract
- ¼ teaspoon salt
For the Raspberry Filling
- 2 cups (240g) fresh or frozen raspberries
- ½ cup (100g) granulated sugar
- 2 tablespoons lemon juice
- 2 tablespoons cornstarch
- 2 tablespoons water
For Decoration
- 1 cup (120g) fresh raspberries
- White chocolate curls or shavings
- Edible flowers (optional)
Let’s Talk About Ingredients
Before we jump into baking, let’s chat about what makes this cake so special – the ingredients!
White Chocolate
Not all white chocolate is created equal, folks! For this recipe, please, PLEASE use real white chocolate – the kind that contains cocoa butter. Those white baking chips? They’re often just sweetened oil and won’t give you the same flavor or texture.
My go-to brands are Ghirardelli, Lindt, or Valrhona if you’re feeling fancy. Good white chocolate should melt smoothly and have a creamy, vanilla-forward flavor. Trust me, it makes a huge difference in the final result.
Raspberries
Fresh or frozen? Both work great! If it’s raspberry season and you can get your hands on some plump, ripe berries – amazing. But honestly, frozen raspberries are picked at peak ripeness and work perfectly in this recipe.
FYI – if using frozen berries in the cake batter, don’t thaw them first. Add them frozen to prevent bleeding throughout your batter. For the filling, however, either fresh or thawed frozen berries will work.
Extracts
Vanilla extract is a must, but the secret weapon here is a touch of almond extract. It enhances the flavor of both the white chocolate and the raspberries in a way that’s subtle but game-changing. If you don’t have it, the cake will still be delicious, but if you do… wow.
Equipment You’ll Need
- Three 8-inch round cake pans
- Parchment paper
- Electric mixer (stand or hand)
- Mixing bowls
- Rubber spatula
- Whisk
- Saucepan (for raspberry filling)
- Offset spatula
- Cake turntable (optional but helpful)
- Sieve or strainer (for raspberry seeds)
Step-by-Step Instructions
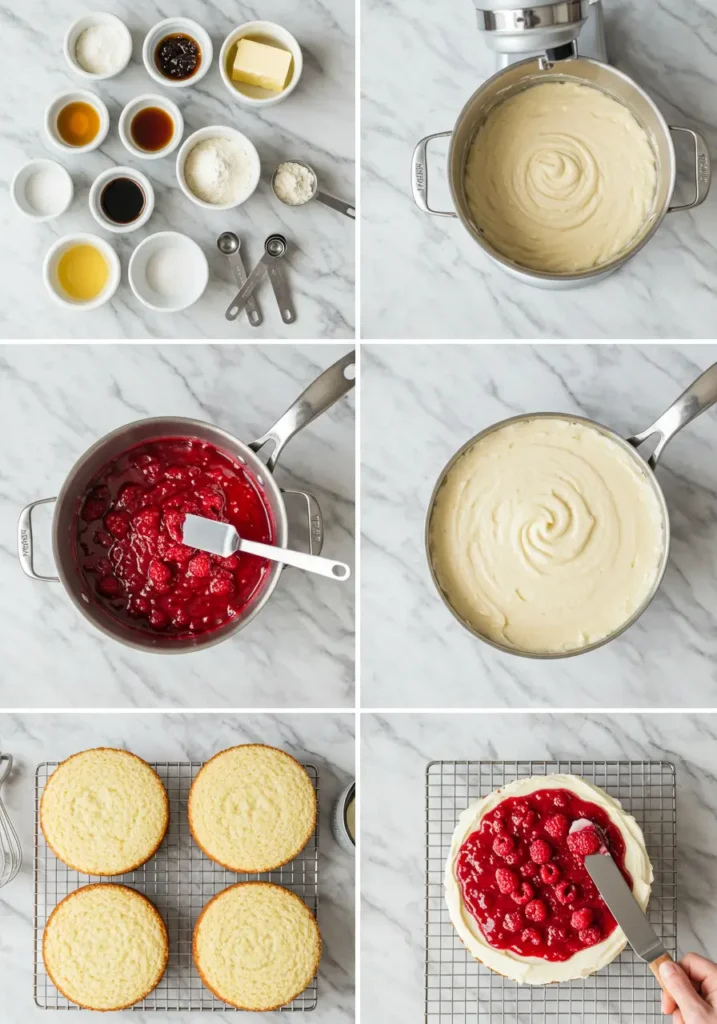
Making the Cake Layers
- Prep time! Preheat your oven to 350°F (175°C). Grease three 8-inch round cake pans and line the bottoms with parchment paper. This might seem like extra work, but it ensures your cakes release perfectly – no tears or broken layers!
- Mix the dry ingredients. In a medium bowl, whisk together the flour, baking powder, and salt. Set aside.
- Cream butter and sugar. In the bowl of your stand mixer (or using a hand mixer), beat the butter and sugar on medium-high speed for about 5 minutes until light and fluffy. Don’t skimp on this step! It creates tiny air pockets that give your cake that perfect texture.
- Add the eggs. Add eggs one at a time, beating well after each addition. Scrape down the sides of the bowl as needed. The mixture might look a bit curdled – that’s totally normal!
- Flavor boost. Mix in the vanilla extract and almond extract.
- Incorporate the melted white chocolate. Pour in the slightly cooled melted white chocolate and mix until well combined.
- Alternate dry ingredients and milk. With the mixer on low speed, add the flour mixture in three parts, alternating with the milk, beginning and ending with the flour mixture. Mix just until combined – overmixing = tough cake, and nobody wants that!
- Gently fold in raspberries. Using a rubber spatula, carefully fold in the raspberries. If using fresh ones, be gentle to avoid crushing them. If using frozen, work quickly so they don’t thaw and bleed into the batter.
- Divide and bake. Divide the batter evenly among the prepared pans. Bake for 25-30 minutes, or until a toothpick inserted into the center comes out with a few moist crumbs (not wet batter).
- Cool properly. Allow the cakes to cool in the pans for 10 minutes, then remove and transfer to a wire rack to cool completely. Seriously – don’t rush this step! Frosting a warm cake = disaster!
Making the Raspberry Filling
- Cook the berries. In a medium saucepan, combine raspberries, sugar, and lemon juice. Bring to a simmer over medium heat, stirring occasionally.
- Thicken it up. In a small bowl, mix the cornstarch and water until smooth. Pour into the simmering raspberry mixture and cook, stirring constantly, until thickened (about 1-2 minutes).
- Strain (optional). If you don’t like seeds, strain the mixture through a fine mesh sieve, pressing with a spoon to extract all the lovely raspberry goodness.
- Chill out. Transfer to a bowl, cover with plastic wrap (pressing it directly onto the surface to prevent a skin from forming), and refrigerate until completely cool.
Making the White Chocolate Buttercream
- Beat the butter. In a large bowl, beat the butter until creamy and pale (about 3-4 minutes).
- Add powdered sugar. Gradually add the sifted powdered sugar, mixing on low speed until incorporated, then increasing to medium-high and beating until fluffy.
- Chocolate time! Add the cooled melted white chocolate and mix until well combined.
- Final touches. Beat in the heavy cream, vanilla extract, and salt. If the frosting seems too thick, add a bit more cream. If it’s too thin, add a little more powdered sugar.
Assembling the Cake
- Level the cakes. If your cake layers have domed tops, use a serrated knife to level them. (Bonus: baker’s treat – snack on those scraps!)
- Start stacking. Place one cake layer on your serving plate or cake stand. Pipe a ring of buttercream around the edge to create a dam (this prevents the filling from oozing out).
- Fill it up. Spread half of the raspberry filling inside the buttercream dam.
- Keep building. Place the second cake layer on top and repeat the process with the remaining raspberry filling.
- Top it off. Place the final cake layer on top, bottom side up for a flat surface.
- Crumb coat. Apply a thin layer of buttercream all over the cake (this is your crumb coat) and refrigerate for about 15-20 minutes to set.
- Final frosting. Once the crumb coat has set, apply the remaining buttercream to the top and sides of the cake.
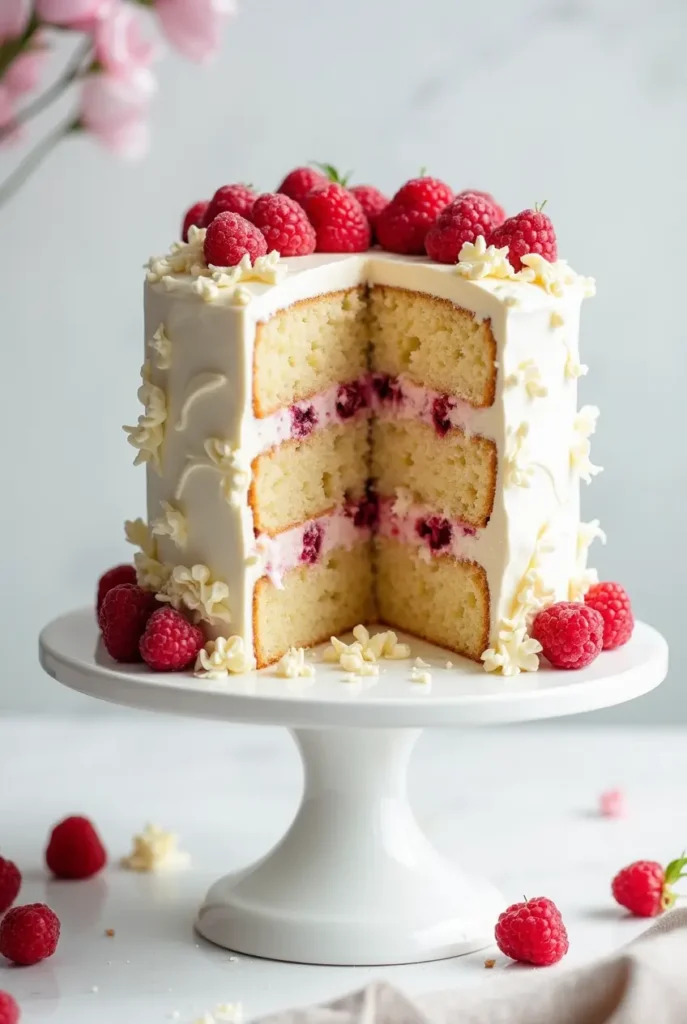
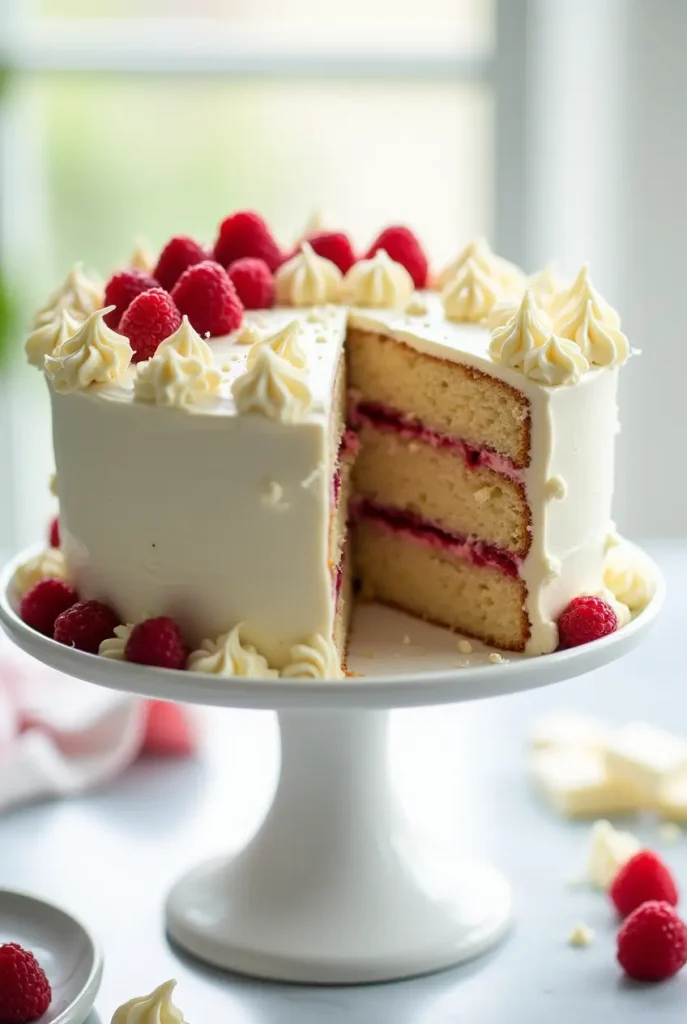
- Get decorative. Decorate with fresh raspberries, white chocolate curls, and edible flowers if desired.
Troubleshooting Tips
My Cake Layers Sank in the Middle!
This usually happens when your oven temperature is too high, or you opened the oven door too early. Next time, use an oven thermometer to check your temperature and resist the urge to peek until at least 20 minutes into baking.
My Raspberries Sank to the Bottom of the Cake!
Toss your raspberries in a tablespoon of flour before folding them into the batter. This helps them stay suspended in the batter during baking.
My White Chocolate Seized When Melting!
White chocolate is finicky! Always melt it slowly using the double boiler method or very short bursts in the microwave (like 15-20 seconds), stirring between each burst. Never let water come into contact with melting chocolate – it will seize immediately.
My Buttercream Is Too Runny!
If your melted white chocolate was too warm when you added it to the butter, it can make the frosting runny. Pop it in the refrigerator for 10-15 minutes, then beat again until it reaches the right consistency.
Variations to Try
White Chocolate Raspberry Bundt Cake
For a simpler version, pour the batter into a well-greased bundt pan and bake at 325°F for 50-60 minutes. Drizzle with a simple white chocolate ganache and fresh raspberries.
White Chocolate Raspberry Cheesecake Version
Love cheesecake? Turn this into a cheesecake by using the same flavor profile but with a traditional cheesecake base. Swirl raspberry filling through the white chocolate cheesecake batter before baking.
White Chocolate Raspberry Cupcakes
Make cupcakes instead! Fill your cupcake liners about 2/3 full and bake for 18-20 minutes. Core each cupcake, fill with raspberry filling, and top with white chocolate buttercream.
Regional Twist: New York White Chocolate Raspberry Cake
Add a New York twist by incorporating a cheesecake layer between your cake layers, or use a cream cheese frosting instead of buttercream for that signature NY cheesecake flavor.
Seasonal & Occasion Adaptations
- Summer Birthday: Decorate with lots of fresh berries and edible flowers
- Winter Holiday: Add a touch of peppermint extract to the frosting and decorate with sugared cranberries
- Wedding: Make it elegant with fresh roses and gold leaf accents
- Valentine’s Day: Shape into a heart or add pink food coloring to some of the frosting for a pink ombré effect
Storage Instructions
- Room Temperature: This cake can be stored at room temperature in a cake keeper for up to 24 hours.
- Refrigerator: Store in the refrigerator for up to 5 days. Bring to room temperature before serving for best flavor and texture.
- Freezer: Individual slices or the whole cake (unfrosted) can be frozen for up to 2 months. Wrap tightly in plastic wrap and then aluminum foil.
Nutritional Information
Per slice (based on 12 slices):
- Calories: 650
- Fat: 38g
- Carbohydrates: 76g
- Protein: 7g
- Sugar: 58g
- Fiber: 3g
White Chocolate Raspberry Cake
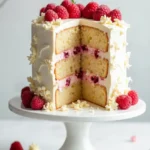
Love a moist & flavorful dessert? This White Chocolate Raspberry Cake is rich, fruity, and easy to make. Try it for your next celebration!
For the Cake Layers
- 2¾ cups 345g all-purpose flour
- 1 tablespoon baking powder
- ½ teaspoon salt
- 1 cup 227g unsalted butter, room temperature
- 1¾ cups 350g granulated sugar
- 4 large eggs (room temperature)
- 2 teaspoons vanilla extract
- ½ teaspoon almond extract (optional but recommended!)
- 1 cup 240ml whole milk, room temperature
- 6 oz 170g white chocolate, melted and slightly cooled
- 1½ cups 180g fresh or frozen raspberries
For the White Chocolate Buttercream
- 1½ cups 340g unsalted butter, room temperature
- 4½ cups 540g powdered sugar, sifted
- 8 oz 225g white chocolate, melted and cooled
- 2 tablespoons heavy cream
- 1 teaspoon vanilla extract
- ¼ teaspoon salt
For the Raspberry Filling
- 2 cups 240g fresh or frozen raspberries
- ½ cup 100g granulated sugar
- 2 tablespoons lemon juice
- 2 tablespoons cornstarch
- 2 tablespoons water
- Prepare your workspace: Preheat your oven to 350°F (175°C). Grease three 8-inch round cake pans and line the bottoms with parchment paper. Trust me on the parchment paper – it’s a game-changer for easy cake removal!
- Mix dry ingredients: In a medium bowl, whisk together the flour, baking powder, and salt until well combined. Set this aside – we’ll come back to it.
- Cream butter and sugar: This is where the magic begins! In your stand mixer (or with a hand mixer), beat the butter and sugar on medium-high speed for a full 5 minutes until light and fluffy. Don’t rush this step – it creates the air pockets that make your cake tender and fluffy.
- Add eggs and flavorings: Add eggs one at a time, beating well after each addition. Then mix in the vanilla extract and almond extract. The almond extract is my secret weapon – it enhances both the raspberry and white chocolate flavors in a subtle but amazing way.
- Incorporate white chocolate: Pour in your melted (but slightly cooled) white chocolate and mix until well combined. The chocolate should be fluid but not hot enough to melt your butter mixture.
- Add dry and wet ingredients: With the mixer on low, add the flour mixture in three parts, alternating with the milk. Always start and end with the flour mixture (so it’s flour, milk, flour, milk, flour). Mix just until combined – overmixing leads to tough cake!
- Fold in berries: Using a rubber spatula, gently fold in the raspberries. If using fresh berries, be super gentle to avoid crushing them. If using frozen, work quickly before they thaw and bleed into the batter.
- Bake to perfection: Divide the batter evenly among your prepared pans and smooth the tops. Bake for 25-30 minutes, or until a toothpick inserted in the center comes out with just a few moist crumbs (not wet batter).
- Cool completely: Let the cakes cool in the pans for 10 minutes, then remove and transfer to a wire rack to cool completely. Patience is key here – frosting a warm cake is a disaster waiting to happen!
- Make raspberry filling: While cakes are cooling, combine raspberries, sugar, and lemon juice in a medium saucepan. Bring to a simmer over medium heat. In a small bowl, mix cornstarch and water until smooth, then pour into the simmering raspberry mixture. Cook, stirring constantly, until thickened (about 1-2 minutes). If you hate seeds (I get it!), strain through a fine mesh sieve. Cover and refrigerate until completely cool.
- Prepare buttercream: Beat the butter until creamy and pale (about 3-4 minutes). Gradually add the sifted powdered sugar, mixing until fluffy. Add the cooled melted white chocolate and mix until well combined. Finally, beat in the heavy cream, vanilla extract, and salt until smooth and silky.
- Assemble the cake: Level your cake layers if needed (a serrated knife works great). Place one layer on your serving plate, pipe a ring of buttercream around the edge to create a dam, and fill with half the raspberry filling. Add the second layer and repeat. Top with the final layer, bottom side up for a flat surface.
- Frost and decorate: Apply a thin crumb coat of buttercream all over the cake and refrigerate for 15-20 minutes to set. Then apply the remaining buttercream and decorate with fresh raspberries and white chocolate curls.
- Serve with style: For the best flavor and texture, let the cake sit at room temperature for about 30 minutes before serving. Then slice, serve, and prepare for compliments!
FAQ About White Chocolate Raspberry Cake
Can I use frozen raspberries in this white chocolate raspberry cake?
Absolutely! You can use frozen raspberries in both the cake batter and the filling. For the cake batter, add them frozen (don’t thaw) to prevent bleeding. For the filling, you can use them frozen or thawed.
What is the best white chocolate for raspberry cake?
Look for high-quality white chocolate that contains cocoa butter (not just oil). Brands like Ghirardelli, Lindt, or Valrhona work well. Avoid white chocolate chips which often contain stabilizers that affect melting.
How do I prevent white chocolate from seizing when baking?
Melt white chocolate over very low heat or use short bursts in the microwave (15-20 seconds), stirring between each burst. Never let water come into contact with the chocolate, and don’t overheat it.
How do I make white chocolate raspberry cake moist?
To ensure a moist cake: don’t overmix the batter, measure ingredients precisely, use room temperature ingredients, and don’t overbake! The melted white chocolate in the batter also adds moisture.
How do I decorate white chocolate raspberry cake?
Fresh raspberries, white chocolate curls, edible flowers, or a simple dusting of powdered sugar all work beautifully. For a more elaborate look, pipe rosettes of buttercream around the top edge and fill the center with fresh berries.
How do I store white chocolate raspberry cake?
Store in the refrigerator for up to 5 days. Bring to room temperature before serving for the best flavor and texture. For longer storage, you can freeze unfrosted cake layers for up to 2 months.
Final Thoughts
I’ve made this White Chocolate Raspberry Cake for countless celebrations, and it never fails to impress. There’s something about the combination of tart raspberries and sweet white chocolate that just works – it’s the perfect balance that keeps people coming back for more.
Whether you’re making this for a special occasion or just because you deserve something delicious (you do!), I hope you enjoy both the process and the result. Baking should be fun, and eating cake should be even more fun!
Have you tried making white chocolate raspberry cake before? Do you have any special tips or tricks? I’d love to hear about your experiences in the comments below!