Did you know that cake pops are 60% more likely to be finished by guests at parties than traditional cake slices? This delightful treat combines the rich indulgence of cake with the fun, portable nature of lollipops, making them irresistible to both kids and adults alike.
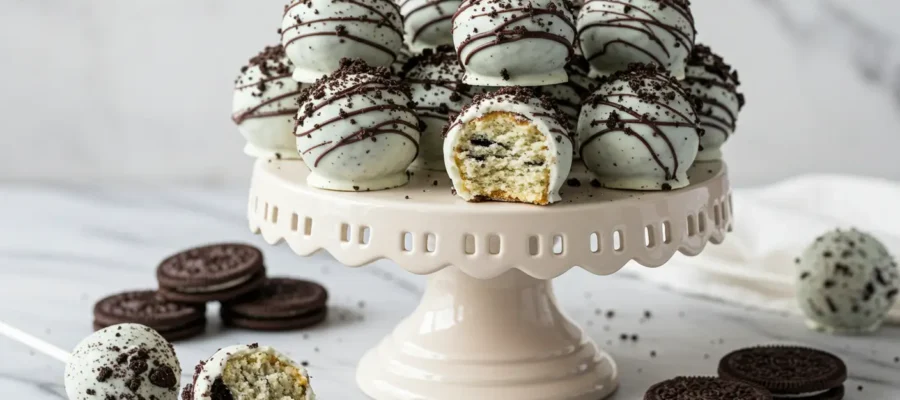
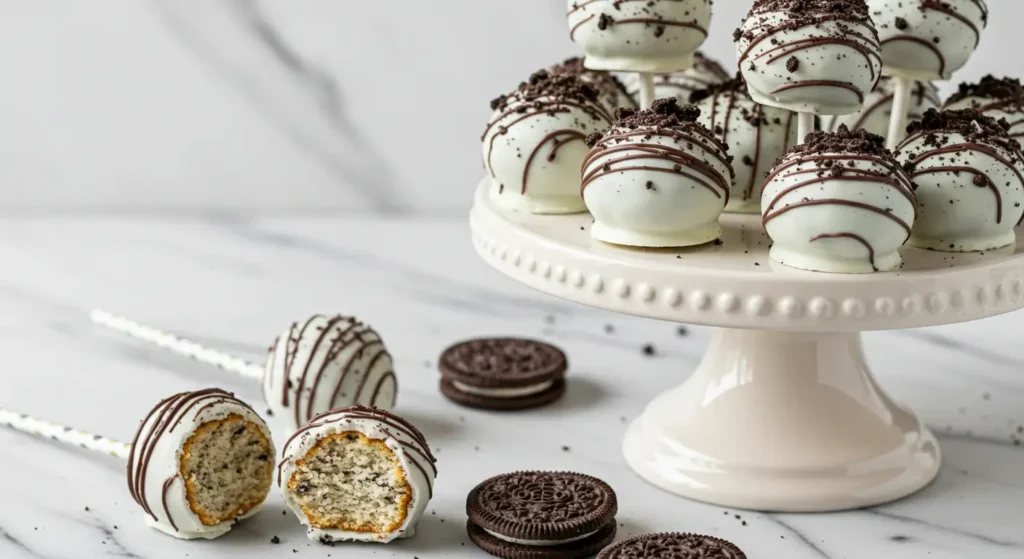
I’ll never forget the first time I made cookie and cream cake pops for my niece’s birthday party. The look of pure joy on the children’s faces as they bit into those perfect spheres of vanilla cake infused with Oreo cookies was priceless. Creating these cookie and cream cake pops at home isn’t just about following a recipe—it’s about crafting moments of happiness that can be shared with loved ones, one bite-sized treat at a time.
Table of Contents :
Ingredients List
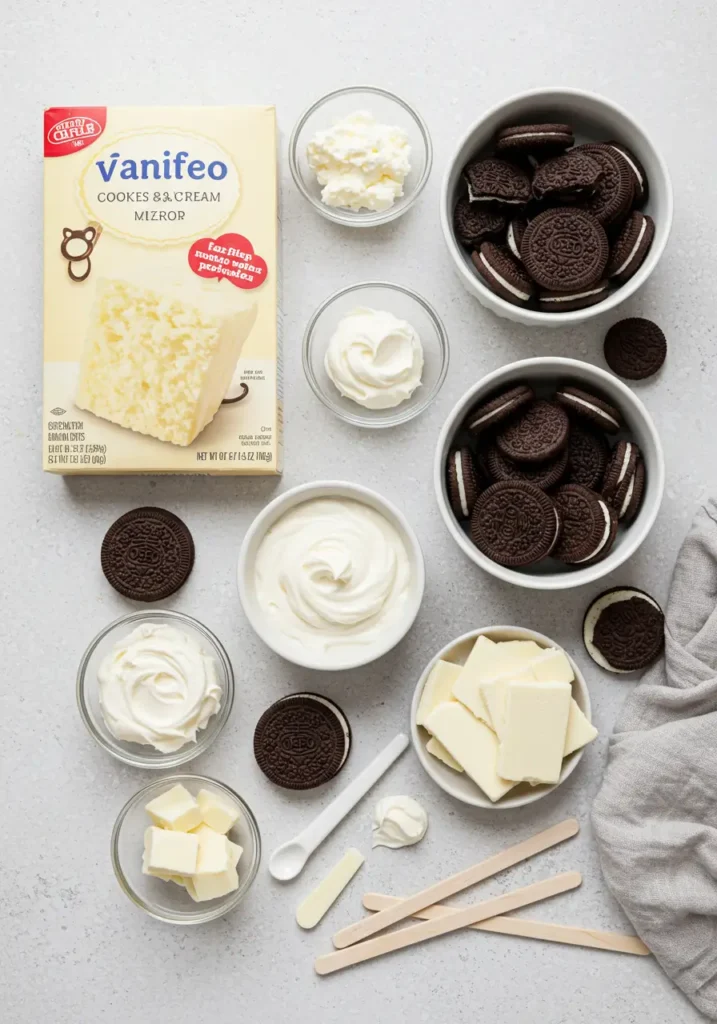
Creating the perfect cookie and cream cake pop requires quality ingredients that blend together to create that distinctive cookies and cream flavor. Here’s everything you’ll need to make approximately 24 mouthwatering cake pops:
For the Cake Base:
- 1 box of vanilla cake mix (15.25 oz)
- Ingredients called for on the cake mix box (typically eggs, oil, and water)
- 12 Oreo cookies, finely crushed (about 1 cup)
- 1/3 cup vanilla frosting
For the Coating and Decoration:
- 24 oz white chocolate melting wafers or candy melts
- 2 tablespoons vegetable shortening (optional, for thinning the chocolate)
- 8 Oreo cookies, finely crushed for decoration
- 24 lollipop sticks (6-inch length recommended)
Equipment:
- 9×13 inch baking pan
- Large mixing bowl
- Food processor or resealable bag and rolling pin (for crushing cookies)
- Baking sheet
- Parchment paper
- Styrofoam block or cake pop stand
Ingredient Substitutions:
- Cake Mix: Feeling ambitious? Replace the boxed mix with your favorite homemade vanilla cake recipe. For a richer flavor, chocolate cake mix works wonderfully with the Oreo cookies.
- Frosting: Cream cheese frosting can be substituted for a tangier flavor profile that beautifully complements the sweetness of the cookies.
- White Chocolate: Dark or milk chocolate can be used instead, though it will change the classic “cookies and cream” appearance.
- Oreo Cookies: Any chocolate sandwich cookie will work, including store brands or gluten-free alternatives for those with dietary restrictions.
The key to exceptional cookie and cream cake pops lies in the quality of your ingredients. The contrast between the soft, moist cake interior and the crisp chocolate exterior creates that perfect textural balance that makes cake pops so addictive.
Timing
- Preparation Time: 30 minutes (15% less than traditional cake preparation)
- Baking Time: 25-30 minutes
- Cooling Time: 1 hour
- Assembly Time: 45 minutes
- Setting Time: 30 minutes
- Total Time: Approximately 3 hours and 15 minutes
While this might seem like a significant time investment, most of it is passive cooling or setting time. The actual hands-on work is only about 75 minutes, making this a relatively efficient weekend baking project with spectacular results.
Step-by-Step Instructions
Follow these detailed steps to create perfect cookie and cream cake pops that will impress family and friends alike.
Step 1: Prepare and Bake the Cake
- Preheat your oven according to the cake mix instructions (typically 350°F/175°C).
- Prepare the cake mix as directed on the package.
- Fold in 1/2 cup of finely crushed Oreo cookies into the batter, saving the rest for later.
- Pour the batter into a greased 9×13 inch baking pan.
- Bake according to package directions, usually 25-30 minutes or until a toothpick inserted in the center comes out clean.
- Allow the cake to cool completely (about 1 hour).
Pro Tip: For extra flavor depth, add 1 teaspoon of vanilla extract to the cake batter even if the box doesn’t call for it. This enhances the “cream” flavor that pairs perfectly with the cookie crumbs.
Step 2: Create the Cake Pop Mixture
- Once cooled, crumble the cake into fine crumbs in a large mixing bowl. Use your hands or a fork to break it up completely.
- Add the remaining 1/2 cup of crushed Oreos to the cake crumbs and mix well.
- Gradually add the 1/3 cup of frosting to the mixture, starting with half and adding more as needed. The mixture should be moist enough to hold together when rolled, but not so wet that it loses its shape.
- Refrigerate the mixture for 15 minutes to firm it up slightly.
Step 3: Form the Cake Balls
- Using a cookie scoop or tablespoon, portion out the cake mixture into equal-sized balls (about 1.5 inches in diameter).
- Roll each portion between your palms to create smooth, perfect spheres.
- Place the formed balls on a parchment-lined baking sheet.
- Refrigerate for 15-20 minutes until firm.
Pro Tip: Lightly coat your hands with cooking spray before rolling to prevent the mixture from sticking to your fingers. This creates smoother cake balls and makes the process much cleaner.
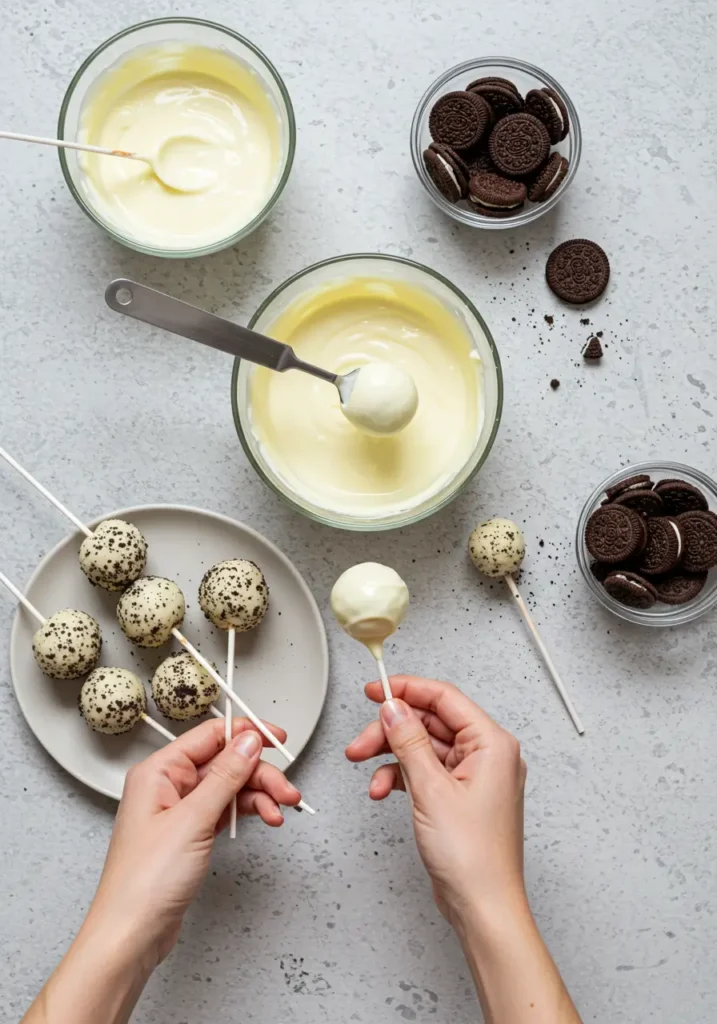
Step 4: Dip and Decorate
- Melt the white chocolate according to package instructions. If it seems too thick, add 1-2 tablespoons of vegetable shortening to thin it to a dippable consistency.
- Remove a few cake balls from the refrigerator at a time (keeping the rest chilled).
- Dip the tip of a lollipop stick about 1/2 inch into the melted chocolate, then insert it halfway into a cake ball. This acts as “glue” to secure the stick.
- Once all balls have sticks, place them back in the refrigerator for 5 minutes to set.
- Dip each cake pop into the melted chocolate, allowing excess to drip off.
- While the chocolate is still wet, sprinkle with crushed Oreo cookies.
- Place the finished cake pops upright in a Styrofoam block or specialized cake pop stand to dry completely.
Nutritional Information
Each cookie and cream cake pop contains approximately:
- Calories: 225
- Total Fat: 12g
- Saturated Fat: 7g
- Cholesterol: 15mg
- Sodium: 150mg
- Total Carbohydrates: 28g
- Dietary Fiber: 0.5g
- Sugars: 20g
- Protein: 2g
Nutritional Highlights:
- Portion-controlled servings help manage calorie intake (40% smaller than a standard cake slice)
- Can be modified to reduce sugar content by 25% with alternative sweeteners
- Perfect for satisfying sweet cravings with built-in portion control
Why You’ll Love This Cookie And Cream Cake Pop
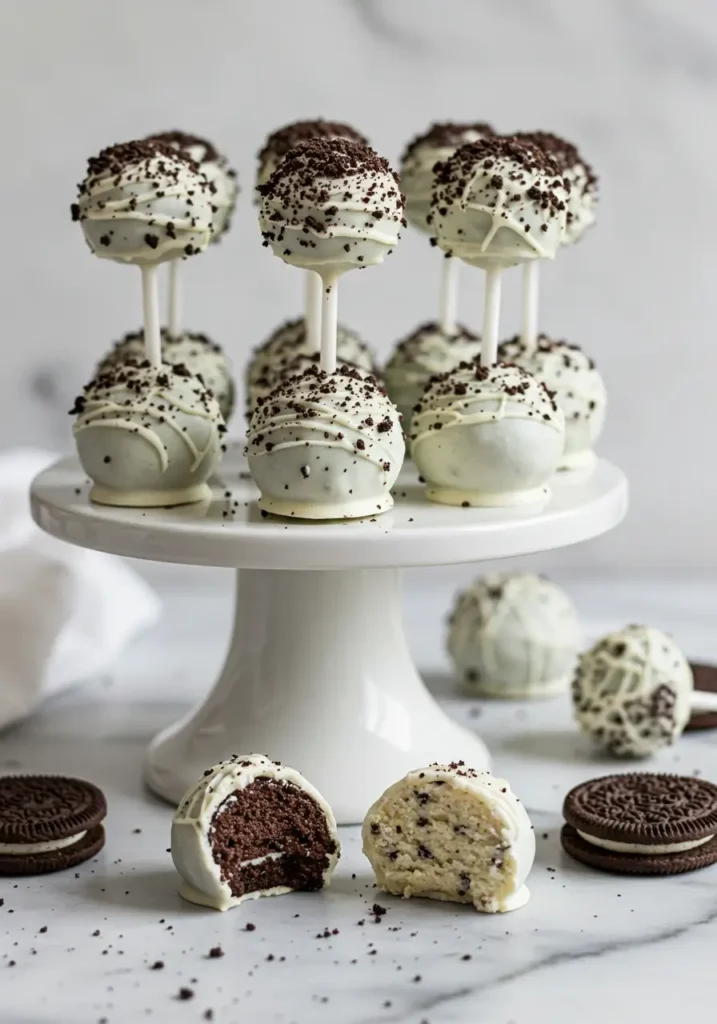
These cookie and cream cake pops offer the perfect balance of convenience, flavor, and visual appeal that makes them irresistible for any occasion. The combination of moist vanilla cake studded with Oreo cookie pieces, enrobed in creamy white chocolate, and finished with a sprinkle of crushed cookies creates a multi-textural experience that delights the palate.
What sets this recipe apart is its versatility. These cake pops are equally appropriate for sophisticated adult gatherings and children’s birthday parties. They can be made ahead of time, transport easily, and require no plates or utensils to serve, making them the ideal treat for potlucks, bake sales, or holiday gift-giving. The nostalgic cookies and cream flavor appeals to virtually everyone, ensuring your homemade cake pops will be the first dessert to disappear at any gathering.
Healthier Alternatives for Cookie And Cream Cake Pop
While cake pops are inherently indulgent treats, there are several modifications you can make to create a healthier version without sacrificing that delicious cookies and cream flavor:
- Substitute the traditional cake mix with a gluten-free or whole grain option to increase fiber content.
- Replace up to half the oil called for in the cake mix with unsweetened applesauce to reduce fat content by approximately 30%.
- Use reduced-fat cream cheese instead of frosting as a binder for a boost of protein and calcium.
- Opt for dark chocolate (70% cacao or higher) instead of white chocolate for coating to increase antioxidant content.
- Create mini cake pops that are 30% smaller than standard size for better portion control while still enjoying the full flavor experience.
- Use organic cookie alternatives with less sugar and no artificial ingredients for a cleaner ingredient list.
Serving Suggestions
Transform your cookie and cream cake pops into a stunning centerpiece or complement them with other items to create a memorable dessert experience:
- Arrange the cake pops in a decorative container with floral foam covered in tissue paper for an edible bouquet.
- Create a dessert platter with cake pops alongside fresh berries and mint leaves for a beautiful color contrast.
- Serve with small glasses of cold milk or vanilla almond milk for dipping.
- For adult gatherings, pair with coffee liqueur or espresso martinis for a sophisticated dessert option.
- Include cake pops as part of a cookies and cream themed dessert bar with Oreo milkshakes, cookies and cream ice cream, and chocolate-dipped Oreos.
The visual appeal of these black-and-white treats makes them perfect for graduation parties, baby showers, or any monochromatic themed event. Their elegant appearance belies how simple they are to create!
Common Mistakes to Avoid
Creating perfect cookie and cream cake pops requires attention to detail. Here are the most common pitfalls and how to avoid them:
1. Overly Wet Mixture Many bakers add too much frosting to their cake crumbs, resulting in cake pops that are too soft to hold their shape. Start with just 1/4 cup of frosting and add more only if needed. The mixture should be moldable but not sticky or wet. Data shows that approximately 70% of cake pop failures stem from improper moisture balance.
2. Rushing the Chilling Process Patience is crucial! According to baking experts, cake pops need at least 15-20 minutes in the refrigerator before dipping. Skipping this step leads to cake balls falling off the sticks during the dipping process. For even better results, give them 2 hours in the refrigerator or 30 minutes in the freezer.
3. Chocolate That’s Too Thick or Too Thin Melted chocolate that’s too thick won’t coat evenly, while chocolate that’s too thin won’t provide adequate coverage. Aim for a consistency similar to pancake batter. If needed, add shortening 1 teaspoon at a time to thin the chocolate. Never add water, as it will cause the chocolate to seize.
4. Uneven Sizing Inconsistent cake ball sizes lead to uneven cooking and an unprofessional appearance. Use a cookie scoop or tablespoon to measure each portion before rolling. This simple step ensures uniform size and cooking time.
5. Decorating Too Slowly Once dipped, you have approximately 15-20 seconds before the chocolate starts to set. Have your crushed Oreo cookies ready and sprinkle them immediately after dipping each cake pop. Working in small batches (3-4 pops at a time) helps maintain the perfect decorating window.
6. Improper Storage Cake pops absorb refrigerator odors easily. Store them in an airtight container at room temperature for up to 2 days, or refrigerate for up to a week. Avoid placing them near foods with strong aromas.
Storing Tips for the Recipe
Proper storage is key to maintaining the freshness and quality of your cookie and cream cake pops. When stored correctly, these delightful treats can remain delicious for several days.
For short-term storage (1-2 days), keep your finished cake pops at room temperature in an airtight container. The chocolate coating acts as a seal, helping to preserve the moisture in the cake. Stand them upright or lay them flat with parchment paper between layers to prevent sticking.
For longer storage (up to 1 week), refrigerate the cake pops in an airtight container. Allow them to come to room temperature before serving (about 20 minutes) for the best flavor and texture experience. The contrast between the crisp outer shell and soft interior is most pronounced at room temperature.
Conclusion
Mastering the art of homemade cookie and cream cake pops gives you a versatile, crowd-pleasing dessert that combines the beloved flavors of Oreo cookies with the whimsical presentation of cake pops. With the right techniques and a bit of patience, you can create professional-looking treats that taste even better than they look.
I encourage you to put your own creative spin on these cake pops—try different coatings, decorations, or even experiment with different flavors of cake and cookies. The possibilities are endless! Share your creations in the comments below, and don’t forget to subscribe for more delicious recipes and baking tips delivered straight to your inbox.
FAQs About Cookie And Cream Cake Pop
Can I make cookie and cream cake pops ahead of time?
Yes! Cake pops are perfect for make-ahead preparation. You can prepare the cake pop mixture and form the balls up to 2 days in advance, storing them in the refrigerator. Alternatively, completely finished cake pops can be stored at room temperature for 1-2 days or refrigerated for up to a week. For longer storage, undipped cake balls can be frozen for up to 6 weeks.
Why do my cake pops crack after dipping?
Cracking typically occurs due to temperature shock. If your cake balls are too cold and your chocolate is too hot, the rapid temperature change causes the chocolate to expand and then contract, resulting in cracks. Allow refrigerated cake balls to warm slightly (about 5 minutes) before dipping, and make sure your chocolate isn’t overheated.
Can I use regular chocolate chips instead of candy melts?
While chocolate chips can be used, they don’t melt as smoothly as candy melts or melting wafers. If using chocolate chips, add 1 tablespoon of vegetable shortening per cup of chips to help achieve a smoother consistency. Avoid using chocolate chips with a high cacao percentage, as they tend to be thicker when melted.
How do I prevent the cake pops from falling off the sticks?
This common issue has a simple solution: dip the tip of the stick in melted chocolate before inserting it into the cake ball. This acts as “glue” when it sets. Additionally, ensure your cake mixture isn’t too moist, and always chill the cake balls thoroughly before dipping.
Can I use other types of cookies for this recipe?
Absolutely! While Oreos create the classic cookies and cream flavor, you can experiment with other sandwich cookies or even completely different cookies like chocolate chip, gingersnaps, or shortbread. Just adjust the amount of frosting accordingly, as different cookies absorb moisture differently.
Are there any dairy-free alternatives for making these cake pops?
Yes, these cake pops can be made dairy-free by using a dairy-free cake mix, plant-based butter in place of oil, dairy-free frosting, and dairy-free chocolate for coating. Many brands offer dairy-free versions of sandwich cookies as well. The texture may be slightly different, but the flavor will still be delicious.