Grilled corn on the cob recipes have been my summer obsession for years, and I’ve finally nailed down four foolproof methods that beat boiled corn any day of the week. There’s something about those charred kernels, that subtle smokiness, and the way butter melts into all the nooks and crannies that makes grilled corn the ultimate backyard barbecue side. After years of experimenting (and yes, more than a few burnt ears), I’ve got techniques that range from “throw it directly on the grill” to “fancy foil packets” that even a complete grilling novice can master.
Table of Contents :
Why Grilled Corn Beats Boiled Corn Every Time
Look, I used to be firmly in the boiling camp. Fill pot with water, add corn, wait, drain, eat. Simple enough. But then my neighbor Dave (grill master extraordinaire) handed me an ear of his grilled corn at a block party about five years ago, and honestly, I felt like I’d been cooking corn wrong my entire life.
My first attempt at recreating Dave’s corn was… less than stellar. I left the husks on completely, didn’t soak them, and ended up with ears that were simultaneously burnt on the outside and undercooked on the inside. The second time, I got impatient and cranked the heat too high, resulting in kernels that were charred to oblivion on one side and practically raw on the other. Classic rookie mistake.
What I’ve learned since then is that grilled corn isn’t just about throwing ears on flames and hoping for the best. It’s about understanding how to use the grill to enhance corn’s natural sweetness while adding that smoky char that you simply can’t get from a pot of boiling water. And the best part? There’s more than one way to do it right, depending on what equipment you have and how much effort you feel like putting in. Sometimes I want that deep char from direct grilling, and other times I want the convenience of foil-wrapped perfection.
Ingredients for perfect grilled corn on the cob
The beauty of grilled corn is that you don’t need a ton of fancy ingredients. But there are definitely a few things that can elevate your corn game from “pretty good” to “people begging for your secret.” The corn itself matters most—everything else is just enhancing what’s already there. So start with the best corn you can find and build from there.
And while I’m sharing four different topping combinations, feel free to mix and match or create your own. These are just the ones that have earned permanent spots in my summer rotation after years of tweaking.
Fresh Corn (8 ears)
This is obviously the star of the show. Look for ears with bright green husks that feel slightly damp, not dry and brittle. The silk (those annoying strings) should be pale yellow or light brown, not dark or dry. I always peel back a tiny bit to check that the kernels are plump and tightly packed. Farmers market corn in late July through August is peak perfection, but even grocery store corn works well on the grill. Just try to use it within a day or two of buying.
Unsalted Butter (1/2 cup, softened)
I always use unsalted butter so I can control the salt level myself. Leave it out for at least 30 minutes before you want to use it—room temperature butter spreads so much more easily on hot corn. I’ve tried olive oil as a substitute, which works in a pinch, but there’s something about butter melting into those charred kernels that just can’t be beat. For dairy-free folks, plant-based butters work surprisingly well here.
Kosher Salt (2 teaspoons)
Please use kosher salt, not table salt. The larger flakes distribute better and give you little pops of saltiness rather than an overall salty taste. I keep a small dish of it by the grill so I can pinch and sprinkle as soon as the corn comes off. If you’re watching sodium, you can cut back, but don’t eliminate it entirely—salt is what makes the corn’s natural sweetness really pop.
Fresh Black Pepper (1 teaspoon, coarsely ground)
Freshly ground is non-negotiable here. Pre-ground pepper just doesn’t have the same punch. I go for a medium-coarse grind that adds little bursts of heat without overwhelming the corn. If you’re making the Mexican-style variation, you might want to dial back the black pepper since you’ll be adding other spices.
Olive Oil or Vegetable Oil (2 tablespoons)
This is mainly for brushing the corn before it hits the grill, especially if you’re using the direct grilling method. I slightly prefer olive oil for the flavor, but vegetable oil has a higher smoke point, so it’s better if your grill runs super hot. Either works fine, honestly. I’ve even used spray oil in a pinch (don’t tell the food purists).
For Classic Herb Butter:
Fresh herbs make all the difference here. I use about 2 tablespoons of chopped chives and 1 tablespoon each of finely chopped parsley and dill. Mix them into 4 tablespoons of softened butter with a pinch of salt. Fresh basil or tarragon can stand in for any of these herbs—whatever looks best at the market or is thriving in your garden. Dried herbs are a definite no-go for this topping; they just sit on the surface like sad confetti.
For Mexican Street Corn Style:
This is my family’s favorite. You’ll need 1/4 cup mayo, 1/4 cup crumbled cotija cheese (feta works too, but it’s tangier), 1 teaspoon chili powder, 1/4 teaspoon cayenne pepper (adjust to your heat preference), and 1 lime cut into wedges. Sometimes I add a tablespoon of chopped cilantro, but that’s a divisive herb in my household, so I often serve it on the side. The mayo might sound weird, but trust me—it creates the perfect creamy base for the other flavors.
For Parmesan Garlic:
Simple but so good: 1/4 cup grated Parmesan (the real stuff, not the shelf-stable canister), 2 cloves of garlic minced to a paste, and 4 tablespoons of butter. I sometimes add a pinch of red pepper flakes for heat. Let the hot corn slightly melt the parmesan—that’s when the magic happens. Pre-shredded parmesan won’t melt as well, so take the extra minute to grate it yourself.
For Sweet & Spicy:
This unexpected combo converts even corn skeptics: 2 tablespoons of honey, 1 tablespoon of hot sauce (I like Cholula), 4 tablespoons of butter, and a pinch of smoked paprika. The sweet-heat balance is totally customizable. If you don’t have honey, maple syrup works surprisingly well and adds a different dimension. This topping is particularly amazing on corn that has a good char from direct grilling.
Instructions for the perfect grilled corn on the cob recipe
Let me walk you through my four favorite methods for grilling corn. Each has its pros and cons, and I bounce between them depending on what else I’m grilling and how much attention I want to devote to the corn. The direct grilling method gives you the most intense char and smokiness but requires the most attention. The foil method is basically foolproof but sacrifices some of that direct char flavor. You’ll figure out your own preference after trying them.
And a quick note on timing: corn doesn’t take that long to grill, usually 10-15 minutes depending on your method. But don’t wander off to chat with guests during those minutes (learned that one the hard way). The difference between perfectly charred and “maybe the dog will eat it” can be just a couple of minutes, especially with direct grilling.
STEP 1: Prep your corn.
For methods 1 and 2, completely husk the corn, removing all the silk. For methods 3 and 4, pull the husks back (but don’t detach them), remove the silk, then either re-cover the corn with the husks or leave them pulled back as a handle. I find the easiest way to deal with those annoying silks is to brush them away with a clean, dry kitchen towel. If you’re soaking (for method 3), submerge the whole ears in cold water for 15-30 minutes before grilling. This prevents the husks from burning too quickly and adds some steam for cooking.
STEP 2: Preheat your grill to medium-high heat.
Aim for around 400-450°F. Too hot and your corn will burn before cooking through; too cool and you won’t get that lovely caramelization. For gas grills, this is easy—just set the dial. For charcoal, spread the coals evenly and wait until they’re covered with light gray ash. I always leave a small area with fewer coals as a “safe zone” to move the corn if it’s charring too quickly. Test the heat with your hand about 4 inches above the grate—if you can only hold it there for 3-4 seconds, you’re good to go.
STEP 3: Choose your grilling method.
Here’s where you make your big decision. Method 1: Direct grilling (naked corn directly on the grates). Method 2: Foil-wrapped (great for adding flavors during cooking). Method 3: In the husk (traditional and gives a gentle smoky flavor). Method 4: Husk-handle method (my personal favorite for serving a crowd). Each method has its own prep requirements and cooking times, so commit to one before starting. For beginners, the foil method (#2) is most forgiving. For grill masters looking for the best flavor, direct grilling (#1) is your move.
STEP 4: Method 1 – Direct Grilling.
Brush shucked corn with oil and place directly on the grill grates. This gives you the most intense char and smoke flavor. Turn every 2-3 minutes until you have some charring on all sides, about 10 minutes total. The kernels will start to look plumper as they cook. Watch carefully—this method can go from perfect to burnt quickly! If flare-ups occur (and they will), just move the corn to a cooler part of the grill temporarily. The telltale sign of doneness: kernels that look slightly shrunken and feel tender when pierced with a knife.
STEP 5: Method 2 – Foil-Wrapped Grilling.
Lay each husked ear on a piece of foil, spread with a little butter, season with salt and pepper, and wrap tightly. For extra flavor, add a slice of lemon or lime inside the packet. Place on the grill and cook for 12-15 minutes, turning occasionally. This method is super forgiving—the foil protects the corn from burning and creates a steaming environment. The corn won’t char, but it will cook perfectly evenly. You can tell it’s done when the kernels feel tender when you press them through the foil.
STEP 6: Method 3 – Grilling in the Husk.
If you soaked your corn, shake off excess water. Place the ears in their husks directly on the grill and cook for 15-20 minutes, turning every 5 minutes or so. The husks will get charred and might even catch fire briefly—that’s normal, don’t panic! You’ll hear the kernels sizzling inside and might see some steam escaping. To check doneness, carefully peel back a small section of husk (use tongs and heat-resistant gloves—I have the scars to prove why this matters) and press a kernel. It should be juicy and tender.
STEP 7: Method 4 – Husk Handle Method.
Pull the husks back without detaching, remove silk, brush the exposed kernels with oil, then place on the grill with the husks hanging off the edge. This creates a convenient handle and lets you get direct char on the kernels. Grill for about 10 minutes, turning occasionally. The exposed husks might catch fire—just blow them out or have a spray bottle of water handy. This method lets you get the char of direct grilling with the convenience of a built-in handle for serving. Plus it looks impressive when plated!
STEP 8: Apply your chosen topping.
As soon as the corn comes off the grill, apply your chosen topping while it’s still hot. For the Classic Herb Butter, simply roll the corn in the herbed butter and watch it melt into all the crevices. For Mexican Street Corn, brush with mayo first, then sprinkle with cotija, chili powder, and cayenne, finishing with a squeeze of lime. For Parmesan Garlic, roll in the garlic butter and then press the Parmesan onto all sides. For Sweet & Spicy, brush with the honey-hot sauce butter mixture, making sure to get it evenly distributed. The residual heat from the corn helps melt and incorporate all the toppings.
Tips & Variations for your grilled corn on the cob recipe
If you need to make ahead, grill the corn using any method, then refrigerate without toppings. Reheat on a baking sheet in a 350°F oven for about 5 minutes before adding toppings. The texture won’t be quite as perfect as fresh off the grill, but it’s still delicious. For a less messy Mexican street corn experience, cut the kernels off the cob after grilling and toss with the toppings in a bowl—same flavor, easier to eat. And don’t stress if your grill marks aren’t picture-perfect like the ones in food magazines. Those are often “enhanced” with kitchen torches. Real grilled corn has uneven char marks, and that’s part of its charm!
For a fun party idea, set up a corn topping bar with all four options and let people customize their own. I’ve done this for summer gatherings and it’s always a hit—plus it takes pressure off you to guess which style everyone prefers. Just keep the corn warm on the top rack of the grill or wrapped in foil until serving time.
Final Thoughts on this grilled corn on the cob recipe
After years of corn experiments, these four methods have earned permanent spots in my summer cooking rotation. The direct grilling method still gives me a little anxiety (I’ve definitely sacrificed some ears to the grill gods over the years), but the flavor is unbeatable. The foil method is my Tuesday night go-to when I just can’t deal with monitoring the grill like a hawk.
If you try any of these methods, drop a comment below and let me know which topping won at your table. My family is divided between the Mexican street corn style and the sweet & spicy version, which basically means I’m always making both. And really, is there such a thing as too much grilled corn in summer? I think not.
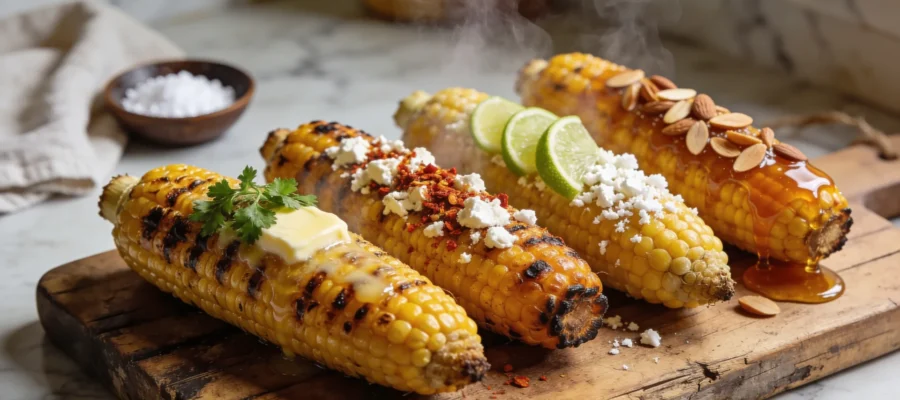
Grilled Corn on the Cob 4 Ways
Grilled corn on the cob recipes offer four foolproof methods that enhance the natural sweetness of the corn with added smoky flavors. Perfect for summer barbecues.