Making a smash burger recipe homemade honestly changed my burger game forever. Look, I used to think that incredible, juicy burgers with crispy edges were something only fast food joints and diners could pull off. But after several weekends of experimenting (and a few sad, dry attempts), I’ve nailed down a method that consistently delivers burgers that are better than anything from a drive-thru – thin patties with lacy, caramelized edges and juicy centers that don’t require fancy equipment or exotic ingredients.
Table of Contents :
Why Smash Burgers Beat Regular Burgers Every Time
I first tried making smash burgers after a road trip where I hit every famous burger joint I could find. What struck me was how these thin, crispy-edged burgers packed more flavor than the thick, pub-style burgers I’d been struggling to perfect at home. The secret, as it turns out, is in the smashing technique and the Maillard reaction – that beautiful browning that creates flavor compounds you simply can’t get any other way.
My first attempts were…problematic. I smashed too early, too late, used the wrong fat content, and once memorably set off the smoke alarm when my wife’s parents were visiting (they still bring it up at holiday dinners). But those failures taught me what works. I learned that smashing the burger only during the first 30 seconds is crucial – do it later and you’ll press out all the juices. I discovered that a heavy spatula works just fine if you don’t have a dedicated burger press. And most importantly, I learned that a ripping hot cast iron skillet creates that restaurant-quality crust that makes these burgers special.
Ingredients for Homemade Smash Burger Recipe
The beauty of a smash burger is its simplicity. You don’t need fancy ingredients or complicated seasonings – just a few quality components that let the beef shine. That said, there are some non-negotiables when it comes to making these right.
I’ve tried dozens of variations, and honestly, simpler is better here. While I love experimenting with exotic spices and ingredients in other recipes, with smash burgers, restraint is your friend. The magic happens in the technique, not by adding a million different flavors.
Ground Chuck Beef (80/20 fat content) – 1 pound
This is absolutely non-negotiable. I’ve tried leaner blends and the burgers were disappointingly dry. The fat is what creates that incredible sear and keeps the interior juicy despite the thin patty. If your store doesn’t label it as “chuck,” just look for 80/20 ground beef. And please, buy it fresh the day you’re making burgers if possible – it makes a difference.
Kosher Salt – 1 teaspoon
I use Diamond Crystal kosher salt, which has larger crystals than table salt. If you’re using table salt, cut this amount in half. I used to add salt to the meat before forming patties, but learned through trial and error that salting the outside of the ball right before smashing yields a better crust and doesn’t toughen the meat.
Freshly Ground Black Pepper – 1/2 teaspoon
Pre-ground pepper from the store doesn’t have the same punch. I keep a pepper grinder loaded and ready because that fresh-ground aroma adds another layer to the burger experience. If you hate pepper, feel free to omit it – the salt is the crucial seasoning here.
American Cheese Slices – 4 slices
I know, I know. Fancy cheese lovers might scoff, but after trying everything from aged cheddar to Gruyère, I’ve come back to American cheese for smash burgers. It melts perfectly, adds the right amount of tang, and complements rather than overwhelms the beef flavor. Splurge on the deli counter American if you can – it melts better than the individually wrapped stuff.
Potato Buns – 4 buns
Martin’s Potato Rolls are the gold standard here, but any soft potato bun works well. The slight sweetness balances the savory meat, and they toast beautifully with a little butter. Brioche buns make a decent substitute, though they can be a bit sweet for some tastes. Whatever you do, avoid dense, artisanal rolls – they throw off the meat-to-bread ratio completely.
Unsalted Butter – 2 tablespoons
This is for toasting your buns, and it’s worth the extra step. I’ve tried using the burger fat instead, and while it works, the clean buttery flavor on the buns provides a nice contrast. In a pinch, mayo works for toasting too, giving the buns an even deeper golden exterior.
Neutral Oil – 1 tablespoon
You need just enough to coat the pan. I use vegetable or canola oil because they have high smoke points. Don’t use olive oil here – it’ll smoke like crazy and doesn’t add the right flavor for burgers. The oil is just to prevent sticking during that initial smash; the fat from the beef will take over from there.
Instructions for the Perfect Homemade Smash Burger Recipe
Here’s where the magic happens. The technique for smash burgers is completely different from regular burgers, and timing is everything. These cook incredibly fast – we’re talking 3-4 minutes total cooking time per burger. This is not a recipe where you can wander off and check your phone. Stay focused, and you’ll be rewarded with burger perfection.
The key is to get your pan ripping hot before you start. And I mean HOT. You should see wisps of smoke before the meat ever touches the surface. This creates that immediate sear that locks in juices and develops the crispy edges. Also, work in batches – overcrowding the pan lowers the temperature too much. Yes, it takes a bit longer, but the results are worth it.
STEP 1: Prep your work area and ingredients.
Before you even turn on the heat, get everything ready and within arm’s reach. Divide your ground beef into 2-ounce balls (about golf ball size) – don’t overwork the meat! Just gently form loose balls. Have your spatula, salt, pepper, and a piece of parchment paper cut to about 6 inches square ready. Open your windows or turn on exhaust fans. I learned the hard way that smash burgers create smoke, and my wife wasn’t thrilled when the smoke detector went off three times in one cooking session.
STEP 2: Heat your cast iron skillet until smoking hot.
Place your cast iron skillet over medium-high heat and let it get properly hot – about 5 minutes. Add your tablespoon of oil and swirl to coat. The oil should shimmer immediately and maybe even send up a few wisps of smoke. If your pan isn’t hot enough, you won’t get that beautiful crust. Too hot, and you’ll burn the outside before the inside cooks. It should be just at the smoking point – trust your eyes and nose here.
STEP 3: Smash those burger balls!
Place a beef ball on the hot skillet and IMMEDIATELY smash it down with your spatula. I place the parchment paper on top of the ball first, then press down HARD with the spatula (or another heavy, flat object if your spatula isn’t sturdy enough). You want to smash it until it’s about 1/4 inch thick. The thinner, the better for those crispy edges. You have about 30 seconds max to do the smashing before the meat starts cooking through – after that window, smashing will just push out juices. Work quickly!
STEP 4: Season and let it cook.
As soon as you’ve smashed the patty, remove the parchment (it should peel off easily) and season the top liberally with salt and pepper. Don’t touch it again! Let it cook for about 1-2 minutes. You’ll see the edges getting brown and crispy, and juices might bubble up through the top. That’s your sign that magic is happening. Resist the urge to peek underneath or press down again – you’ll disrupt the crust formation.
STEP 5: The perfect flip.
When you see those lacy, crispy edges forming and the top starting to show some color change (but before the top is fully cooked), it’s time to flip. Use a firm, sharp-edged spatula to scrape underneath, making sure you get all those crispy bits. It should release relatively easily if your pan was hot enough. If it’s sticking, give it another 15-30 seconds. The flipped side should be gorgeously browned with a shiny crust.
STEP 6: Add cheese and finish cooking.
Immediately place a slice of American cheese on the seared side of the patty. It will start to melt from the residual heat. Let the second side cook for about 45 seconds to 1 minute – much less time than the first side. You’re looking for the cheese to get melty and the bottom to develop just enough crust. If you’re making multiple burgers, transfer the finished ones to a warm plate while you cook the rest. Don’t stack them or the crispy texture will steam away!
STEP 7: Prepare and toast your buns.
While your patties are cooking or between batches, melt some butter in a separate pan over medium heat. Place your split buns cut-side down in the melted butter and toast until golden brown, about 30-60 seconds. Watch them carefully – they go from perfectly toasted to burnt in the blink of an eye. I destroyed an entire package of buns once because I was too focused on the meat. A toasted bun isn’t just about looks – it provides structural integrity to hold up to the juicy burger.
STEP 8: Assemble your burgers.
This is where you can get creative. My favorite basic build is: toasted bottom bun, a smear of mayo or special sauce, burger patty with melted cheese, thinly sliced onion, pickle chips, a leaf of lettuce, and the top bun. For the full experience, double up with two patties and two slices of cheese. Don’t overload with toppings though – the star here is that beautifully seared beef patty with its crispy edges. Too many toppings will mask what you worked so hard to create.
Tips & Variations for Smash Burger Recipe Homemade
Don’t refrigerate the beef balls before cooking – room temperature meat smashes more easily. For a double smash burger (which I highly recommend), just stack two patties with cheese between them. If you don’t have a heavy metal spatula, use the bottom of a small pot or a bacon press. For a different flavor profile, try adding thinly sliced jalapeños under the cheese while it melts, or a smear of caramelized onions on the bottom bun. These burgers are best eaten immediately – they don’t reheat well since that crispy texture is lost. If you must make ahead, keep the patties separate from the buns and reheat in a hot skillet for 30 seconds per side.
Final Thoughts on Homemade Smash Burger Recipe
Look, I’m not saying these smash burgers will change your life, but they have absolutely ruined restaurant burgers for me. Once you nail this technique, you’ll find yourself making excuses to invite people over just so you can show off your burger skills. There’s something deeply satisfying about producing restaurant-quality food in your own kitchen, especially something that seems so simple but has such specific technique.
If you try this smash burger recipe homemade, drop a comment about how it went. I especially want to know what toppings you used, or if you found any tricks I missed. And seriously, send help if you figure out how to make these without setting off the smoke detector – my family would appreciate it.
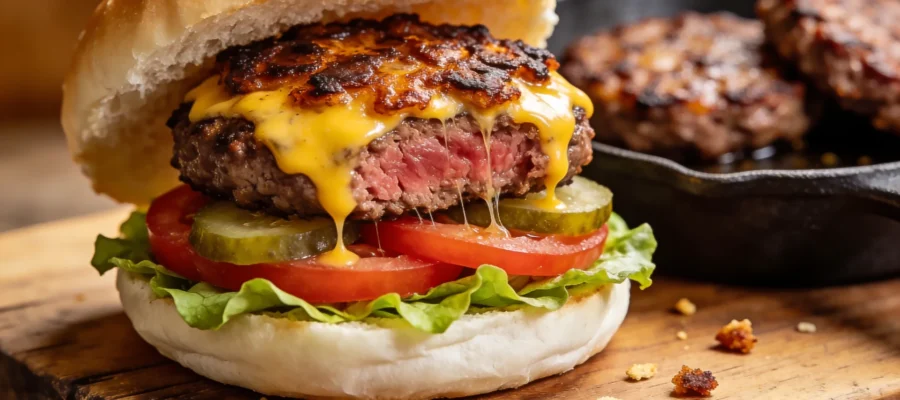
Juicy Smash Burger Recipe — Better Than Fast Food
This homemade smash burger recipe delivers incredible, juicy burgers with crispy edges, better than anything from a drive-thru.