Ever since I mastered this bbq ribs recipe oven technique, I’ve completely stopped ordering ribs at restaurants. Why pay $30 for a half rack when I can make fall-off-the-bone tender ribs at home for a fraction of the cost? The secret is a slow roast in the oven—not a grill or smoker—that transforms tough meat into something so tender you barely need teeth. And honestly, the flavor might be even better than what you’d get at your local BBQ joint.
Table of Contents :
Why Oven-Baked Ribs Are Actually Better
I used to think making good ribs at home was impossible without a smoker or at least a decent grill. I tried quick-cooking methods that left me with chewy, tough meat, and I tried complicated setups trying to mimic a smoker on my gas grill that ended with burned sauce and raw centers. Total disasters, both times.
Then my brother-in-law (who actually competes in BBQ competitions) let me in on a secret: most restaurant ribs are actually finished in the oven. That’s how they get that perfect tenderness every single time. The slow, consistent heat breaks down all the tough connective tissue without drying the meat out. Since that revelation, I’ve been perfecting this method for years, tweaking the rub ingredients, adjusting oven temperatures, and experimenting with different finishing techniques.
Look, I’m going to be honest—these won’t have the intense smoke ring or bark of competition-style smoked ribs. That’s just physics. But what they will have is incredible flavor from the dry rub, fall-off-the-bone tenderness that’s actually hard to achieve on a grill, and a caramelized finish from a quick broil at the end. The trade-off is absolutely worth it, especially when it’s 20 degrees outside and I’m not standing over a smoker for 6 hours.
Ingredients for Perfect Oven BBQ Ribs
The beauty of this bbq ribs recipe oven method is that it’s surprisingly simple. You don’t need fancy equipment or obscure ingredients—just good-quality ribs and pantry staples for the rub and sauce. I’ve tried lots of complicated rub recipes with 15+ ingredients, but honestly, I’ve found that simpler is better here. You want to enhance the pork flavor, not mask it.
If you’re a BBQ purist, you might insist on making your own sauce. I respect that! But for weeknight cooking (which is when I usually make these), a good store-bought sauce doctored up with a few extras works beautifully. The real magic happens during the slow roasting anyway.
Baby Back Ribs (2 racks, about 2-3 pounds each)
Baby backs are my go-to for this method because they’re more tender to start with than spare ribs. Look for racks with good meat coverage and avoid ones with too much surface fat. The membrane on the bone side MUST be removed—this is non-negotiable! If you’re squeamish about doing it yourself, ask your butcher. Most will remove it for you if you ask nicely.
Brown Sugar (1/2 cup, packed)
This creates that gorgeous caramelization on the outside of the ribs and balances the salt and spices. Dark brown sugar has more molasses flavor, but light works fine too. If you’re watching your sugar intake, you can reduce to 1/4 cup, but don’t eliminate it completely—it’s crucial for that authentic BBQ bark texture.
Kosher Salt (2 tablespoons)
Please use kosher salt, not table salt (which would be way too salty in this quantity). Diamond Crystal is my preferred brand because it dissolves nicely, but Morton’s works too—just use about 25% less because it’s denser. The salt doesn’t just add flavor; it helps break down the proteins for more tender meat.
Paprika (2 tablespoons)
Regular paprika works, but smoked paprika adds that subtle smokiness that approximates what you’d get from actual smoking. I’ve tried fancy Spanish pimentón, but honestly, the regular smoked paprika from the grocery store spice aisle works perfectly here. It adds color too, which matters for that “authentic BBQ” look.
Garlic Powder (1 tablespoon)
Not garlic salt! Powder distributes more evenly. Fresh garlic would burn during the long cooking time, so powder is actually better here. I’ve tried adding more, thinking “more garlic = more flavor” but it gets bitter past this amount. Trust me on the quantity—I learned the hard way during a dinner party disaster.
Black Pepper (1 tablespoon)
Freshly ground gives the best flavor, but pre-ground works too. The pepper adds a subtle heat that builds in the background without being “spicy.” If you like more kick, you can add 1/2 teaspoon of cayenne, but I usually keep it mild since my kids eat these too.
Onion Powder (1 tablespoon)
This adds depth without actual onion chunks, which would never survive the long cooking process. If you don’t have it, you can skip it, but it does add a subtle sweetness and savory note that rounds everything out. The cheap stuff from the regular grocery store works perfectly fine here.
BBQ Sauce (1 1/2 cups)
Use whatever style you like—sweet, spicy, smoky. My go-to is Sweet Baby Ray’s Original because it has the right balance and thickness to stick to the ribs. If you’re feeling fancy, doctor it up with a splash of bourbon, a squirt of sriracha, or a spoonful of apple butter. Or use homemade if you’ve got it! The sauce goes on at the end only—applying it too early will burn it.
Instructions for Fall-Off-The-Bone Oven BBQ Ribs
Okay, so here’s the thing about this bbq ribs recipe oven method—it’s not quick. You can’t rush perfect ribs. But the actual hands-on time is minimal. We’re talking maybe 15 minutes of active work, followed by hours of your oven doing all the heavy lifting while you go about your day. I usually start these around 1 or 2 PM for dinner, which gives plenty of time for the slow magic to happen.
And no, you can’t crank up the heat to speed things up. I tried that once when I was in a hurry, and ended up with ribs that were simultaneously dry and tough. The low, slow heat is absolutely necessary to break down the collagen into gelatin, which is what makes ribs tender. There are no shortcuts here that actually work.
STEP 1: Prep the ribs and make the dry rub.
Preheat your oven to 275°F (not higher!). While it’s heating, combine all your dry ingredients in a bowl: brown sugar, salt, paprika, garlic powder, black pepper, and onion powder. Mix well, breaking up any brown sugar clumps with your fingers. Now for the most important part—removing that membrane from the back of the ribs. Slide a butter knife under the membrane at one end, grab it with a paper towel (it’s slippery!), and pull it off in one piece if possible. If it tears, just work in sections until it’s all gone. I ruined a rack my first time by skipping this step—the membrane turns into an unpleasant plastic-like barrier if left on.
STEP 2: Apply the rub generously.
Pat the ribs dry with paper towels first—this helps the rub stick better. Then apply that dry rub mixture generously on both sides, really working it into the meat. Don’t be shy here; you should use nearly all of the rub between your two racks. The first time I made these, I was too conservative with the rub and they came out bland. More is better! The rub creates that delicious crust and helps season the meat all the way through during the long cook time. If you have time, you can wrap the rubbed ribs in plastic and refrigerate for 2-24 hours, but it’s not necessary—I usually skip this step and they’re still amazing.
STEP 3: Wrap and slow roast.
Tear off two long sheets of heavy-duty aluminum foil for each rack (regular foil works too, just double it up). Place each rack on its own foil sheets, meat side up. Fold the foil up around the ribs and seal tightly—this is crucial for keeping in moisture. I accidentally left a gap once, and that section dried out completely. Place the wrapped ribs on a baking sheet (in case of leaks) and put them in the oven. Now for the hard part—waiting. They need at least 2.5 hours, but I find 3 hours is the sweet spot for that perfect fall-off-the-bone texture. You can go up to 3.5 hours if you want them even more tender, but beyond that they can get mushy.
STEP 4: Check for tenderness.
After about 2.5-3 hours, carefully open one packet (watch out for the hot steam!) and check tenderness. The meat should be pulling back from the bone ends, and if you pick up the rack with tongs in the middle, it should bend significantly and almost start to break. If you’re not sure, take a fork and twist it gently between two bones—the meat should separate easily. If there’s still resistance, rewrap and give them another 30 minutes. Trust your instincts here; you’re looking for that moment when they’re tender but not falling completely apart yet. That comes in the next step.
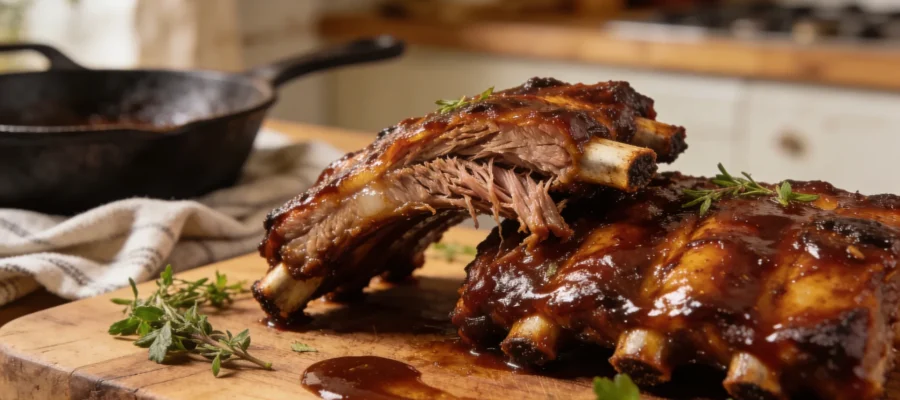
STEP 5: Sauce and broil to finish.
Once tender, carefully transfer the ribs to a new foil-lined baking sheet, this time leaving them unwrapped and bone side down. Brush them generously with BBQ sauce, making sure to cover all exposed meat. Now turn your broiler to high and position a rack about 6 inches from the heat. Broil for 3-5 minutes until the sauce is bubbling and starting to caramelize—but watch carefully! The sugar in the sauce can go from caramelized to burned in seconds. I literally once walked away to answer the door and came back to black ribs. Stand guard during this step! For extra saucy ribs, you can add another layer of sauce after the first broil, then broil again briefly.
STEP 6: Rest and serve.
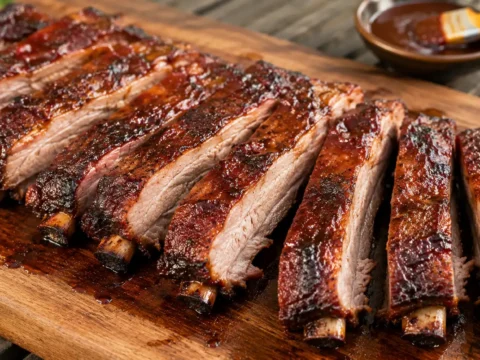
This step is tempting to skip when you’re drooling over those gorgeous ribs, but don’t! Let them rest for about 10 minutes before cutting. This allows the juices to redistribute and actually makes them more tender. To cut, flip them over so the bone side is up (you can see where to cut more easily), and slice between each bone. If they’re properly cooked, you might find they’re almost falling apart as you cut them—that’s perfect! Serve with extra sauce on the side, and prepare for your family to ask you to make these every weekend. And maybe have some wet wipes ready—these are gloriously messy.
Tips & Variations for BBQ Ribs Recipe Oven Success
Want to switch things up? Try adding 1 teaspoon of cumin or coriander to the rub for a different flavor profile. For spicy ribs, add 1/2-1 teaspoon of cayenne to the rub or use a hot BBQ sauce. You can also try brushing the ribs with apple juice every hour during cooking for extra moisture and subtle sweetness.
Leftover ribs will keep in the fridge for 3-4 days. Reheat them covered in a 275°F oven for about 20 minutes, or until warmed through. The low temperature prevents them from drying out. I actually think they’re sometimes even better the next day after the flavors have had more time to meld.
If you’re serving a crowd, you can make these ahead! Cook them through the slow roast step, then refrigerate them still wrapped in their foil. About 30 minutes before serving, let them come to room temperature, then unwrap, sauce, and broil. Nobody will know they weren’t made fresh that day.
Final Thoughts on Perfect Oven BBQ Ribs
Look, I’m not saying these are competition-level BBQ ribs—any pitmaster would probably roll their eyes at oven ribs. But for those of us without $1,000 smokers and the time to tend them all day, this bbq ribs recipe oven method delivers seriously impressive results that will make your family think you’ve been hiding secret cooking skills.
If you try this recipe, please let me know how it turns out! I’m genuinely curious if the membrane-removal step gives everyone else as much trouble as it gave me the first few times. And if you come up with any rub variations or sauce combinations that work well, drop a comment—I’m always looking to upgrade my rib game even further.
Oven BBQ Baby Back Ribs — Fall Off the Bone
This oven BBQ baby back ribs recipe will help you create fall-off-the-bone tender ribs at home with incredible flavor.