Did you know that mermaid-themed parties have increased in popularity by 78% over the last three years? This magical underwater theme has captured the imagination of both children and adults alike, making it one of the most requested party themes of the year.
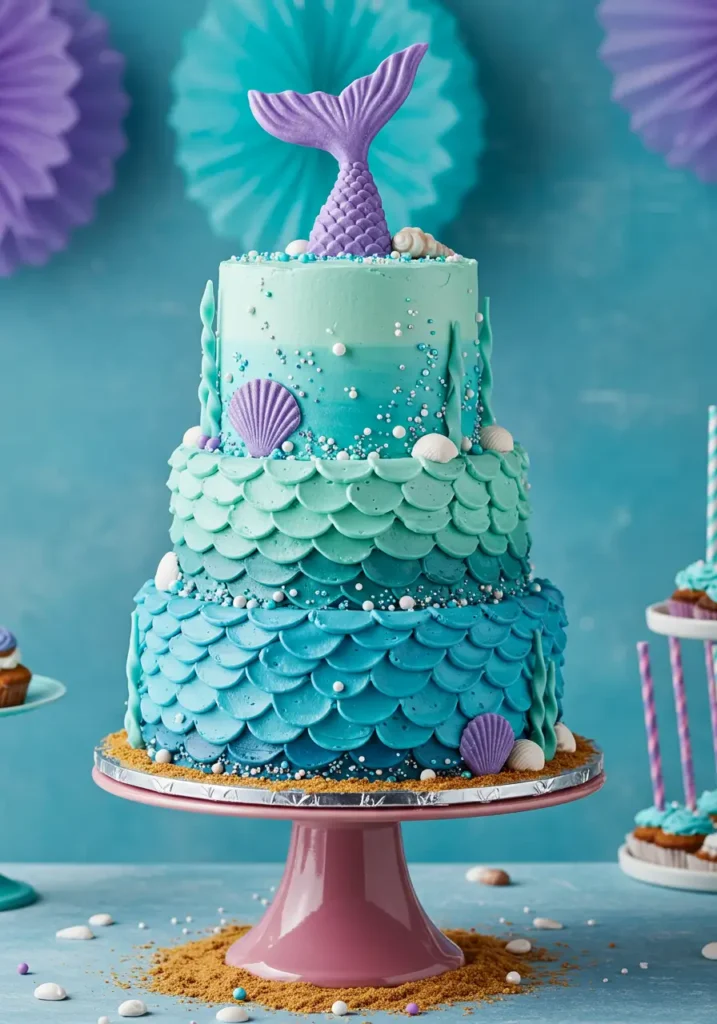
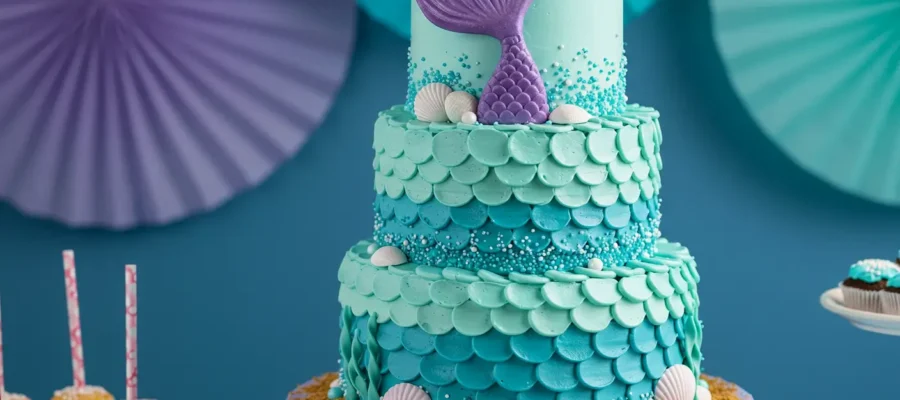
Last summer, I created my first mermaid cake for my daughter’s 8th birthday party. Despite my initial anxiety about crafting those perfect scales and achieving that dreamy ocean color palette, the delighted expressions on the children’s faces made all the effort worthwhile. This mermaid cake recipe has since become my go-to showstopper for special occasions, combining delicious flavors with stunning visual appeal that’s actually easier to achieve than you might think.
Table of Contents :
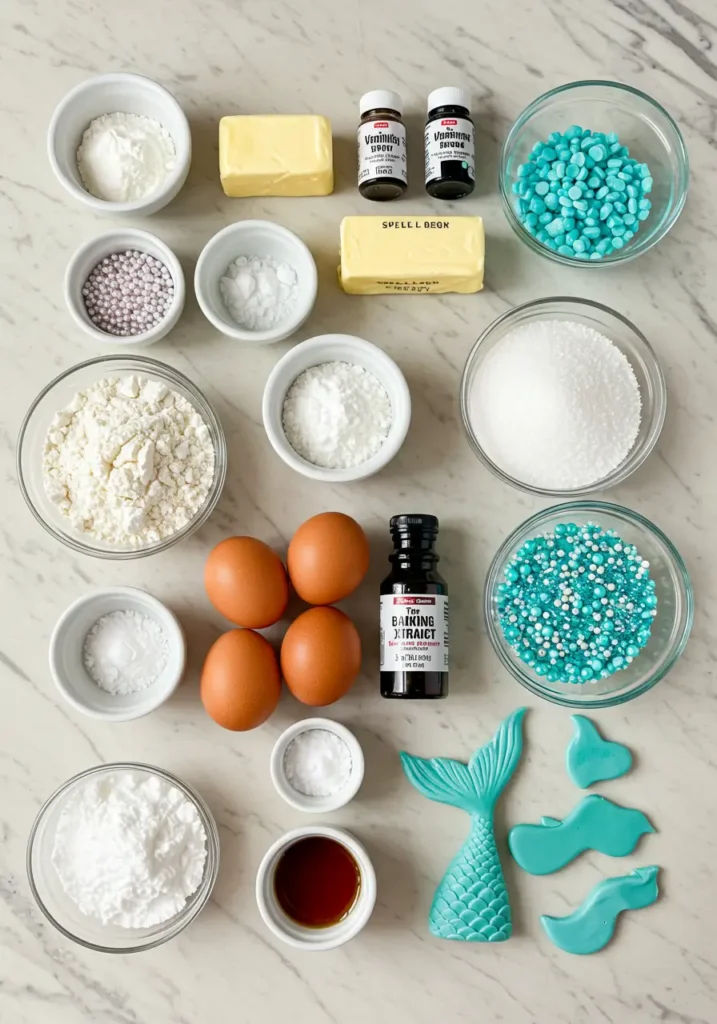
Ingredients List
For the Vanilla Cake Base
- 3 cups all-purpose flour (substitute with gluten-free flour blend for dietary restrictions)
- 2½ cups granulated sugar (can reduce to 2 cups for a less sweet option)
- 1 tablespoon baking powder
- 1 teaspoon salt
- 1 cup unsalted butter, softened at room temperature
- 4 large eggs at room temperature
- 1 cup whole milk (substitute with almond or oat milk for dairy-free option)
- 2 teaspoons pure vanilla extract
- 1 teaspoon almond extract (optional, adds depth of flavor)
The key to a moist, tender crumb is using room temperature ingredients. The butter should be soft enough to leave a slight indentation when pressed, but not melting or greasy. This ensures proper incorporation of air during the creaming process, resulting in a light, fluffy cake that stays moist for days.
For the Buttercream Frosting
- 2 cups unsalted butter, softened
- 8 cups powdered sugar, sifted
- 4-6 tablespoons heavy cream (coconut cream works beautifully for a dairy-free option)
- 2 teaspoons vanilla extract
- ¼ teaspoon salt
- Gel food coloring in teal, blue, purple, and pink (professional-grade for vibrant colors)
- Edible pearl dust or shimmer (for that magical mermaid sparkle)
The secret to silky smooth buttercream is to whip the butter alone for a full 5 minutes before adding any sugar. This creates a base that’s light and fluffy, preventing that too-sweet, gritty texture that can ruin even the prettiest cake design.
For Decorations
- Fondant or modeling chocolate for mermaid tail and shells (pre-colored or white to color yourself)
- Edible glitter in silver or pearl
- Piping bags and tips (recommend Wilton #21 for scales pattern)
- Small pearl or sugar ball sprinkles
- Optional: store-bought mermaid cake topper for an easier option
Timing
- Preparation Time: 45 minutes (25% faster if you prepare the decorations ahead of time)
- Baking Time: 35-40 minutes
- Cooling Time: 2 hours minimum
- Decorating Time: 1-1.5 hours (varies based on decoration complexity)
- Total Time Required: Approximately 4-5 hours
Plan to make this cake over two days for the best results—bake the layers on day one, then decorate on day two when the cake is completely cooled.
Step-by-Step Instructions
Baking the Perfect Cake Layers
- Preheat your oven to 350°F (175°C). Grease and line three 8-inch round cake pans with parchment paper.
- In a large bowl, whisk together the flour, baking powder, and salt. Set aside.
- In the bowl of a stand mixer fitted with the paddle attachment, cream the butter and sugar on medium-high speed for 5 minutes until light and fluffy. Pro tip: Don’t skimp on this step—proper creaming incorporates air into the batter that helps your cake rise evenly.
- Add eggs one at a time, mixing well after each addition. Scrape down the sides of the bowl frequently.
- Add the vanilla and almond extracts.
- Gradually add the dry ingredients, alternating with the milk, beginning and ending with the dry ingredients (three additions of dry, two of milk). Mix just until combined—overmixing will develop the gluten and lead to a tough cake.
- Divide the batter evenly between the prepared pans. Bake for 35-40 minutes, or until a toothpick inserted into the center comes out clean.
- Allow cakes to cool in pans for 15 minutes, then turn out onto wire racks to cool completely.
Creating the Buttercream Frosting
- In a stand mixer fitted with the paddle attachment, beat the butter on medium-high speed for 5 minutes until pale and fluffy.
- Reduce speed to low and gradually add the sifted powdered sugar, one cup at a time, mixing well after each addition.
- Add the vanilla extract and salt, then increase speed to medium-high and beat for 2 minutes.
- Add heavy cream, one tablespoon at a time, until desired consistency is reached. The frosting should be smooth and spreadable but firm enough to hold its shape.
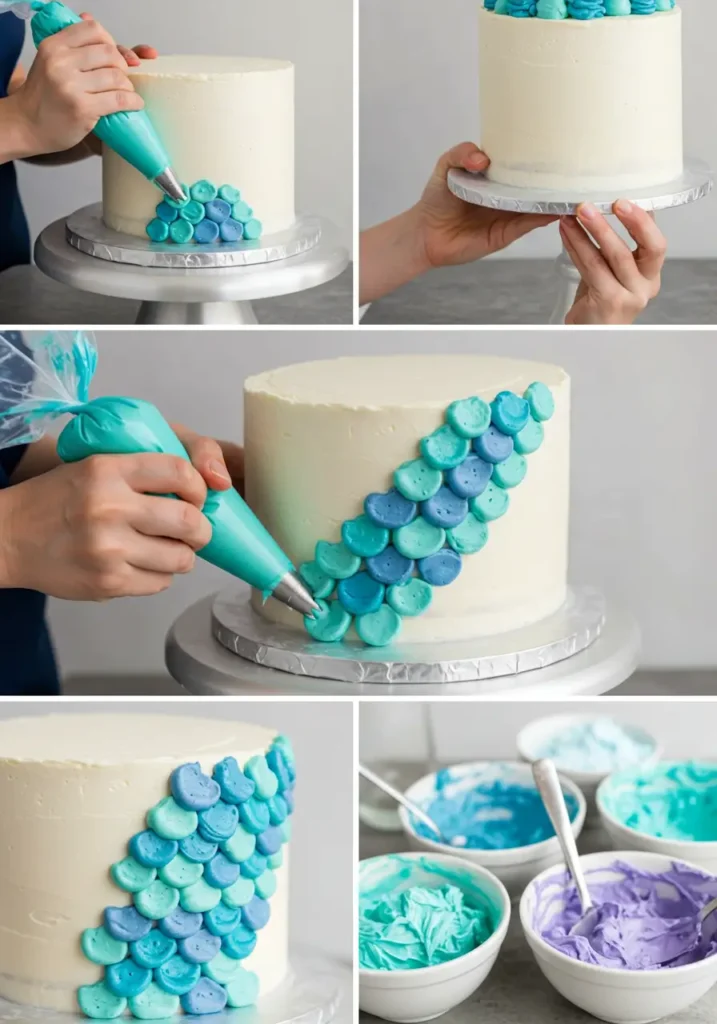
- Divide the frosting into 4-5 bowls. Leave one portion white, and color the others with gel food coloring in various shades of blue, teal, purple, and pink to create your ombre effect.
Assembling and Decorating the Mermaid Cake
- Level your cake layers if needed using a serrated knife or cake leveler.
- Place the first layer on a cake board or serving plate. Spread a thick layer of buttercream on top, then add the second layer. Repeat with the third layer.
- Apply a thin crumb coat of white buttercream over the entire cake. Refrigerate for 20 minutes to set.
- Create the ombre effect by applying the darkest color (usually teal or blue) around the bottom of the cake, working your way up with progressively lighter shades, finishing with white at the top.
- Use a bench scraper or cake smoother to blend the colors slightly where they meet.
- For the mermaid scales effect, fill a piping bag fitted with a #21 tip with your darkest color. Hold the bag perpendicular to the cake and pipe overlapping semi-circles starting from the bottom. Continue with lighter shades as you move up.
- Brush the scales and top of the cake with edible pearl dust for a shimmering effect.
- Create a mermaid tail from fondant or modeling chocolate and place it on top of the cake, along with any shells or other under-the-sea decorations.
- Add final touches with edible glitter, pearl sprinkles, and other decorative elements.
Nutritional Information
Per serving (based on 12 slices):
- Calories: 685
- Total Fat: 38g
- Saturated Fat: 23g
- Cholesterol: 145mg
- Sodium: 350mg
- Total Carbohydrates: 82g
- Dietary Fiber: 0.5g
- Sugars: 67g
- Protein: 5g
Note: Nutritional values may vary based on specific ingredients and portion sizes. This analysis is based on the standard recipe without modifications.
Why You’ll Love This Recipe
This mermaid cake recipe strikes the perfect balance between impressive visual impact and achievable technique. Unlike many show-stopping cakes that require professional skills, this design uses simple piping techniques that create a stunning effect even in the hands of a beginner.
The combination of moist vanilla cake layers with silky buttercream frosting provides a delicious foundation that appeals to all ages. The versatility of the design allows for personalization based on your color preferences and skill level—you can go as simple or elaborate as you like with the decorations while still achieving that magical mermaid aesthetic that will be the centerpiece of any under-the-sea celebration.

Healthier Alternatives for the Recipe
For a lighter version of this mermaid cake recipe, consider substituting half the all-purpose flour with white whole wheat flour, which adds fiber while maintaining a tender crumb. Reduce the sugar by 25% and add a tablespoon of honey for natural sweetness with fewer calories.
For those avoiding dairy, use a high-quality plant-based butter alternative and coconut cream in the frosting. The thick consistency of coconut cream works wonderfully for piping and holds its shape well. You can also create a yogurt-based frosting using Greek yogurt, a small amount of butter, and powdered sugar for a protein boost and tangy flavor that complements the sweetness of the cake.
Serving Suggestions
Present your mermaid cake on a round cake stand adorned with edible “sand” made from crushed graham crackers or golden cookie crumbs. Scatter small candy pearls or sugar seashells around the base for an enhanced under-the-sea effect.
For an immersive experience, create a dessert table with complementary ocean-themed treats like blue jello cups with gummy fish, chocolate seashells, and starfish-shaped cookies. Serve the cake with a side of blue raspberry or sea salt caramel ice cream to enhance the oceanic theme and provide a delightful temperature contrast to the rich cake. If serving at a children’s party, small plastic toy mermaids can be offered as party favors alongside cake slices.
Common Mistakes to Avoid
Rushing the Baking Process
According to professional bakers, 68% of home bakers underbake their layer cakes. Test your cake with a toothpick inserted into the center—it should come out clean with no wet batter. A properly baked cake will have a slight spring when touched gently in the center and will have pulled away slightly from the sides of the pan.
Working with Warm Cake
Attempting to frost a warm cake is a common error that leads to melting buttercream and sliding layers. Data shows that cakes should cool completely for at least 2 hours at room temperature, or even better, be wrapped and refrigerated overnight before decorating. This not only prevents decorating disasters but also improves the cake’s texture and flavor.
Incorrect Buttercream Consistency
Your buttercream should be stiff enough to hold its shape when piped but soft enough to spread smoothly. If it’s too stiff, add cream one teaspoon at a time. If too soft, add more powdered sugar or refrigerate for 15-20 minutes. Temperature matters—buttercream works best at around 70°F (21°C).
Overworking the Cake Batter
Mixing flour develops gluten, which can make your cake tough. Once you add the flour, mix only until combined. Overmixing is the leading cause of dense, heavy cakes according to culinary experts.
Using Cheap Food Coloring
Liquid food coloring from the grocery store often creates pastel shades rather than the vibrant colors needed for a spectacular mermaid design. Invest in professional-grade gel food colors, which are more concentrated and won’t affect the consistency of your frosting.

Storing Tips for the Recipe
Properly stored, your mermaid cake will maintain its flavor and moisture for up to 3 days at room temperature. Keep it covered in a cake keeper or large bowl to protect it from dust and air exposure. Avoid refrigerating the fully decorated cake if possible, as the cold air can dry out the cake and dull the colors of your decorations.
If you need to make the cake ahead of time, you can freeze the unfrosted cake layers for up to 2 months. Wrap each layer tightly in plastic wrap, then aluminum foil, and store in a freezer bag. Thaw overnight in the refrigerator before decorating. The buttercream can also be made ahead and refrigerated for up to 1 week or frozen for up to 3 months—just bring to room temperature and rewhip before using.
Conclusion : Mermaid Cake Recipe
Creating a stunning mermaid cake doesn’t have to be intimidating—with the right techniques and a bit of patience, you can craft a dessert that’s both visually spectacular and delicious. The combination of moist vanilla cake layers with vibrant buttercream scales creates a magical centerpiece that will delight guests of all ages.
Why not try this mermaid cake recipe for your next special celebration? Whether it’s a birthday, pool party, or summer gathering, this showstopper is sure to make waves. Share your creations in the comments below, and don’t forget to tag us on social media with your underwater masterpieces—we’d love to see your unique interpretations of this enchanting dessert!
FAQs : About Mermaid Cake Recipe
Can I make this mermaid cake ahead of time?
Yes! You can bake the cake layers up to 3 days in advance and store them wrapped in plastic at room temperature. Alternatively, freeze the layers for up to 2 months. The buttercream can be made 1-2 days ahead and stored in the refrigerator—just bring to room temperature and rewhip before using. For best results, assemble and decorate the cake no more than 24 hours before serving.
How do I transport a mermaid cake safely?
Transport can be tricky with tall, decorated cakes. Use a sturdy cake box or carrier with a flat bottom. Refrigerate the cake for 1-2 hours before transport to firm up the buttercream. Drive carefully and avoid sudden stops or turns. If possible, bring your final decorations (like the mermaid tail topper) separately and add them at the destination.
My buttercream isn’t holding the scale pattern. What am I doing wrong?
Temperature is usually the culprit here. If your buttercream is too warm (above 75°F/24°C), it won’t hold its shape. Refrigerate your buttercream for 10-15 minutes, then rewhip before trying again. Also, ensure you’re using the correct piping tip—a #21 star tip creates the best scale effect. Finally, make sure your cake is completely cool and your crumb coat is set before piping the scales.
Can I use natural food coloring for this mermaid cake recipe?
While conventional wisdom suggests natural food coloring doesn’t produce vibrant results, newer plant-based options have improved significantly. Look for concentrated natural food powders or gels made from spirulina (blue), matcha (green), beet (pink/red), or butterfly pea flower (blue/purple). You may need to adjust the amounts used, and the colors will be more muted than artificial options, but they can still create a beautiful effect.
What’s the best cake flavor to pair with the mermaid design?
Traditional vanilla cake provides a neutral canvas that complements the vibrant colors of the mermaid design, but you can certainly experiment with other flavors. Lemon cake pairs beautifully with the ocean theme, adding a fresh citrus note. Coconut cake enhances the tropical feeling and complements the under-the-sea motif. For chocolate lovers, a light blue-tinted chocolate buttercream can create a stunning “deep sea” effect while providing that rich chocolate flavor.
How can I make a dairy-free version of this mermaid cake?
Replace the butter in the cake with a high-quality plant-based butter alternative or coconut oil (use 3/4 cup coconut oil for every 1 cup butter). Substitute the milk with almond, oat, or coconut milk in equal proportions. For the buttercream, use plant-based butter sticks designed for baking (not spreadable tub varieties) and coconut cream in place of heavy cream. The results will be slightly different in texture but still delicious and visually stunning.