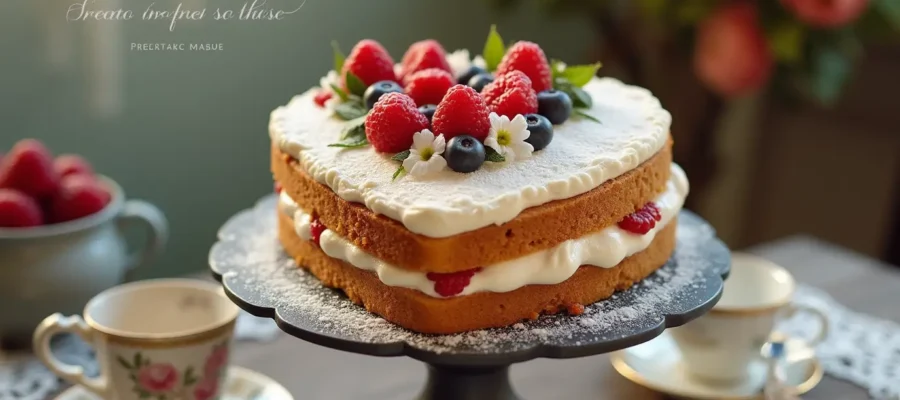
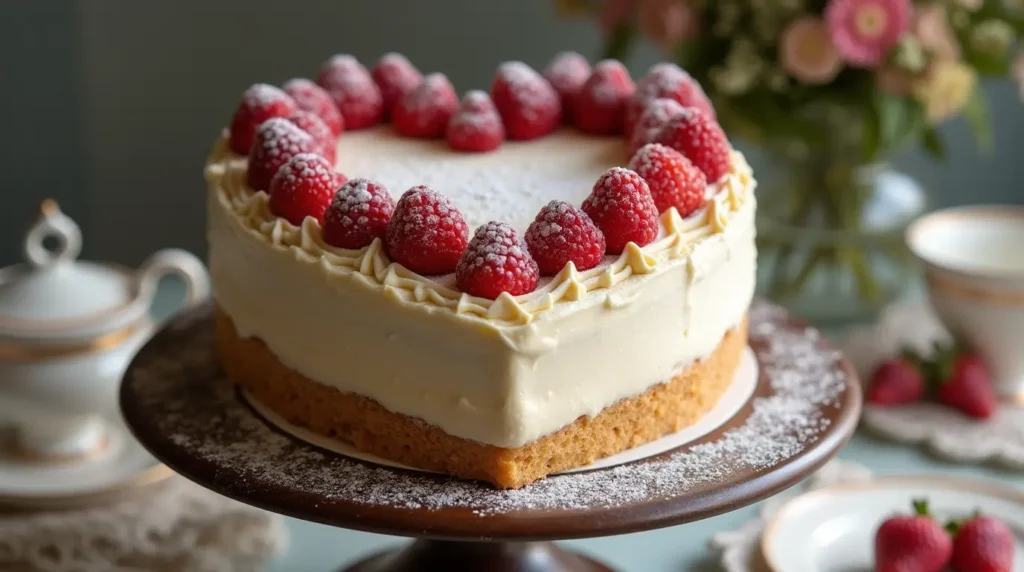
Are you ready to bake a dessert that will leave everyone swooning? The Vintage Heart Cake is not only a beautiful showstopper, but it’s also surprisingly easy to make! Whether you’re planning a special celebration or simply treating yourself, this cake offers the perfect balance of elegance and flavor. Its soft layers, creamy frosting, and charming heart shape make it ideal for everything from romantic occasions to family gatherings. What’s even better is that this recipe can be customized to suit any taste—from a fruity twist with fresh berries to a rich chocolate drizzle.
Table of Contents
The best part? This Vintage Heart Cake can be made with simple ingredients you likely already have in your pantry. It’s a dessert that feels luxurious without being overly complicated, making it a go-to recipe when you want to impress with minimal effort. Whether you’re a seasoned baker or just starting out, you’ll find this cake to be a fun and rewarding baking project. So, grab your heart-shaped pan, and let’s get started on creating a cake that’s as sweet as it is stunning!
Key Benefits of Making a Vintage Heart Cake
There’s something undeniably special about a Vintage Heart Cake—it’s not just about the taste, but the memories it evokes. Whether you’re preparing for a romantic celebration, a birthday, or simply want to impress your guests with a showstopper dessert, this cake is perfect for any occasion. Here are a few key benefits that make this cake an irresistible choice:
- Simple Yet Stunning
Don’t let the elegant look fool you. While this cake is beautiful enough to be the star of any gathering, it’s surprisingly easy to make! The step-by-step process is simple to follow, even if you’re a beginner baker. No need for complicated techniques—just a bit of creativity and some basic cake-making skills! - Perfect for All Occasions
A heart-shaped design makes it an ideal treat for romantic occasions like anniversaries or Valentine’s Day, but it’s also versatile enough for birthdays, wedding receptions, and even casual gatherings. The vintage appeal adds a nostalgic touch, making it a great choice for those who appreciate timeless flavors and aesthetics. - Customizable to Your Taste
One of the best things about this cake is how you can tailor it to suit your preferences. Whether you want a classic vanilla cake or a rich chocolate flavor, you have the flexibility to choose the base of the cake. And don’t get me started on the frosting options—buttercream, fondant, or cream cheese frosting are all excellent choices that can take your cake to the next level. - A Showstopper Dessert
It’s not just about how it tastes—it’s also about how it looks. The beautiful heart shape is perfect for eye-catching cake displays, and with the right decorative touches (think edible flowers, vintage-style decorations, or a simple dusting of powdered sugar), you can create a cake that’s as gorgeous as it is delicious. Your guests will be in awe! - Budget-Friendly and Accessible Ingredients
Another great benefit of this recipe is how accessible the ingredients are. You likely already have many of the basics like butter, eggs, sugar, and flour in your pantry. With just a few additional items (like frosting ingredients and optional decorations), you can easily whip up this cake without breaking the bank. - Impressive But Low-Stress
The vintage style might make the cake seem intimidating at first, but it’s actually quite forgiving. Even if you’re not a professional cake decorator, the design allows for a little leeway. No one will judge you if your frosting isn’t perfectly smooth or if your heart shape is a tad uneven—it will still look beautiful and taste amazing!
Why You’ll Love It
This vintage heart-shaped cake is all about striking the right balance between elegance and simplicity. The recipe guides you through creating a cake that’s both easy to make and delightful to serve. Whether you’re a seasoned baker or just starting out, this cake will surely leave a lasting impression on everyone who gets a slice. So, let’s dive into the next section where I’ll walk you through exactly what you’ll need to make this gorgeous dessert!
Ingredients for Vintage Heart Cake
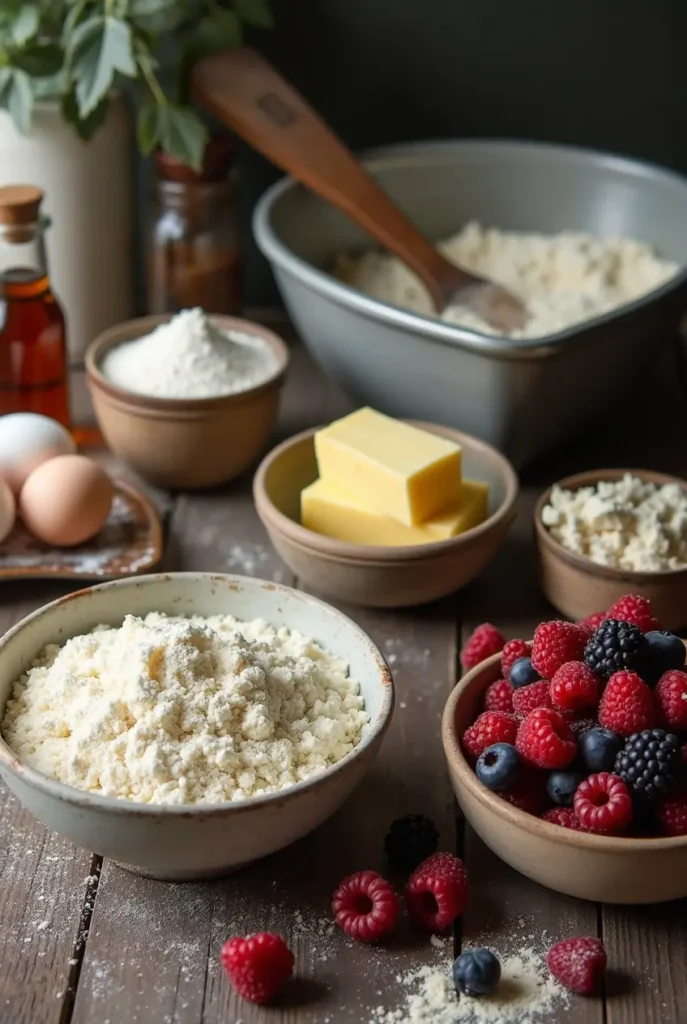
Before we dive into the fun part—baking and decorating—let’s gather all the ingredients you’ll need for this delicious vintage heart-shaped cake. I’ve kept it simple and straightforward, so you don’t need any fancy tools or hard-to-find ingredients. Here’s everything you’ll need to make this showstopping dessert:
For the Cake:
- 2 cups all-purpose flour
- 1 ½ cups granulated sugar
- 1 cup unsalted butter, softened
- 4 large eggs
- 1 teaspoon vanilla extract
- 1 ½ teaspoons baking powder
- ½ teaspoon baking soda
- ½ teaspoon salt
- 1 cup whole milk (or any milk of your choice)
- A few drops of food coloring (optional, for a vintage hue)
For the Frosting:
- 1 cup unsalted butter, softened
- 4 cups powdered sugar
- 1 teaspoon vanilla extract
- 1-2 tablespoons milk (for desired frosting consistency)
- A pinch of salt
- Edible flowers or fondant decorations (optional, for that vintage touch)
Optional Garnishes and Variations:
- Fresh berries (strawberries, raspberries)
- Edible gold leaf or glitter (for extra elegance)
- Whipped cream (for a lighter alternative)
A Few Notes:
- Butter: Be sure to use softened butter for both the cake and frosting. Cold butter will make it harder to blend and create a smooth texture.
- Milk: For a richer flavor, I recommend using whole milk, but you can substitute with almond, oat, or any milk alternative.
- Food Coloring: If you’re aiming for a soft, vintage look, consider using a pale pink or lavender food coloring. It’s a small touch that can elevate the overall look.
- Frosting Consistency: When making the frosting, you want it thick enough to hold its shape, but not so stiff that it’s hard to spread. If it’s too thick, add a little more milk to loosen it up.
Why These Ingredients Work:
Each of these ingredients plays a key role in making your vintage heart cake as flavorful and delightful as possible. The butter brings richness and tenderness to the cake, while the sugar and milk create a moist, sweet crumb. The baking powder and baking soda ensure that the cake rises to perfection, while the vanilla extract adds that classic flavor everyone loves.
Now that you have everything prepped and ready, let’s move on to the fun part—making the cake!
How to Make Vintage Heart Cake

Now that we’ve gathered all the ingredients, it’s time to bring this vintage heart-shaped cake to life! Don’t worry—it’s easier than it looks, and I’ll guide you through each step. Whether you’re a seasoned baker or a newbie, these clear, simple instructions will have you creating a gorgeous cake that’s both delicious and showstopping.
Step 1: Preheat the Oven & Prepare Your Pans
Before you start mixing, preheat your oven to 350°F (175°C). This ensures that the oven is at the right temperature when you’re ready to bake. Now, grease and flour your heart-shaped cake pan, making sure to coat it well so the cake doesn’t stick. You can also line the bottom with parchment paper for extra security.
Step 2: Mix the Dry Ingredients
In a medium bowl, whisk together the flour, baking powder, baking soda, and salt. This step helps to evenly distribute the leavening agents, ensuring your cake rises beautifully and has a soft texture.
Step 3: Cream the Butter & Sugar
In a separate large bowl, beat the softened butter and granulated sugar together using a hand mixer or stand mixer. Beat on medium speed for about 3-5 minutes until the mixture becomes light, fluffy, and pale. This is a key step for creating a soft, airy cake—so take your time here!
Step 4: Add the Eggs & Vanilla
Once your butter and sugar are perfectly creamed, add the eggs, one at a time, beating well after each addition. Then, stir in the vanilla extract. The eggs will help bind everything together, while the vanilla adds that warm, nostalgic flavor we all love.
Step 5: Alternate Adding Dry Ingredients and Milk
Now it’s time to combine your dry ingredients with the wet mixture. Start by adding a third of the dry mixture to the butter and sugar. Mix until just combined, then add half of the milk. Repeat this process until all ingredients are incorporated, ending with the dry mixture. Be sure to mix gently, avoiding over-mixing to keep the cake light and fluffy.
Step 6: Add Food Coloring (Optional)
For a fun vintage touch, you can add a few drops of food coloring to your batter. Whether it’s a soft pastel pink or a pale lavender, this will give your cake a charming, nostalgic hue. Mix gently until the color is evenly distributed.
Step 7: Pour the Batter into the Pan
Once your batter is smooth and well-mixed, pour it evenly into your prepared heart-shaped pan. Use a spatula to level it out so the top is even. If you’re making multiple layers, divide the batter into separate pans for each layer.
Step 8: Bake to Perfection
Bake your cake in the preheated oven for 25-30 minutes, or until a toothpick inserted into the center comes out clean. Baking times may vary slightly depending on your oven, so keep an eye on the cake as it bakes. While it’s baking, you’ll start to smell that sweet, comforting aroma—such a treat!
Step 9: Let the Cake Cool
Once your cake is baked, remove it from the oven and let it cool in the pan for about 10 minutes. Afterward, turn it out onto a wire rack to cool completely. This step is important to prevent the frosting from melting when you start decorating!
Tips for a Perfect Cake:
- Room Temperature Ingredients: For the best texture, make sure your butter, eggs, and milk are at room temperature before you start mixing. This helps the ingredients combine more smoothly.
- Don’t Overmix: Overmixing the batter can result in a dense cake. Mix just until everything is incorporated to ensure a light and fluffy texture.
- Test for Doneness: When checking the cake with a toothpick, make sure it comes out clean or with just a few moist crumbs. If it’s still wet, give it a few more minutes in the oven.
With the cake baked and cooled, you’re now ready to move on to the most fun part: decorating! But before that, let’s make sure you’ve got the perfect frosting to complement your vintage creation. Stay tuned for the next section!
Pro Tips and Variations for Your Vintage Heart Cake
Now that you’ve baked your beautiful vintage heart-shaped cake, let’s talk about the little details that will elevate it from delicious to dazzling. Whether you’re looking for some expert decorating tips or want to try a fun variation, this section will guide you through the pro tips and cake variations that will make your cake truly stand out!
1. Mastering Frosting Techniques
Frosting can make or break a cake, but don’t worry—I’ve got you covered. Here are a few key tips to help you get that perfect finish:
- Smooth Frosting: If you want a perfectly smooth, glossy finish, consider using buttercream frosting. Use an offset spatula to spread it evenly across the cake. After applying the frosting, dip a bench scraper into warm water and gently smooth the sides and top for a professional, clean finish.
- Piped Details: For extra flair, use a piping bag with different tips to add piped borders, rosettes, or decorative accents. This is a simple way to add a vintage charm, especially if you use classic techniques like roses or ruffles. It’s easier than it looks and will give your cake that showstopping edge!
- Fondant Finishes: If you’re aiming for a sleek, modern look with a vintage twist, try using fondant. Roll it out and place it gently over your cake. It gives a smooth, polished look, perfect for a special occasion. You can even cut out little flowers or shapes to adorn the top for a truly personalized touch.
2. Fun Variations for Your Cake
Feel free to get creative with the base flavors and decorations! Here are some fun variations to make your cake your own:
- Flavor Swap: While the classic vanilla cake is a fan favorite, don’t hesitate to experiment with other flavors. A chocolate or red velvet cake would work wonderfully if you’re looking to add a rich, bold flavor. Just be sure to adjust the baking time based on the thickness of your batter.
- Layer It Up: Want to make your cake even more impressive? Try making a multi-layer heart cake! Use the same heart-shaped pan and divide the batter to create two or three layers. Add a layer of jam or whipped cream between the layers for added texture and flavor.
- Add Fruit: Fresh fruit like berries or sliced peaches can add a burst of freshness and a pop of color to your vintage cake. If you go this route, consider layering fruit in between your cake layers or even adding a few pieces as garnish on top.
- Boozy Option: For adults only, a splash of liqueur such as Grand Marnier or Baileys can be added to your frosting or cake batter for an extra touch of flavor. Just remember, a little goes a long way!
3. Decorative Touches That Wow
The magic of a vintage heart cake lies in its ability to look both timeless and elegant. Here are some simple but impactful ways to dress up your cake:
- Edible Flowers: Add a romantic and rustic touch by decorating your cake with edible flowers like roses, lavender, or violets. These flowers are not only beautiful but also safe to eat and can take your cake to a whole new level of elegance.
- Dusting with Powdered Sugar: If you’re keeping it simple, a light dusting of powdered sugar can add a delicate, vintage-inspired look. Use a sifter to sprinkle the sugar evenly across the top of your cake, letting the soft powder settle like a light snowfall.
- Gold Leaf: For a more luxurious vibe, top your cake with edible gold leaf. It’s a quick way to add some extra sophistication without much effort. A few strategically placed gold flecks can make your cake look straight out of a professional bakery!
4. Baking and Decorating Made Easy
If you’re ever feeling a bit overwhelmed with all the decorating options, remember this: simple is often better. The beauty of a vintage heart-shaped cake is its elegance, which doesn’t require intricate details to shine. You don’t need to be a professional cake decorator to create something beautiful—sometimes, a smooth frosting finish with a few simple touches is all it takes to make your cake look stunning.
Final Pro Tip:
Always make sure your cake is completely cooled before decorating. If it’s too warm, the frosting can melt, creating a mess. Patience is key when it comes to decoration, and taking the time to let your cake cool properly will result in a flawless finish.
These tips and variations are here to help you customize your vintage heart cake so it reflects your personal style and taste. Now, let’s move on to how you can serve and enjoy your beautiful creation!
Serving Suggestions for Your Vintage Heart Cake
Now that your Vintage Heart Cake is beautifully baked and decorated, it’s time to think about how to serve it. After all, presentation and pairing are just as important as flavor! Whether you’re serving it at a romantic dinner or a special celebration, here are some delicious serving suggestions that will help you showcase your cake in the best way possible.
1. Pair with Fresh Berries
For a refreshing contrast to the sweetness of the cake, serve it with a handful of fresh berries like strawberries, raspberries, or blueberries. The juicy, slightly tart flavor of the fruit pairs wonderfully with the rich, creamy frosting and adds a pop of color to your plate.
- Tip: If you want to add a little more flair, macerate the berries with a touch of sugar and let them sit for 10-15 minutes. This will release their natural juices and create a simple, sweet syrup to drizzle over the cake.
2. Serve with a Scoop of Ice Cream
Nothing goes better with cake than a scoop of vanilla ice cream (or your favorite flavor). The cool, creamy texture complements the softness of the cake and provides a delightful contrast in temperature. If you want to take it up a notch, try a chocolate or coffee-flavored ice cream for a richer pairing.
- Tip: To make it extra special, try making homemade ice cream or a frozen yogurt for a lighter option that still adds that indulgent touch.
3. Lightly Whipped Cream or Chantilly Cream
For a lighter alternative to traditional frosting, serve your cake with a dollop of freshly whipped cream or Chantilly cream. The airy, slightly sweet cream adds a soft texture that pairs beautifully with the cake’s tender crumb. It’s perfect for those who want something a little less rich.
- Tip: For an extra burst of flavor, add a few drops of vanilla extract or almond extract to your whipped cream. It’s a small detail that makes a big difference in flavor.
4. A Touch of Caramel or Chocolate Sauce
If you’re in the mood for something more indulgent, drizzle caramel sauce or chocolate ganache over each slice of cake. The rich, velvety sauce will melt slightly into the cake, making each bite even more decadent. It’s an easy way to add a luxurious touch to a simple dessert.
- Tip: Warm up your sauce before serving so it drizzles smoothly over the cake without being too thick.
5. Serve as Part of a Dessert Buffet
If you’re planning a dessert spread, this Vintage Heart Cake is perfect for impressing guests! Serve it alongside other sweet treats like cupcakes, cookies, or mini tarts for a charming, vintage-inspired dessert table. The heart-shaped design makes it a standout piece on any buffet.
- Tip: To make it easier for guests to enjoy, slice the cake into small, bite-sized pieces so everyone can sample a little bit of everything.
6. Tea Time Delight
This cake is also an excellent choice for afternoon tea. Pair it with a pot of your favorite tea—whether it’s a classic Earl Grey, a floral chamomile, or a refreshing green tea. The delicate flavors of the cake will complement the tea, making it a perfect pairing for a cozy, relaxed afternoon.
- Tip: For a vintage feel, serve the cake on a beautiful cake stand with vintage teacups and saucers to complete the look.
A Few Final Serving Tips:
- If you’ve made a multi-layer version of the cake, remember to keep the slices slightly thicker to maintain the balance between cake and frosting.
- For a romantic touch, garnish each slice with a sprig of mint or a chocolate curl.
- To keep the cake fresh, store it in an airtight container at room temperature for up to 3 days, or refrigerate if you prefer to keep the frosting cool and firm.
No matter how you serve it, your Vintage Heart Cake is sure to be the highlight of the table. Whether you’re hosting a special celebration or enjoying a quiet moment with a loved one, this cake will make any occasion feel extra special!
Conclusion: Your Perfect Vintage Heart Cake Awaits
Congratulations—you’ve just baked an unforgettable Vintage Heart Cake that’s sure to impress anyone who gets a slice! Whether you’re celebrating a special occasion or simply indulging in a sweet treat, this cake’s tender crumb, creamy frosting, and charming design make it a go-to dessert for any event.
Here’s a quick recap of what makes this cake so special:
- Simple Ingredients: No need for complex tools or exotic ingredients—just basic pantry staples and a few simple steps.
- Timeless Appeal: The heart shape and vintage touches, like edible flowers or fondant accents, make this cake a showstopper at any gathering.
- Endless Customizations: With endless flavor options and decorating possibilities, you can easily make this cake your own. From fresh berries to decadent chocolate ganache, the sky’s the limit!
This cake isn’t just about the baking process; it’s about creating memories and sharing moments with the people you love. Whether you’re baking for a birthday, an anniversary, or a cozy afternoon tea, the Vintage Heart Cake will become a favorite in your recipe collection.
FAQs: Your Vintage Heart Cake Questions Answers
1. Can I make this cake ahead of time?
Absolutely! This cake actually holds up really well when made ahead of time, and the flavors have a chance to meld. If you’re prepping in advance:
- Bake the cake layers a day ahead, then wrap them tightly in plastic wrap and store them at room temperature.
- Frost the cake the day you plan to serve it for the freshest look and taste.
- If you’re storing the frosted cake, pop it in the fridge (especially if it has a buttercream or whipped cream frosting) to keep it fresh. Just be sure to let it come to room temperature before serving for the best texture.
2. Can I make this cake without a heart-shaped pan?
Of course! While the heart shape adds a special touch, you can make this cake in any pan you have on hand. If you don’t have a heart-shaped pan, you can use a round or square cake pan instead. Simply adjust the baking time slightly, as the size of the pan may affect how quickly the cake bakes.
3. Can I make a gluten-free version of the Vintage Heart Cake?
Yes! You can easily make this cake gluten-free by swapping the regular all-purpose flour for a gluten-free flour blend. Make sure the blend you choose includes a binding agent (like xanthan gum) to ensure the cake holds together. You may also want to double-check the baking powder and baking soda to ensure they’re gluten-free.
4. How do I prevent the cake from sticking to the pan?
To prevent sticking, make sure to grease and flour your heart-shaped pan thoroughly before pouring in the batter. For extra insurance, you can also line the bottom with a piece of parchment paper. This will make it much easier to remove the cake after it’s baked, especially with intricate pans like heart shapes!
5. Can I use a different frosting than buttercream?
Absolutely! While buttercream is the classic choice, you can get creative with other frosting options:
- Cream cheese frosting: This will add a tangy flavor that pairs beautifully with the cake.
- Whipped cream: For a lighter, fluffier option, whipped cream is a great choice, especially for a less sweet finish.
- Ganache: A rich chocolate ganache can add a luxurious, glossy finish to your cake.
Feel free to experiment with different frostings to match your taste or the occasion!
6. How can I decorate my cake to make it look even more beautiful?
Decorating your cake can be as simple or elaborate as you like! Here are a few tips to help:
- Edible flowers (like roses or lavender) add a vintage touch and look stunning.
- Fresh berries placed around the top or between layers add color and freshness.
- Piping techniques: Use a piping bag with different tips to create beautiful rosettes, borders, or even intricate designs on the cake.
7. Can I freeze this cake?
Yes, you can freeze the cake for future enjoyment! Just make sure to freeze the baked and cooled layers (without frosting) in an airtight container or wrapped tightly in plastic wrap. When you’re ready to serve, thaw the cake at room temperature, frost it, and enjoy!
8. What can I pair this cake with for a dessert table?
If you’re serving this Vintage Heart Cake as part of a dessert spread, it pairs beautifully with a variety of sweet treats. Consider adding:
- Mini tarts (lemon or fruit-filled)
- Cupcakes with pastel frosting
- Chocolate-dipped strawberries
- Shortbread cookies This variety will complement the heart cake’s rich flavors and give your guests plenty of options to choose from.
9. Can I add food coloring to the cake batter?
Yes, adding a few drops of food coloring is a fun way to enhance the visual appeal of your Vintage Heart Cake. You can go for a soft pastel hue or even add swirls of color to the batter. Just be sure to use gel food coloring, as it won’t alter the texture of the cake like liquid food coloring can.
So, take a moment to enjoy your creation! Share it with loved ones, celebrate the beauty of homemade treats, and bask in the joy of creating something truly special from scratch. Happy baking!
Vintage Heart Cake Recipe
Looking for a showstopping dessert? Learn how to make a beautiful Vintage Heart Cake in 5 easy steps. Perfect for any special occasion. Try it today!
- Recipe Ingredients
- 2 cups all-purpose flour
- 1 ½ cups granulated sugar
- ½ cup unsalted butter (softened)
- 3 large eggs
- 1 tsp vanilla extract
- 1 ½ tsp baking powder
- ¼ tsp salt
- ½ cup whole milk
- 1 ½ cups buttercream frosting (store-bought or homemade)
- Fresh berries (strawberries, raspberries, blueberries for decoration)
- Edible flowers (optional for decoration)
- Powdered sugar (for dusting)
- Recipe Instructions
- Preheat your oven to 350°F (175°C) and grease and flour a heart-shaped cake pan.
- Mix the dry ingredients: In a large bowl, whisk together the flour, baking powder, and salt.
- Cream the butter and sugar: In a separate bowl, beat the softened butter and sugar together until light and fluffy.
- Add eggs and vanilla: Beat in the eggs one at a time, followed by the vanilla extract. Mix until well combined.
- Combine wet and dry ingredients: Gradually add the dry ingredients to the wet mixture, alternating with milk, and stir until the batter is smooth.
- Pour the batter into the pan: Pour the batter into the prepared heart-shaped pan and spread it evenly.
- Bake the cake: Bake for 25-30 minutes or until a toothpick inserted into the center comes out clean. Let the cake cool in the pan for 10 minutes before transferring it to a wire rack to cool completely.
- Frost and decorate: Once the cake is fully cooled, frost with buttercream and decorate with fresh berries and edible flowers.
- Serve and enjoy: Slice, serve, and enjoy your beautiful Vintage Heart Cake!